IMPORTANT SAFETY INSTRUCTIONS This range must be secured and connected using the anti-tip device according to the installation instructions. If you have moved the range, slide the locking latch onto the anti- tip device until you feel it lock into place. Do not use the range if the anti-tip device has not been properly installed and engaged. Failure to observe the information contained in the installation instructions can lead to serious or fatal injuries for children and adults.
TABLE OF CONTENTS IMPORTANT SAFETY INSTRUCTIONS —————— 5 INSTALL GUIDE ——————11 USE GUIDE ——————29 CARE GUIDE ——————37 All CANTEE products carry a 2 year parts and warranty. Service on all CANTEE products shall be carried out by factory‐trained professionals only.
IMPORTANT SAFETY INSTRUCTIONS ! WARNING If the information in this manual is not followed exactly, a fire or explosion may result causing property damage, personal injury, or death.Cantee cannot be held liable for damage occurring as a result of non-compliance with the instructions. -Do not store or use gasoline or other flammable substances in the vicinity of this or any other appliance. -WHAT TO DO IF YOU SMELL GAS •Do not light any appliance. •Do not touch any electrical switch.
IMPORTANT SAFETY INSTRUCTIONS When using the appliance, follow basic safety precautions, including the following: Read all instructions before installation and use of the range to prevent accidents and machine damage. ! WARNING This appliance complies with current safety requirements. Improper use of the appliance can lead to personal injury and material damage. Read all instructions before installing or using the oven for the first time. Only use the appliance for its intended purpose.
IMPORTANT SAFETY INSTRUCTIONS ! WARNING Installation of any gas-fired equipment should be made by a licensed plumber. A manual gas shut-off valve must be installed in the gas supply line ahead of the oven in the gas flow for safety and ease of service. make sure the appliance must be isolated from the gas supply piping system and plug wire The plug should always be accessible. Installation must conform with local codes or in the absence of codes, the National Fuel Gas Code NSIZ223.1/NFPA54.
IMPORTANT SAFETY INSTRUCTIONS If local codes permit, a flexible metal appliance connection with the new AGA or CGA certified design, max. 5 feet (1,5 m) long, 34" I.D. is recommended for connecting this appliance to the gas supply line. Do not bend or damage the flexible connector when moving the appliance. This appliance must be used with the pressure regulator provided. The regulator shall be properly installed in order to be accessible when the appliance is installed in its final location.
IMPORTANT SAFETY INSTRUCTIONS ! WARNING ! WARNING ! WARNING Do not carry or lift the range by the oven door handle or the control panel! Heating elements may be hot even though they are not glowing. Interior surfaces of an oven become hot enough to cause burns. External parts of the oven such as the door glass, vents, and the control panel can become hot.
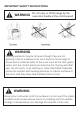
IMPORTANT SAFETY INSTRUCTIONS ! WARNING for Children - As with any appliance, close supervision is necessary when the oven is used by children. - Do not leave children unattended: Children should not be alone or unsupervised in the area where the appliance is installed. Do not allow them to sit or stand on the appliance. - As with any appliance, close supervision is necessary when used by children.
INSTALL GUIDE INSTALLING THE LEGS The ranges must be used only with the legs properly installed. Four height-adjustable legs are shipped with the range in the polystyrene container situated over the appliance.Before installing the legs, position the appliance near its final location as the legs are not suitable for moving the appliance over long distances. After unpacking the range, raise it enough to insert the legs in the appropriate receptacles situated on the lower part of the appliance.
INSTALL GUIDE INSTALLING THE ANTI-TIP Stability DEVICE 1,The anti-tip bracket shipped with the range must be properly secured to the rear wall as shown in the picture below.The height of the bracket from the floor must be determined after the range legs have been adjusted to the desired height and after the range has been levelled. Measure the distance from the floor to the bottom of the anti-tip bracket receptacle on the back of the appliance.
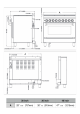
INSTALL GUIDE CABINETS This range may be installed directly adjacent to existing countertop high cabinets (36" or 91.5 cm from the floor).For the best look, the worktop should be level with the cabinet countertop. This can be accomplished by raising the unit using the adjustment spindles on the legs.ATTENTION: the range CANNOT be installed directly adjacent to kitchen walls, tall cabinets, tall appliances, or other vertical surfaces above 36"(91.4 cm) high.
INSTALL GUIDE ELECTRICAL A properly grounded and horizontally-mounted electrical receptacle Type NEMA 14-50R should be installed no higher than 3" (7.6 cm) above the floor, no less than 2" (5 cm) and no more than 8" (20,3 cm) from the left side (facing product); refer to ELECTRICAL CONNECTION section pag. 13.Check all local code requirements. GAS An agency-approved, properly-sized manual shut¬off valve should be installed no higher than 3" (7.
INSTALL GUIDE ELECTRICAL CONNECTION The appliance shall be connected to a single phase electric line rated at 120/208Vac or 120/240Vac and 60Hz frequency. Electric power rating: - 120/240Vac: 30 A max.
INSTALL GUIDE Check your local code for which of the options below should be used in grounding the receptacle power supply connections.
INSTALL GUIDE WIRING DIAGRAM double oven
INSTALL GUIDE WIRING DIAGRAM 8 selector
INSTALL GUIDE WIRING DIAGRAM 5 selector ELECTRICAL GROUNDING This appliance is equipped with a four-prong plug for your protection against shock hazard and should be plugged directly into a properly grounded receptacle. Do not cut or remove the grounding prong from this plug. WARNING! ELECTRICAL SHOCK HAZARD Disconnect electrical power at the circuit breaker box or fuse box before installing the appliance. Provide appropriate ground for the appliance. Use copper conductors only.
INSTALL GUIDE LOCATION OF APPLIANCE PLATES The data rating plate shows the model and serial number of your range.
INSTALL GUIDE GAS CONNECTION All gas connections must comply with national and local codes. The gas supply line (service) must be the same size or greater than the inlet line of the appliance. This range uses a 1/2" NPT inlet (see drawing below for details of gas connection). On all pipe joints use appropriate sealant resistant to gas. This range can be used with Natural or LP/Propane gas. The range is shipped from the factory for use with natural gas.
INSTALL GUIDE MANUAL SHUT-OFF VALVE THIS VALVE IS NOT SHIPPED WITH THE APPLIANCE AND MUST BE SUPPLIED BY THE INSTALLER. The manual shut-off valve must be installed in the gas service line between the gas hook-up on the wall and the appliance inlet, in a position where it can be reached quickly in the event of an emergency. In Massachusetts: A T handle type manual gas valve must be installed in the gas supply line to this appliance.
INSTALL GUIDE PRESSURE REGULATOR Since service pressure may fluctuate with local demand, every gas cooking appliance must be equipped with a pressure regulator on the incoming service line for safe and efficient operation. The pressure regulator shipped with the appliance has two female threads 34" NPT. The regulator shall be installed properly in order to be accessible when the appliance is installed in its final position.
INSTALL GUIDE APPLIANCE SERVING Before carrying any servicing operation disconnect the appliance from gas and electric supply and extra appliance from final installation place in order to have access to the appliance for proper servicing intervention. GAS CONVERSION WARNING! Before carrying out this operation, disconnect the appliance from gas and electricity. Gas conversion shall be conducted by a factory- trained professional.
INSTALL GUIDE STEP 1: PRESSURE REGULATOR The pressure regulator supplied with the appliance is a convertible type pressure regulator for use with Natural Gas at a nominal outlet pressure of 4" w.c. or LP gas at a nominal outlet pressure of 10" w.c. and it is pre-arranged from the factory to operate with one of these gas/pressure as indicated in the labels affixed on the appliance, package and Instruction booklet. To convert the regulator for use with other liquid propane LP gas: 1.
INSTALL GUIDE STEP 2: SURFACE BURNERS To replace the nozzles of the surface burners, lift up the burners and unscrew the nozzles shipped with the range using a 7 mm (socket wrench).Replace nozzles using the conversion set supplied with the range. Each nozzle has a number indicating its flow diameter printed on the body. Consult the table on as following for matching nozzles to burners.
INSTALL GUIDE STEP 3: MINIMUM FLAME ADJUSTMENT WARNING! These adjustments should be made only for use of the appliance with natural gas. For use with liquid propane gas, the choke screw must be fully turned in a clockwise direction. SURFACE BURNERS 1. Light one burner at a time and set the knob to the MINIMUM position (small flame). 2. Remove the knob. 3. The range is equipped with a safety valve.
INSTALL GUIDE INSTALLATION Checklist 1. Is the range mounted on its legs? 2. Is the back guard securely connected? 3. Has the anti-tip device been properly installed? 4. Does the clearance from the side cabinets comply with the manufacturers directions? 5. Is the electricity properly grounded? 6. Is the gas service line connected following the directions of the manufacturer? 7. Have all the proper valves, stoppers and gasket been installed between the range and the service line? 8.
USE GUIDE This product is intended for the cooking of food and must not be used for other purposes. Unstable or deformed pans should not be placed on the burners or hot plates in order to avoid accidents caused by spill over. Particular care should be taken when cooking with oil or fat. Always ensure that the knobs are in the "O" Off or Stop position when the appliance is not in use. Before maintenance and cleaning, disconnect the appliance and allow cooling down.
USE GUIDE The appliance is heavy, move it carefully. To facilitate ignition, light the burners before placing pans on the grid. Check that the flame is regular. Always lower the flame or turn it off before removing the pan. Ensure burner caps are installed correctly (See instruction as below.) Control knobs on the gas burners The knobs for the gas burners of the cooker are found on the control panel.
USE GUIDE TIPS FOR USING PANS CORRECTLY ATTENTION! Always ensure that bottom and handles of pans do not protrude from the worktop. When cooking with flammable fat such as oil, do not leave the range unattended.Use pots of the appropriate size on each burner following the indication of the diagram below.
USE GUIDE ELECTRIC OVEN FUNCTIONS Our oven functions allow the user to have flexibility in the method of cooking and provide heating alternatives to suit a wide variety of dishes. USING THE OVEN LIGHT For gas ovens the light is controlled by a push switch on the control panel. The light can be used while cooking or cleaning the oven.
USE GUIDE 5 Selector Key DIRECT ROAST Heat comes from two elements - top and bottom for faster heat-up and shorter cooking times at lower temperatures. Evenly circulates the hot air around the oven cavity for even cooking results. Ideal for baking or cooking on up to 3 levels.temperature from 0 to 450°F BAKE Heat comes from bottom elements. Bake on one level. Suitable for cakes, muffins, pizzas,and delicate egg dishes.
USE GUIDE 8 Selector Key No.1 FUNCTION: No.2 FUNCTION: No.3 FUNCTION: No.4 FUNCTION: No.5 FUNCTION: No.6 FUNCTION: No.7 FUNCTION: No.
USE GUIDE COOKING TIMES Cooking times can vary according to the type of food, its density and its size. It is advisable to watch when cooking for the first time and check results since when preparing the same dishes, in the same conditions, similar results are obtained.
USE GUIDE ! oven quick start tips the Direct Roast Function provides a more even heat than a conventional oven (seal) very quickly. Pre-heating is generally unnecessary. This setting is ideal for batch baking or a complete meal.
CARE GUIDE REPLACING THE OVEN LIGHT BULBS WARNING! Disconnect power before servicing unit. To replace the oven light bulb, unscrew the protection cap that projects out inside the oven. NOTE: Touching the bulb with fingers may cause the bulb to burn out. Always use protective glove or use a cloth to remove the bulb. CLEANING YOUR RANGE ATTENTION During cleaning operation never move the appliance from its foreseen original installation position.
CARE GUIDE Cleaning the worktop: periodically clean the burner heads, the cast iron pan supports and the burner caps using warm water. Remove burned food and fat residues with a rubber spatula . If food residue prevent the smooth operation of the control knobs, call the customer service hotline to schedule service by a factory-trained professional. Cleaning stainless steel: for best results use a stainless steel cleaner product with a soft sponge or wipe.
CARE GUIDE
WARRANTY The main objective of KUCHT is to meet the needs and expectations of our customers. For this reason all our products are subjected to rigorous security and quality controls to be above the North American safety standards. KUCHT Warranty, cover defects in Parts and Labor for functional parts that are the result of normal usage for a period of time of 2 Years for Parts and Labor from date of purchase.