
Daim Ntawv Qhia Tus Neeg Siv
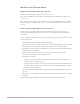
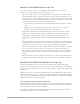
Table Of Contents
- Contents
- Control surfaces
- Mackie Control
- Mackie Control overview
- Mackie Control displays
- Mackie Control channel strips
- Mackie Control assignment buttons
- Mackie Control fader bank buttons
- Function keys
- Modifier buttons
- Automation buttons
- Group button
- Utilities buttons
- Mackie Control transport buttons
- Cursor and zoom keys
- Jog/Scrub wheel
- Programmable user modes
- Foot switches
- Mackie Control assignments
- Assignments overview
- Display buttons table
- Channel strips assignments table
- Assignment buttons table
- Assign Function keys table
- Global View buttons table
- Modifier buttons table
- Automation buttons table
- Utilities buttons table
- Transport buttons table
- Cursor keys table
- Jog/Scrub wheel assignments table
- External inputs table
- M-Audio iControl
- Euphonix devices
- CM Labs Motormix
- Frontier Design TranzPort
- JLCooper CS-32 MiniDesk
- JLCooper FaderMaster 4/100
- JLCooper MCS3
- Korg microKONTROL and KONTROL49
- Mackie Baby HUI
- Mackie HUI
- HUI setup
- HUI assignments
- HUI assignments overview
- HUI assign controls
- HUI fader bank buttons
- HUI window controls
- HUI keyboard shortcuts
- HUI channel strips
- HUI DSP controls
- HUI function keys
- HUI global controls
- HUI automation controls
- HUI status/group controls
- HUI editing controls
- HUI time display
- HUI numeric keypad controls
- HUI transport controls
- HUI cursor buttons
- HUI jog wheel
- HUI foot switches
- Mackie C4
- Novation Launchpad
- Radikal Technologies SAC-2K
- Recording Light
- Roland SI-24
- Tascam US-2400
- Yamaha 01V96
- Yamaha 02R96
- Yamaha DM1000
- Yamaha DM2000
- DM2000 Setup
- DM2000 assignments
- DM2000 Assignments overview
- DM2000 Matrix Select controls
- DM2000 Aux Select controls
- DM2000 Encoder and Fader Mode controls
- DM2000 Display Access controls
- DM2000 Effect/Plug-in controls
- DM2000 LCD display
- DM2000 Track Arming controls
- DM2000 Automix controls
- DM2000 Locator controls
- DM2000 Transport and cursor controls
- DM2000 Channel strips
- DM2000 Assignable keys
- Copyright

26Control Surfaces Support Guide for Logic Pro
Mackie Plug-in edit view in Logic Pro
You can view and edit plug-in parameters in this mode.
Note:MackieControl can edit all plug-ins that can be automated. The plug-in type (Logic
Pro native or AudioUnits) is irrelevant. Some third-party manufacturer plug-ins don’t
provide parameter names or values as text. In such cases, parameters are named and
enumerated as “Control #1,” “Control #2,” and so on, with values displayed as numbers
ranging between 0 and 1000. Contact the plug-in manufacturer to obtain a version that
supports this feature.
In Plug-in Edit view:
• The mode display shows P1. to P8., indicating the number of the selected plug-in
Insert slot.
• Depending on the NAME/VALUE button, the LCD display changes between the two
modes in the following ways:
• Name: The upper LCD row shows the channel strip’s name, insert number, plug-in
name, current parameter page, and total number of parameter pages. The lower LCD
row shows the name of the parameter, which can be edited via the corresponding
V-Pot (the one below the parameter name).
• Value: The upper LCD row shows the name of the parameter that can be edited via the
corresponding V-Pot. The lower LCD row shows the current value of the parameter. If
there is sufficient onscreen space, the unit type will be added; for example, Hz or dB.
• Rotating the V-Pots changes parameter values.
• Pressing a V-Pot button sets the parameter to its default value, except when the
parameter only has two values (on/off, for example). In this case, pressing the V-Pot
button switches between these values.
• The Cursor Left/Cursor Right buttons switch to the next or previous parameter page.
Note:Ensure that the ZOOM button isn’t active when using the cursor buttons.
When using the cursor buttons to switch between parameters, the parameters change in
groups of eight (unless the parameters on the last page do not make a complete group of
eight). For example, if a plug-in has 19 parameters, and the MackieControl is controlling
parameters 1 to 8:
• Pressing the Cursor Right button shifts to parameters 9 to 16.
• Pressing the Cursor Right button again shifts to parameters 12 to 19.
• Pressing the Cursor Left button shifts back to parameters 9 to 16, not 4 to 11.
This way, you always revert to the page positions you expect to find and are comfortable with.
• To switch by a single parameter, rather than by page, hold down the CMD/ALT key while
pressing the Cursor Left or Cursor Right button.
• The Cursor Up/Cursor Down buttons change the currently displayed Insert slot (1 to 15).
If you have a control surface group consisting of several MackieControl and XT units,
the parameters are distributed across their displays. The number of parameters shown
depends on the Multiple Controls per Parameter settings in Logic Pro > Control Surfaces >
Preferences. See Logic Pro User Guide.
Note:When you leave Plug-in Edit view, the plug-in window closes.