User Manual RADIO CLOCK AND BLUETOOTH SPEAKER KT-100V
Radio Clock Camera Operational Manual Radio instructions 1.Connect to the power, touch the “POWER” button to turn the radio on, and tap again to turn off the radio. 2. Long press the “M” button to automatically search the channel and save the channel. Up to 20 radio channels can be stored. 3. After the automatic search is completed, touch the “M” button to play the saved channel continuously. At this time, touch the “TUNING” button to play the previous channel or the next channel. 4.
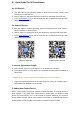
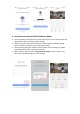
Quick Guide For APP Installation For iOS Devices: a. Scan QR Code for iOS operating system to download and install “Yoosee” APP with iPhone or iPad devices. b. Search “Yoosee” in App Store with your iOS devices, download and install APP. c. Input www.yoosee.co on PC web browser for iOS or Android devices QR code, download and install APP. For Android Devices: a. Scan QR Code for Android operating system to download and install “Yoosee” APP with Mobile or tablet devices. b.
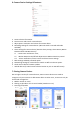
3. Pairing Camera Device to Wifi Router: a. Connect mobile device to Wifi router signal. (Ensure mobile is connected to 2.4Ghz Wifi signal as camera device does not support 5Ghz wifi signal currently.) b. Start “Yoosee” APP, click “+” icon on top right corner or center of APP interface, Click “Add new device” and select “Fast Networking” (For camera device that supports AP connection) or Smartlink (For camera device that supports sound wave connection) to start pairing installation.
4. Using Camera Device with AP Standalone Mode: 1. Press and hold the reset button for camera device for 5 to 10 seconds to activate rebooting for device to factory default settings. 2. Wait for 5 minutes after camera device is restored to factory default settings. Press and hold reset button till sound prompt is heard. 3. Go to network settings for mobile or tablets device and select GW_AP_XXXXX ( generally XXXXX refers to camera ID number). 4. Open “Yoosee” APP and select “skip,shift to AP mode”.
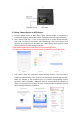
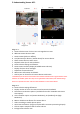
5. Understanding Yoosee APP: (l) Diagram 1. Diagram 2 Diagram 1: a. Camera device name. Click on icon to change device name. b. Add new camera device to APP. c. Camera status (Online or Offline). d. Arm (On Guard) or disarm ( Disable Alerts) for camera device. e. Share camera device to other users. f. Playback video clips for camera device. g. Camera device settings and features. h. Camera main interface (display all added camera devices). i. Display all alarm alerts messages. j.
6. Camera Device Settings & Features: a. b. c. d. e. f. g. h. i. Camera device information. Set time zone and time for camera device. Adjust picture resolution and volume for camera device. Recording settings for camera device. (Micro SD Card is inserted and made available) Alarm settings for camera device. (Receive Alarm prompt, Alarm Buzzer, Motion Detection & RF 433 MHz Sensors). e.i : Camera Arm and Disarm Time; e.ii : Motion Detection On/Off and adjustment to Motion Sensitivty control. e.
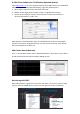
. CMS Client Software for PC (Windows Operated System): Input www.yoosee.co on your computer browser. Select CMS Client icon to download software for PC (Windows Operated System). Login with below options: a. Admin login ( LAN enviroment with blank password) b. Mobile number login (ensure mobile number is registed with account) c. Email or Yoosee account number ( Yoosee account number can be found in “Account information” at “My” icon.
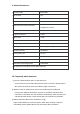
. Related Parameters. Resolution Ratio Real 1080P Video Format AVI Frame Number 30 Visual Angle 90 degree Motion Detection Camera Shooting Straight line 6 meters Minimal Illumination 1LUX Compressed Format H.
④ Recording or video file is unavailable. . Ensure Micro SD card is formatted to FAT32. Please also check if Micro SD card is damaged. **Micro SD card capacity above 64GB, please use C10 (Class 10) card. ⑤ Camera device cannot connect to WiFi. a. Check if Wifi signal is 2.4Ghz bandwith as camera device does not support 5Ghz Network currently. Please ensure Wifi password is correct and as requested format as per APP indicated. b.
FCC Statement Changes or modifications not expressly approved by the party responsible for compliance could void the user's authority to operate the equipment. This equipment has been tested and found to comply with the limits for a Class B digital device, pursuant to Part 15 of the FCC Rules. These limits are designed to provide reasonable protection against harmful interference in a residential installation.