Audio + Video Standard Surround Preamp/Processor Instructions for Use,v 98.
Audio + Video Standard Surround Preamp/Processor CONTENTS INTRODUCTION 3 UNPACKING 3 PLACEMENT 4 45 Connair Road FRONT PANEL DESCRIPTION 5 Orange, CT 06477-3650 USA BACK PANEL DESCRIPTION 9 Krell®Industries,Inc. TEL 203-799-9954 FAX 203-799-9796 E-MAILkrell @krellonli ,ne.com WEBSITE ~.krellonline.
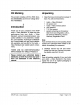
CE Marking Unpacking This ’product complieswith the EMC directive (89/336/EEC) andthe low-voltagedirective (73/23/EEC). 1. Openthe box andremovethe top layer of foam.Youwill seetheseitems: ¯ Introducbon ® Thankyou for your purchaseof the Krell Audio+ VideoStandard.To obtain the best performance from your Audio + Video Standard surround preamp/processor,pay careful attention to its placement,installation, andoperation.
Placement WARNING The surround preamp/processor must not be locatedwhereit couldbe exposed to dripping or splashin~luids. IMPORTANT Theventilation grids andcooling fan on the top of the Audio + Video Standardneedto be unobstructedat all times during operation. Do not place flammablematerial on top of or beneath the Audio + Video Standard.For installations inside cabinet04, makesure the Audio ÷ Video Standardhas adequate air circulation. Contactyour dealer, distributoror Krell~ for further information.
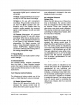
Front Panel Description See Figure 1 on page 8 1 Tape A tape monitor al!~ws you to comparethe output from your a~logtape recorderto the original source while makinga recording. After selecting a sourcefor recording (B1, $1-$5), press the tape button to toggle betweenthe tape recorder output (LEDilluminated)andthe input source(LEDnot illuminated). 2 AnalogIn TheAnalogIn button activates the analog input and cycles .through the six analog audio inputs. B1is a balancedinput via XLR connectors.
10-16 Audio ModeButtons automaticmutingfeature will be active. Be Thefive buttons (10, 13, 14, 15, and 16) sureto turn all amplifiers off whenswitching select one of the Audio+ VideoStandard’s the mainpowerswitch on andoff. audio modes. 10 Dolby Digital engagesDolby Digital (AC-3) processing for use with Dolby TheAudio + Vid~.o Standardautomatically selects whichdi~al decodingformatto use, Digital (AC-3) encodedsourcematerial. basedon the input signal it receives.
appropriatedigital input is selectedand connected. 14 MusicengagesKrell MusicSurround circuitry for usewith stereorecordings. TM 15 Monois for use with monophonic recordings. This provides monauraloutput from the ~nter speaker and subwoofer(s) only.~lf the systemdoesnot include a center speaker, the monaural signal is split between theleft andright speakers. 16 Preampdisengages all surround processingcircuitry for use with stereo recordings.
FIGURE 1 AUDIO + VIDEO STANDARD FRONT PANEL 2 3 4 6 5 9 11 1 Tape 2 Analog~’~ 3 DigitalIn 4 MainDisplay 5 Composite 10 13 15 17 12 14 16 ..
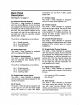
Back Panel Description Connections are via RCAor BNCcoaxial digital cable. See Figure 2 on page 11 27 S-Video Inputs The Audio + Video Standard is equipped with four S-videoinputs (labeled1-4). 22 Balanced Channel Outputs The Audio + Vid~p Standard is equipped with nine channel~utputs. All nine channels are equippedwith balancedoutputs via XLR connectorsas well as single-endedconnectors (30).
33 Digital AudioInputs The Audio + Video Standard is equipped with five digital audioinputs in the following formats: Twocoaxial via RCAconnectors TM TwoTosLink OneAES/EBUvixen XLRconnector 34 CompositeVideo Inputs The Audio + Video Standard is equipped with four RCAcomposite video inputs (labeled1-4). 35 CompositeVideo Outputs The Audio + Video Standard is equipped with three RCAcomposite video outputs. The main compositevideo output (labeled on screen) includes on-screen;graphics.
FIGURE 2 AUDIO +VIDEO STANDARD BACK PANEL 22 23 30 22 22 Balanced Ch~l Outputs 23 AnalogTape~nput 24 BalancedAnalogInputs 25 Single-Ended AnalogInputs 26 DolbyDigital Inputs 27 S-VideoInputs 32 24 31 25 26 33 S-Vid oOuts 29 In~raredRemote Sensors ChannelOutputs 30 Single-Ended 31 Digital AudioOutputs 32 TapeOutputs 33 Digital AudioInputs 27 28 34 35 36 39 29 34 Composite VideoInputs VideoOutputs 35 Composite 36 Cdmposite Video(BNC)Input/Output 37 IECPowerConnector 38 MainPowerSwitch 39 12
Connectingthe Audio + Video Standard to Your System WARNING Whenmaking conn~ions to thi.s component or any other, makesure the power amplifier is off andthe preamplifieris in the mute or stand-by mode. Make sure all cable terminationsare of the highest quality, free from frayed ends, shorts, or cold solderjoints. For analog audio sources, connect the left andright outputsof your sourcecomponentsto the inputs on ,the Audio + Video Standard.
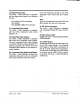
Connectthe outputs of the Audio+ Video Standardto the input(s) of your power amplifier(s). RemoteControl Description See Figure 3 on page 16 The Audio + Video Standard has balanced outputs via XLRconnectors and singleended outputs ~,, RCAconnectors. Both outputs are act~e at all times, allowing simultaneousconnectionto separateamplifiers. Only one of these output formats shouldbe connected to a single amplifier. 40 AnalogAudio Input Buttons These buttons select the analog audio source.
sensingto eliminatethis muting,if youwish. Todo so, switch the unit into standby.Press the DTSbutton (13) on the front panel and switch the Audio+Video Standard out of standbyto poweron (operate). This will disable the automatic muting feature of the Audio+Video Stan,~ardandwill alter the way in whichthe automaticformat,sensingoperates. For bestresults, select DTSprior to listening to any DTSencodedmaterial and be careful to select the properformatfor each piece of softwareplayedthroughthe digital inputs.
individual channel,a~: selectedby the levels buttons(4,3). 46 Amplifier Buttons ® Thepowerandmeterbuttons operateKrell amplifiers. 47 System Button~ Thesebuttons select a preassigned video input. Oncea videoin put is assigned,it may then be linked to a specific audioinput and surroundmode.For details on this assigning and linking procedure, see Direct Access RemoteControl SystemProgrammingon page24. 49 Enter Button This button inputs on-screen menuselections (functions only in the menumode).
FIGURE 3 AUDIO + VIDEO STANDARD REMOTE CONTROL 46 49 4O 41 50 42 52 44 43 40 AnalogAudioinput Buttons 41 Digital AudioInputButtons 42 ProcessingModeButtons 43 LevelsButtons 45 47 48 44 PowerButton 45 Vol Down/Vol UpButtons 48 VideoButtons 49 EnterButton 46 AmplifierButtons 50 Scroll Buttons 51 MenuButton 47 SystemButtons 52 PreviousButton Page16 of 32 English ® Audio + Video Standard KRELL
BATrERY INSTALLATION AND REMOVAL Note Batteries should be replacedwhenfunctions fromthe remotecontrol become intermittent. The Audio + Video Standard remote uses four AAAsize 1.~olt .batterie s the backplateto exposethe bat1. Remove teries. ® Audio + Video Standard KRELL 2. Remove the old batteries. Install the newbatteries, following the battery position diagramon the plastic battery receptacle. 4. Re-install the backplate. 5. Checkto makesure the remotecontrol is functioningproperly.
SystemConfiguration STEP1 CONFIGURE SPEAKERS Theremotecontrol is the maininput device for the Audio+ VideoStandard.All initial setup and subsequentsystemconfiguration adjustmentsm~.~t be madevia the remote control. Theremotecontrol, also includes functionsfor KrelPpoweramplifiers. To configure the Audio+ VideoStandardfor the specific types of speakersusedin the system, highlight CONFIGURE SPEAKERS and pressthe enter button (49). Thespeakersys-.
Modifyingspeakersettings Highlight the appropriate( ) that represents To disablea speaker,highlight the appropri- the subwooferconfiguration in your system and press Enter. The (x) will nowappear ate (×) andpressEnter. next to the newsubwoofersetting. Highlight To enablea speaker,highlight the appropri- OKand press Enter. Youwill be returned to the speaker systemsetup menu.Highlight ate ( ) andpressEnter. OKand press Enter again to return to the To changethe ~ttings for the FRNT,CNTR, main menu.
Note Auto Noise Sequence Any speakernot Configuredin the speaker Set the SPLmeter to C weighting and slow system setup menuwill display N/A (not response.After initializing, the LEFT channel available)for the distancespecification. dBsetting will be blinking, andbanded white noisewill be heardthroughthe left speaker. STEP3 This noise will continuefor two secondsand CALIBRATE THE VOLUME then moveclockwise to the next speakerin the system.Usingthe up or downscroll but~ Note .
The subwoofer designation will change dependingon the configuration entered in the speakersystemsetup menu.For a mono setup, the subwoofersare designatedSUB1 andSUB2. For a left andright stereo setup, the subwoofers are designated sue L and sue R. For a fro~ and rear setup, the subwoofersare designatedSUBF andSUBR.
Special AnalogSources Theanaloginput sensitivity of the Audio+ VideoStandard is set for the standard2 Volts that DolbyLaboratoriesmandates for proper Dolby Pro Logic processing. For analog sources (componentsconnected to $1-$5 and tape) that do n~correspon.dto a standard 2 Volt output ~pecificationl, it maybe necessary to adjust individual input levels on the Audio+ VideoStandard. PressMenuto exit the menusystem,select the desired analoginput andreturn to the configure inputs menu.
KRELL A+V STANDARD - LINK INPUTWHICHINPUT LINK DO YOU WANT TO CHANGE? Note If a videoinput is linked to botha digital and an analoginput, the Audio+ VideoStandard will select the digital input as the mainaudio sourcewhenever the video input is selected. ANALOG Whencompleted, highlight OKand press Enterto return to the link input menu.At this point you maychooseto changethe linked Highlightthe audioinput style, either ANALOGoperating mode.
this case, the appropriate processingmode will beselected. Highlight the desired modeandpress Enter. Whencompleted, highlight OKand press Enterto return to the link input menu.Select anothervideoinput to I!#~k or pressPrevious to return to the configu~inputs menu. Direct AccessRemoteControl System Programming Systemprogramming functions allow you to simplify the use of your Audio + Video Standard by namingthree sets of linked inputs, System 1, 2, and3 (47).
configureinputs menu.PressPreviousto return to the mainmenu. KRELL A+V STANDARD - CONFIGUREMUSIC MODESELECT THE SPEAKERSTO STEP 5 CONFIGURE THE MUSIC MODE It is oftendesiral~eto havethe settingsfor music listening dl~erentfrommovielistening. Highlight CONFIGURE MUSIC MODEand press Enter. Theconfiguremusicmode screenwill appear: KRELL A+V STANDARD - CONFIGUREMUSIC MODETHE A+V STANDARDWILL BE SET TO MUSIC MODE. OK TO CONTINUE? YES NO HighlightYESandpressEnter.
Operation VOLUME Theoperationmenu offers optionsfor a variety of Audio+ Video Standarduser operations andfeatures. Fromthe mainmenu,highlight OPERATION andpress Enter. This operation menuwill appe~: KRELL A-IV STANDARD - OPERATION - The default on-screen volume display is numerical.TheAudio+ VideoStandard’svolumecontrol ranges from 0 to 152 with 89 representing the Dolbyreference level. To changethe mainvolumeto a bar graph display, highlight MAINVOLUME DISPLAY andpress Enter.
KRELL A+V STANDARD - ON-SCREEN DELAYHOWLONGWOULD YOU LIKE THETEXT TO REMAINON THE SCREENAFTERVOLUME ADJUSTMENT OR CHANGING INPUT~ANDMODES? displayed on-screenwhenevera video input is changed. REMOTE CONTROL SENSOR TheAudio+ VideoStandardreceivesinfrared remotecommands at the front panel infrared sensor(18). Additionally, the Audio+ Video 3 SECONDS Standardfeatures a duplicate remotesensor anda malebaselJandinfrared connector(29) PressEnterandthe 3 will beginblinking. Use on the rear panel.
speakersin all theater modes.To activate both pairs of speakersin any theater mode, highlight FULL SURROUND SETUPOI3 the operation menuandpress Enter. Thefull surround setup menuwill appear: KNELL~.{~V STANDARD - FULL S~OUND SETUp IF YOU WOULDLIKE BOTH THE SIDES AND REARSACTIVE IN ALL THEATERMODES CHECK THE BOX BELOW: ( ) FULL SURROUND MODE OK Audio + Video Standard presents a CDor DATrecordablesignal to the digital outputs whenan analog signal is inputted.
Saving, Recalling, and Clearing Configuration settings Tosaveyour configurationsettings, turn the Audio + Video Standardoff from the front panel or the rem~econtrol. While pressing the recall button(’~7), pressthe powerbutton (8) on the front panel. Themaindisplay will read SAVE CNFG whenthe settings havebeen stored in the Audio+ VideoStandard’snonvolatile memory. ® Audio ÷ Video Standard KRELL To recall your storedconfigurationsettings, press Recall until RSTR CNFG appearsin the maindisplay.
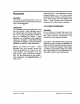
Warranty sequential damages arising from purchase, use, or inability to usethis product,evenif KrelP has beenadvisedof the possibility of such damages. KrelP warrantsthis product to be free from defects in material or workmanshipfor a periodof five yearsfor circuitry fromtheorig- Thewarrantyfor this KrelP productis valid inal dateof purchase.
ReturnAuthorization Procedure IMPORTANT ff you believe there is a problemwith your component, pleasecontact your dealer, distributor, or the ~IP factory to discussthe problembefore you return the component for repair. Toexpediteservice, you maywishto complete and e-mail the Service Request Formon our websiteat wwvckrel/online.com.
Krell®Industries, Inc. 45 CohnairRoad Orange,CT06477-3650 USA Audio + Video Standard Surround Preamp/Processor TEL203-799-9954 FAX203-799-9796 E-MAIL krell @krellon!i~.com WEB SITEwww.krell~line.