4- Framing Table INSTRUCTIONAL MANUAL KFT4X8 The Blue Mark of Quality.
1. Table of Contents 4- Thank you for your purchase! Kreg Tool Company is proud to manufacture top quality machines that are surpassed only by our commitment to customer service. If after reviewing this manual you still have a question or concern that you would like addressed please visit our website at www.kregtool.com, call 800-447-8638 or email: techsupport@kregtool.com.
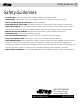
Safety Guidelines 2. 4- Safety Guidelines • To avoid injury, never place hand under clamping cylinders while adjusting them. • When drilling, make sure drill comes to a complete stop before removing or securing workpiece. • Don’t use in dangerous environment. Keep work area well lit. • Keep children and visitors away. All children and visitors should be kept a safe distance from work area. • Wear proper apparel.
3.
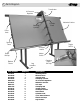
Assembly Instructions 4. 4- Follow the steps below for assembling your new Kreg Framing Table. If you have any questions, please give us a call at 1.800.447.8638. Figure 3 Step 1 Unpack all of the Framing Table components and remove them from the pallet. Carefully lay the components out on the floor and make sure you have everything needed to begin the assembly process. Tools Required for Installation: Flat screwdriver, 1/2” socket and wrench and a 1/4” hex wrench.
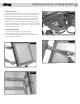
5. Assembly Instructions 4- Step 7 Figure 8 Remove the socket head stop bolt from the table frame. See figures 5 below. Figure 5 Step 10 Connect to your shop’s air supply at 3/8” fitting located on top of clamping arm. See figure 8 above. Remove socket head bolt. Step 8 Figure 9 Slide the clamping arm onto both the top and bottom frames so that it rolls freely. See figures 6 below. Figure 6 Step 11 Air pressure regulator on top of clamping arm controls pressure to optional screw gun.
Operating Instructions - Clamping Cylinders 6. 4- Clamping Cylinders Figure 3 Each of the four clamping cylinders included with this framing table throw over 400 lbs. per square inch of pressure on the joint line. Each clamping cylinder can be moved independently of every other cylinder by simply sliding it up and down the transfer arm. A toggle switch is located on the top of each cylinder assembly that controls air flow to that particular cylinder.
Operating Instructions - Squaring the Fence 7. Squaring the Fence 4- Figure 2 The squaring fence serves as a general reference to keep your workpieces aligned prior to assembly. It comes calibrated from the factory with a basic carpenters square. It should be noted that the most important aspect of making sure your frames turn out square and flush is by assuring that your workpieces are cut square and true prior to assembly.
4- Operating Instructions - Retracting the Fence 8. Retracting the Fence Figure 2 In addition, the squaring fence retracts below the table surface for use when joining large frames. This allows the frame to be moved down beyond the left-hand side of the table so that assembly can continue down the right-hand side of the table on extremely large frames.
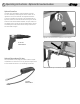
9. Operating Instructions - Optional Screw Gun & Hose Optional Screw Gun This table can accommodate an optional pneumatic screw gun for use in assembling frames (Kreg part number CT6030). An air regulator on the top of the transfer arm regulates the amount of air that is supplied to the screw gun. We recommend that you adjust the pressure to a level that causes the screw gun to stall out when the screw has been seated completely.
4- Maintenance Table Surface – The slick melamine coating of the table surface cleans up well from glue. If you’d like to make the table even more “glue-proof” we recommend coating the surface with Bates Glue Release (1-888-363-2628) or Empire Top Saver (1-866-700-5823). Replacing the table surface can also be completed relatively easily. Just remove 1” wood screws (11 total) from the mounting holes found on the backside of the frame as shown in figure 2.
11. Accessories and other Products 4- Be sure to visit www.kregtool.com to get all the details surrounding our entire product line. The Foreman - #DB55, DB110 Demo Video Available DK1100 Pro Series - #DK1100 TP, DK1100 FP, DK1100 FE Demo Video Available If your production needs have outpaced manual jigs but you’re not ready for a heavy-production machine, the Foreman is just what the contractor ordered.