
Installation Guide


5
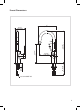
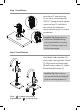
Step 1: Install base
Insert base (C) into base ring
(F) on sink or countertop with
“FR↑NT” facing forward. Tighten
screws on base (C) with 4mm
hex wrench (E) until base is
secure on base ring (F) on sink or
countertop
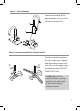
Step 2: Install faucet
Insert hot & cold waterlines (D),
one by one, into large hole of base
(C). Align arrow on faucet body
(B) with arrow on base (C). Attach
faucet body (B) to base (C)
Installer Tip: Rotate the two
half-moon shaped locking
nuts inward before inserting
base (C) into base ring (F) on
sink or countertop
Installer Tip: Please loosen
set screw from faucet body (B)
prior to securing to base (C)
NOTE: The mark “FR↑NT” should parallel with face basin,align to front
(Otherwise, the faucet will deflect)
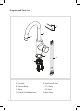
Aligning shank with groove of washer.
Half Moon Locking Nuts
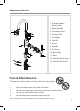
F
D
C
C
B
Note: “ ” on base should be in
alignment with “ ” on faucet body.