
Installation Guide


9
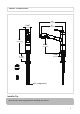
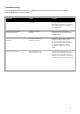
Troubleshooting
If you have followed the instructions carefully and your faucet still does not work properly,
take the following corrective steps:
Leakage under the handle.
PROBLEM CAUSE ACTION
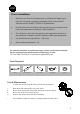
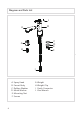
Bonnet nut (5) has
come loose.
Remove the cover button (1). Loosen set
screw (2) with hex wrench (16). Remove
the handle (3). Unscrew cap (4) (by hand
only). Tighten bonnet nut (5) with an
adjustable wrench
The aerator has an irregular
or reduced water flow.
The aerator is dirty or
misfitted.
Remove the aerator and check for
debris. Ensure that the rubber washer is
properly installed.
Water will not shut off
completely.
Cartridge may need to be
adjusted or replaced.
Remove the cover button (1). Loosen
set screw (2) with hex wrench (16).
Remove the handle (3). Unscrew cap
(4) (by hand only). Loosen the bonnet
nut (5) with an adjustable wrench.
Remove the cartridge (7). Check for
cracks
There is a low flow of water.
The filter washers in the
hose connectors are dirty.
Turn off the water supply at the water
valves and unscrew the hose connectors
from the water supply lines. Clean the
washers in the water lines with hot water,
removing any debris or calcium build up.