
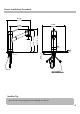
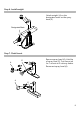
Installation Instructions
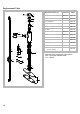

11
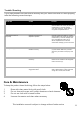
Trouble-Shooting
If you have followed the instructions carefully and your faucet still does not work properly,
take the following corrective steps:
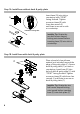
Leakage under faucet handle
PROBLEM CAUSE ACTION
Locking nut has come loose.
Unscrew joystick from handle (1). Loosen
set screw with a hex wrench (12). Remove
metal handle (1). Unscrew cartridge
cover (2) by hand only. Tighten locking
nut (3) with an adjustable wrench.
Leaking from spray hose
Quick Connect may be
installed incorrectly.
Remove Quick Connect (9) from spray hose
(10) and reinstall. Make sure you hear a
click when you install it on the spray hose
(10).
Care & Maintenance
To keep the product clean & shining, follow the steps below:
1. Rinse with clean water & dry with a soft cloth
2. Do not clean with soaps, acid, polish, abrasives or harsh cleaners
3. Do not use cloth with a coarse surface
4. Unscrew the aerator and clean when necessary
This installation manual is subject to change without further notice.
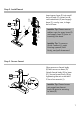
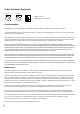
Water does not shut off
completely
Cartridge may need to be
adjusted or replaced.
Unscrew joystick from handle (1). Loosen
set screw with a hex wrench (12). Remove
metal handle (1). Unscrew cartridge cover
(2) by hand Remove locking nut (3)
with an adjustable wrench. Remove
ceramic disc cartridge (4). Check for cracks.
Hose does not retract
Weight may be installed
incorrectly.
Readjust weight (11) on the hose (10).
Make sure it is installed on the designated
mark on the hose (11).
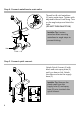
Low flow
Quick Connect may be
clogged with debris.
Remove Quick Connect (9) from hoses.
Soak in 50/50 solution of warm water and
vinegar for 5 minutes, then reinstall.
ACID