INSTALLATION MANUAL Britt™ Single Handle Commercial Style Kitchen Faucet KPF-1691 www.kraususa.com I Toll Free: 1.800.775.0703 I © 2023 Kraus USA Plumbing LLC I Rev.
Congratulations on the purchase of your new Kraus plumbing fixture! R Please keep the box and packaging materials until your product is completely installed. If you have any questions, require technical assistance or have any problems with your product: STOP DO NOT RETURN TO STORE Please contact our Customer Service Team 1-800-775-0703 / customerservice@kraususa.com Have the model number available and retain a copy of your receipt with purchase date for reference.
STOP Prior to Installation: · Make sure you have all necessary parts by checking the diagram and parts list. If any part is missing or damaged, please contact Kraus Customer Service at 800-775-0703 for a replacement. R · Read all instructions and safety warnings and ensure you have all tools, parts, and equipment necessary for a safe installation. · Turn off the hot and cold water supply at the angle stops and turn on the old faucet to release any built up pressure. Remove existing faucet.
Diagram and Parts List B K A C D E F G H I J A. Spray Head B. Faucet Body C. Flange D. Rubber Washer E. Metal Washer F. Mounting Nut 4 G. Screws H. Weight I. Weight Clip J. Quick Connector K.
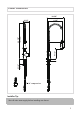
Faucet Dimensions 10 5/8" 4 1/4" 6 1/2" [164.3mm] 22 1/4" 8 3/8" [213.6mm] [565.4mm] [108.8mm] [268.9mm] Ø2 1/8" 3 1/8" [80.3mm] [54.2mm] 3/8” compression Installer Tip: Shut off main water supply before installing new faucet.
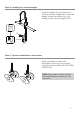
Step 1: Installing the faucet B G Shut off the water supply. Place the faucet (B) through the hole in the sink or countertop. Secure the faucet (B) to the sink or countertop using the rubber washer (D), metal washer (E) and mounting nut (F) provided. Tighten screws (G). Do not overtighten. (2N.m Max) F D E G Step 2: Securing the faucet assembly Push the quick connector (J) firmly upward and attach it to the receiving block (a). Pull down moderately to ensure the connection has been made.
Step 3: Installing the counterweight Install the weight clip (I) at the point of the hose marking "weight here". Insert the weight (H) onto the weight clip (I) by sliding it down onto the weight clip (I). Weight here H Weight here I Step 4: Connect waterlines to main valve Attach waterlines to angle stops and tighten until snug. Turn on angle stops and check for leaks (DO NOT TURN FAUCET ON). NOTE: Please make sure filter washers are installed before connecting to the main valve.
Step 5: Flush faucet Pull the hose assembly out of the spout and remove the spray head (A) by unscrewing it from the hose in a counterclockwise direction. Be sure to hold the end of the hose down into the sink and turn the faucet on to the warm position where it mixes hot and cold water. Flush the water lines for one minute. This flushes away any debris that could cause damage to internal parts. Check for leaks. Retighten any connections if necessary, but do not overtighten.
Replacement Parts Replacement Parts List 1. Sprayer Head Finish / Color SFACB, BB, SFS, MB** 2. Washer 5 6 3 2 8 9 10 1 4. Sprayer Hose BLSFACB,GRSFS KP27244 BLMB, BLBB,BLSFS* SFACB, BB, SFSB KP27243 SFS, MB** 15 16 17 18 19 23 12 13 14 21 BL, GR** KP27124 KP27083 9. Bonnet Nut KP27238 11. Handle SFACB, BB, SFSB SFS, MB** SFACB, BB, SFSB SFS, MB** 13. Index KP27239 KP27240 KP27001 12. Screw BL, GR** 14. Hex Wrench 15. Flange & Washer 20 KP27084 8. Cartridge 10.
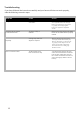
Troubleshooting If you have followed the instructions carefully and your faucet still does not work properly, take the following corrective steps: PROBLEM CAUSE ACTION Leakage under the handle. Bonnet nut ( ) has come loose. 5HPRYH WKH LQGH[ /RRVHQ WKH VFUHZ ZLWK WKH KH[ ZUHQFK 5HPRYH WKH KDQGOH 8QVFUHZ WKH FDS E\ KDQG RQO\ 7LJKWHQ ERQQHW QXW ZLWK DQ DGMXVWDEOH ZUHQFK The aerator has an irregular or reduced water flow. The aerator is dirty or misfitted.
Codes/Standards Applicable: NSF/ANSI 372 UP C NSF/ANSI/CAN 61: Q ≤ 1 UP C R C LEAD FREE IA PM C OR R NSF/ANSI 61 &T TM ASME A112.18.1 1.8GPM 6.8L/min maximum Faucet - Lifetime Limited Warranty Kraus USA Plumbing, LLC (“Kraus”) extends this warranty to the original purchaser for personal household use of the Faucet when purchased from an authorized Kraus dealer and in the location of original installation. This warranty is non-transferable.
How to Make a Warranty Claim If you are a consumer purchaser, please contact a Kraus Customer Service Representative at: Kraus USA Plumbing, LLC 12 Harbor Park Drive Port Washington, NY 11050 Toll-free 800-775-0703 Customerservice@kraususa.com R If you are a plumbing contractor or trade professional, please contact a Kraus Pro Representative at: Kraus USA Plumbing, LLC 12 Harbor Park Drive Port Washington, NY 11050 516-801-8955 Proservice@kraususa.
IMPORTANT Register Your Kraus Product Activate Your Warranty Access Premium Customer Support Get Product Information REGISTER TODAY http://www.kraususa.com/registration R www.kraususa.