
Installation Manual

9
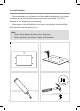
NOTE: Use acetone or rubbing alcohol to remove any excess sealant
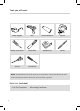
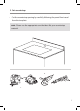
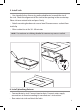
5. Install sink
• Use a bead of clear silicone (or preferred adhesive) around the rim of
the sink. Check the alignment of the sink to the opening in the countertop.
Place sink over cutout hole and press rmly
• Attach mounting hardware to secure bowl. Remove excess sealant from
inside lip
• Allow sealant to set for 30 – 60 minutes
6. Install plumbing xtures
• Connect drain to sink. Connect trap to drain. Connect water supply
connections to faucet according to manufacturer’s instructions
• Run water into sink and check for leaks
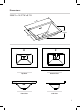
Clip Location
Rim of Lavatory
Cut Along This Line
14.25” (362mm)
14.25” (362mm)
Clip Location
Rim of Lavatory
Cut Along This Line
11.61” (295mm)
17.7” (450mm)
Model No. KCU-251
Allow a minimum of 4.5” (114.3mm)
from wall for faucet placement
clearance before cutting
NOTE: When plotting template
full size: Make sure horizontal
and vertical dimensions match
the dimensions labeled in the
template
12.9” (328mm)
19.9” (506mm)
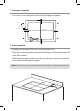
Clip Location
Rim of Lavatory
Cut Along This Line
Clip Location
Rim of Lavatory
Cut Along This Line
11.61” (295mm)
17.7” (450mm)
Model No. KCU-251
Allow a minimum of 4.5” (114.3mm)
from wall for faucet placement
clearance before cutting
NOTE: When plotting template
full size: Make sure horizontal
and vertical dimensions match
the dimensions labeled in the
template
12.9” (328mm)
19.9” (506mm)
Clip Location
Rim of Lavatory
Cut Along This Line
Clip Location
Rim of Lavatory
Cut Along This Line
11.61” (295mm)
17.7” (450mm)
Model No. KCU-251
Allow a minimum of 4.5” (114.3mm)
from wall for faucet placement
clearance before cutting
NOTE: When plotting template
full size: Make sure horizontal
and vertical dimensions match
the dimensions labeled in the
template
12.9” (328mm)
19.9” (506mm)
Clip Location
Rim of Lavatory
Cut Along This Line