
Installation Manual

7
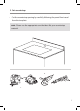
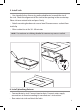
3. Cut countertop
• Cut the countertop opening by carefully following the pencil line traced
from the template
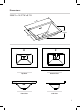
Flushed/Zero Reveal
3/8“ Positive Reveal
1/8“ Negative Reveal
DETERMINE REVEAL TYPE
Step1
Step2
Step3
Step4
Step6
Step5
Step7
Step8 Step9
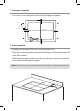
Determine location for mounting brackets; space
1/2"
(13mm)
3/8
1/2
Centerline
3/8”POSITIVE
1/8”NEGATIVE
FLUSHED/ZERO
Flushed/Zero Reveal
3/8“ Positive Reveal
1/8“ Negative Reveal
DETERMINE REVEAL TYPE
Step1
Step2
Step3
Step4
Step6
Step5
Step7
Step8 Step9
Determine location for mounting brackets; space
1/2"
(13mm)
3/8
1/2
Centerline
3/8”POSITIVE
1/8”NEGATIVE
FLUSHED/ZERO
Flushed/Zero Reveal
3/8“ Positive Reveal
1/8“ Negative Reveal
DETERMINE REVEAL TYPE
Step1
Step2
Step3
Step4
Step6
Step5
Step7
Step8 Step9
Determine location for mounting brackets; space
1/2"
(13mm)
3/8
1/2
Centerline
3/8”POSITIVE
1/8”NEGATIVE
FLUSHED/ZERO
Flushed/Zero Reveal
3/8“ Positive Reveal
1/8“ Negative Reveal
DETERMINE REVEAL TYPE
Step1
Step2
Step3
Step4
Step6
Step5
Step7
Step8 Step9
Determine location for mounting brackets; space
1/2"
(13mm)
3/8
1/2
Centerline
3/8”POSITIVE
1/8”NEGATIVE
FLUSHED/ZERO
NOTE: Please use the appropriate saw that best ts your countertop
material
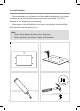
Clip Location
Rim of Lavatory
Cut Along This Line
11.61” (295mm)
17.7” (450mm)
Model No. KCU-251
Allow a minimum of 4.5” (114.3mm)
from wall for faucet placement
clearance before cutting
NOTE: When plotting template
full size: Make sure horizontal
and vertical dimensions match
the dimensions labeled in the
template
12.9” (328mm)
19.9” (506mm)
Clip Location
Rim of Lavatory
Cut Along This Line