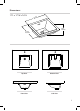
I N S TA L L AT I O N MA N UA L Elavo™ White Ceramic Square Undermount Bathroom Sink w/ Overflow KCU-231 www.kraususa.com I toll free: 1.800.775.0703 I © 2014-2015 Kraus USA Inc. I REV.
Thank you for purchasing Kraus We would like to take this opportunity to thank you for your business with Kraus USA. It is our sincere hope that you are completely satisfied with your experience. We welcome any questions or comments you may have, and will be glad to assist you in the future. For more information about Kraus products, please visit our website at: www.kraususa.
Prior to Installation: • Make sure that you have all necessary parts by checking the parts list. If any part is missing or damaged, please contact Kraus Customer Service at 800-775-0703 for a replacement.
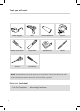
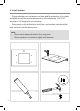
I Tools you will need: Phillips screwd Silicone Sealant Safety Goggles Drill Phillips Screwdriver Putty Knife Silicone Sealant Silicone Adhesive Jig Saw Adjustable wrench Tape Measure Pencil Phillips screwdriver Tools You Will Need Scissors Screwdriver NOTE: Specialized tools may be necessary to install Kraus Ceramic Undermount sinks with countertop materials other than wood, marble, or granite D Parts List (Included) • Cut-Out Template 4 • Mounting Hardware B Hex wrench I J J F Adju
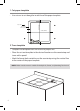
Dimensions 17”L x 17” W x 7.6” H 7.52” 191mm Ø1.77” 45mm 0” 17.0 mm 432 20.8 53 7.68” 195mm Ø1.77” 45mm 17.00” 432mm 14.37” 365mm 6” 21.20mm 4 5 ” 23.62mm 600 ” mm Ø1.77” 45mm 5.71” 145mm 17.24” 438mm 17.
1. Cut paper template Clip Location Rim of Lavatory Cut Along This Line 14.25” (362mm) • Use scissors to cut along the inside line of the paper template 14.25” (362mm) 2.
3 9 Rim of Lavatory Cut Along This Line 14.25” (362mm) Clip Location 14.25” (362mm) Step3 3.
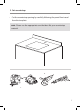
4. Install anchors • Flip countertop over and place on a foam pad for protection. Use cutout template to mark the anchor placement on the countertop. Drill 5/16” diameter x 3/8” deep hole in countertop • Place epoxy in the drilled hole.
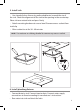
Rim of Lavatory Cut Along This Line 14.25” (362mm) Clip Location 5. Install sink 14.25” (362mm) • Use a bead of clear silicone (or preferred adhesive) around the rim of the sink. Check the alignment of the sink to the opening in the countertop. Place sink over cutout hole and press firmly • Attach mounting hardware to secure bowl. Remove excess sealant from inside lip • Allow sealant to set for 30 – 60 minutes NOTE: Use acetone or rubbing alcohol to remove any excess sealant 6.
Codes/Standards Applicable: KRAUS LIMITED LIFETIME WARRANTY This product has been manufactured and tested to the highest quality standards by Kraus USA Inc. (“Kraus”). We offer our customers thoughtfully crafted fixtures & accessories, engineered for enduring performance over years of use. WHO IS COVERED BY THE WARRANTY This warranty extends to the original purchaser only. This warranty is not transferable, between homes or owners and is only applicable to residential use.
NON-APPLICABILITY OF THIS WARRANTY By the purchase and use of our products, you agree that Kraus is not liable for incidental, consequential or special damages associated with the return, replacement, installation or use of your product.
www.kraususa.