
User`s manual


www.kraun.it 6
User’s Manual
3. Configuration
Kraun Adapter KR.XK can be configured by KR.XK Wireless Utility. This
chapter describes how to configure your Kraun Wireless PCI Adapter
for wireless connectivity on your Wireless Local Area Network (WLAN)
and use the data security encryption features.
After Installing the Adapter, the Adapter’s tray icon will appear in
your system tray. It appears at the bottom of the screen, and shows
the signal strength using color and the received signal strength indica-
tion (RSSI).
If the icon is gray, there is no connection.
If the icon is red, there is poor signal strength and the RSSI is less
than 5dB.
If the icon is yellow, there is poor signal strength and the RSSI is
between 5dB and 10dB.
If the icon is green, there is good signal strength and the RSSI is
between 10dB and 20dB.
If the icon is green, there is excellent signal strength and the RSSI
is more than 20dB.
Double-click the icon and the Kraun Wireless Utility will run. You can
also run the utility by clicking the Start>Programs>KRAUN>KR.XK>KR.XK
Wireless Utility. The utility provides a integrated and easy tools to:
• Display current status information
• Edit and add configured profiles
• Display current diagnostics information
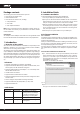
3.0 Configuration for Windows Vista
After the PCI card’s driver has been installed, Windows Vista will display
a wireless Network Connection message like this one.
Figure 3.1v
Icon means the connection has been established. Icon
means there is no connection.
If the icon does not appear, please follow the steps below. If the
icon still does not appear, the driver may be installed incorrectly or the
adapter is unplugged, please try again.
1. Right-click the icon in your system tray, then click Connect to a net-
work.
Figure 3.2v
2. The screen that appears will show you many available wireless net-
works. Highlight the network that you want, and then click Connect
Figure 3.3v
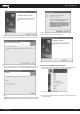
3. To continue, click Connect Anyway. Click the Cancel button to end the
Installation.
Figure 3.4v
4. After that, the installation will proceed as shown in Figure 3.5v, click
close.
Figure 3.5v
5. The screen below will appear if the connection is successfull.
Figure 3.6v
Note: The sections below take Windows XP for example to introduce
these above capabilities.
3.1 Set Wizard
Choose the menu Set Wizard on the top of the utility screen; you can
select the operation mode for the adapter (we select the infrastructure
mode for example).
Step 1: Select Station [infrastructure] (show in Figure 3 1). Then click
Next.
Figure 3 1
Step 2: Click Refresh button to update the wireless network (show in
Figure 3 2). Then select the wireless network and click Next.