Wireless Network Card 54MB PCI User’s Manual Cod. KR.XK www.kraun.
User’s Manual Contents Package contents 3 1. Introduction 3 2. Installation Guide 3 1.1 1.2 1.3 2.1 2.2 2.2.1 2.2.2 2.2.3 Overview of the product Features LED Status Hardware Installation Software Installation Overview Software Installation for Windows XP Software Installation for Windows Vista 3. Configuration 3.0 3.1 3.2 3.3 3.4 3.5 3.6 3.7 3.
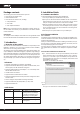
User’s Manual Package contents The following contents should be found in your box: 2. Installation Guide 2.1 Hardware Installation To install the Adapter, follow these steps listed below: • One Kraun KR.XK Wireless Card • Quick Installation Guide 1. Turn off your desktop PC and disconnect the power. • One Kraun KR.XK Resource CD, including: 2. Open your PC case and locate an available PCI slot on the motherboard. Remove the metal slot cover on the back of the PC.
User’s Manual Figure 2 5 Figure 2 2 Step 5: Click the Finish button to complete. Step 3: After that, the next screen displays, select Install to continue. Figure 2 6 Figure 2 3 Step 4: In the next screen, the files will be copied as the next screen shown (shown in Figure 2 4). To end the Installation, click Cancel. 2.2.3 Software Installation for Windows Vista 1. Insert the Resource CD into your CD-ROM drive, right-click the Computer icon as shown in the Figure 2 6, select the Properties. Figure 2.
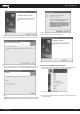
User’s Manual 4. Click the Browse button in the next screen to select the file which contains the driver software for the adapter. After that, click Next to proceed. Figure 2.8 Select Device management Figure 2.11 Select the driver software 3. Right-click the adapter icon “KR.XK”, and select “Update Driver Software” to proceed. ) Note: Vista X86 is designed for the Vista of 32bit, Vista X64 is designed for the Vista of 64bit, please select according as you need. 6.
User’s Manual 3. Configuration Kraun Adapter KR.XK can be configured by KR.XK Wireless Utility. This chapter describes how to configure your Kraun Wireless PCI Adapter for wireless connectivity on your Wireless Local Area Network (WLAN) and use the data security encryption features. After Installing the Adapter, the Adapter’s tray icon will appear in your system tray. It appears at the bottom of the screen, and shows the signal strength using color and the received signal strength indication (RSSI). 3.
User’s Manual Figure 3 2 Step 3: After that, select the network authentication and data encryption, click OK; And the adapter can connect the specific wireless network. Figure 3 4 - Signal Strength - This shows the strength of the wireless signal. - Link Quality - This shows the quality of the wireless connection. - ReNew IP - Click the button to get the IP address from the AP. - Show Tray Icon - Select the option to display the icon on bottom of the desktop. Otherwise, you can see the two icons.
User’s Manual • ASCII - Select this option, you can enter any ASCII characters to compose the password. • PASSPHRASE - Select this option, you can enter the characters from 0~9 to compose the password. • Key Index - Select the index of the password. • Network Key & Confirm network key - The fields configure the network key. The two should be the same. - 802.1x configure - This configures the 802.1x security, it is available when you select the data encryption as WPA 802.1X, WPA2 802.1X or WEP 802.1X.
User’s Manual 2. Shared Key authentication When you select the Shared Key as the authentication, the only available data encryption is WEP. -> Note: The configuration for Shared Key authentication and Open System are similar, you can refer to the Open System authentication to configure it. 3. WPA-PSK authentication When you select the WPA-PSK as the authentication, the available data encryptions are TKIP and AES. Please select the one according your need.
User’s Manual 3.3.3 Duplicate a configuration file Follow the steps below to change the name of a configuration profile. Step 1: Go to the Profile tab (shown in Figure 3 10). Step 2: Select the profile name in the Profiles List. Step 3: Click Duplicate, and then enter the new name for the configuration profile. 3.3.4 Set default configuration profile Follow the steps below to select a configuration profile as default.
User’s Manual 3.7 Statistics Click the tab Statistics as shown in Figure 3 12 to view the traffic statistics about the connection. Click the Reset to refresh the information. Figure 3 16 Step 3: After that, the PIN Code displays on the screen (shown in Figure 3 17). Now, you should enter the pin code into your AP. Figure 3 14 3.8 Wi-Fi Protected Setup Click the tab Wi-Fi Protected Setup as shown in Figure 3 15, select different way to configure the adapter for Wi-Fi network.
User’s Manual 3.8.2 Question-Answer Method Step 1: Click PBC as shown in Figure 3 15. Figure 3 19 Step 2: Push the physical button on the AP. Step 3: Finally, the adapter will create the profile and connect to the AP automatically. Appendix A: Specifications Normal Interface Standards Operating System Transmission Distance 32bit PCI Interface IEEE802.11b; IEEE802.
User’s Manual • WEP (Wired Equivalent Privacy) - A data privacy mechanism based on a 64-bit or 128-bit or 152-bit shared key algorithm, as described in the IEEE 802.11 standard. • Wi-Fi - A trade name for the 802.11b wireless networking standard, given by the Wireless Ethernet Compatibility Alliance (WECA, see http://www.wi-fi.net), an industry standards group promoting interoperability among 802.11b devices.