
System Guide
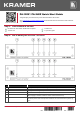
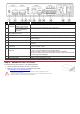

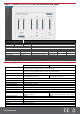
Table Of Contents

#
Feature
Function
7
AUDIO IN
Connectors
Unbalanced Stereo
Audio 3.5mm mini jack
Connect to an unbalanced stereo audio source.
8
balanced Stereo Audio
5-pin Terminal Block
Connector
Connect to a line-level, balanced, stereo audio source.
9
LINE OUT Balanced Stereo Audio 5-pin
Terminal Block Connector
Connect to a balanced, stereo audio acceptor (for example, amplified speakers).
10
VOLUME Attenuator
Master volume for speaker output – rotate to set the maximum amplifier volume.
11
FACTORY DEFAULT Button
Press to return to the factory default settings, including all the configurations and
network settings.
12
ETHERNET RJ-45 Connector
Connect to an ETHERNET LAN.
13
RS-232 (G, Tx, Rx) Port
Connect to an RS-232 connector on A/V equipment or a PC or other Serial
Controller.
14
Hi-Z/Lo-Z and 100V/70V
DIP-Switches
Set to Hi-Z for high impedance and Lo-Z for low impedance.
In Hi-Z, set to 70V or 100V.
15
Lo-Z/Hi-Z Out Terminal Block
Connectors
Lo-Z – connect stereo output to Lo-Z speakers:
L+ and L- to the left speaker; R+R- to the right speaker.
Hi-Z (70V or 100V) – connect Hi-Z and COM to mono Hi-Z speakers.
Speaker can output either the left side of the audio input or reduce the stereo input
to a mono signal (via webpages).
16
Power Connector with Fuse
AC connector, enabling power supply to the unit.
17
Mains Power Switch
Switch for turning the device on or off.
Step 3: Mount PA-120Z / PA-240Z
Install PA-120Z / PA-240Z using one of the following methods:
• Attach the rubber feet and place the unit on a flat surface.
• Mount the unit in a rack using the recommended rack adapter
(see www.kramerav.com/product/PA-120Z).
• Ensure that the environment (e.g., maximum ambient temperature & air flow) is compatible for the device.
• Avoid uneven mechanical loading.
• Appropriate consideration of equipment nameplate ratings should be used for avoiding overloading of the circuits.
• Reliable earthing of rack-mounted equipment should be maintained.