Kramer Electronics, Ltd.
Contents Contents 1 2 2.1 3 3.1 3.2 3.3 4 5 6 7 7.1 7.2 7.3 7.
Introduction 1 Introduction Welcome to Kramer Electronics! Since 1981, Kramer Electronics has been providing a world of unique, creative, and affordable solutions to the vast range of problems that confront the video, audio, presentation, and broadcasting professional on a daily basis. In recent years, we have redesigned and upgraded most of our line, making the best even better! Our 1,000-plus different models now appear in 11 groups 1 that are clearly defined by function.
Getting Started 2.
Overview 3 Overview The VM-4HDCPxl is an HDCP compliant distribution amplifier for DVI-D signals. The unit inputs one DVI-D signal, and distributes it to four outputs. The VM-4HDCPxl features: • Up to 2.
Your VM-4HDCPxl 1:4 DVI Distributor 3.
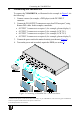
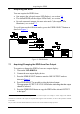
Your VM-4HDCPxl 1:4 DVI Distributor Figure 1: VM-4HDCPxl 1:4 DVI Distributor 5
Installing in a Rack 5 Installing in a Rack This section provides instructions for rack mounting the unit.
Connecting the VM-4HDCPxl 6 Connecting the VM-4HDCPxl To connect the VM-4HDCPxl, as illustrated in the example in Figure 2, do the following 1: 1. Connect a source (for example, a DVD player) to the DVI INPUT connector. 2. Connect the DVI OUTPUT connectors to up to four DVI acceptors 2, using Kramer DVI cables.
Acquiring the EDID 7 Acquiring the EDID You can acquire the EDID from: • One output (the selected output LED flashes), see section 7.1 • The default EDID (all the output LEDs flash), see section 7.2 • Several connected outputs, the auto-mix mode 1 (the output LEDs illuminate), see section 7.3 To cycle between the different modes, press the EDID SELECT button as shown in Figure 3. Figure 3: EDID Modes 7.
Acquiring the EDID While the EDID is being copied, the EDID SELECT and READ buttons illuminate. The new EDID is copied when both buttons no longer illuminate. 7.2 Acquiring the Default EDID To reset to the default EDID, do the following: 1. Turn on the VM-4HDCPxl. 2. Press the EDID SELECT button and set it to the DEFAULT EDID mode. All the OUTPUT STATUS LEDs flash simultaneously. 3. Press the EDID READ button to copy the default EDID to the input2.
Technical Specifications 3. Carefully move the jumper to the PROGRAMMING position (to the left when the front panel of the machine is facing towards you)1 4. Connect the RS-232 9-pin D-sub port on the unit via a crossed cable (pin 2 to pin 3, pin 3 to pin 2, and pin 5 to pin 5) to the RS-232 9-pin D-sub port on the PC. If a shielded cable is used, connect the shield to pin 5. Note: There is no need to connect any other pins.
LIMITED WARRANTY Kramer Electronics (hereafter Kramer) warrants this product free from defects in material and workmanship under the following terms. HOW LONG IS THE WARRANTY Labor and parts are warranted for three years from the date of the first customer purchase. WHO IS PROTECTED? Only the first purchase customer may enforce this warranty. WHAT IS COVERED AND WHAT IS NOT COVERED Except as below, this warranty covers all defects in material or workmanship in this product.
For the latest information on our products and a list of Kramer distributors, visit our Web site: www.kramerelectronics.com, where updates to this user manual may be found. We welcome your questions, comments and feedback. Safety Warning: Disconnect the unit from the power supply before opening/servicing. Caution PN: 2900- 000618 Rev: 3 Kramer Electronics, Ltd. Web site: www.kramerelectronics.com E-mail: info@kramerel.