Kramer Electronics, Ltd.
Contents Contents 1 2 3 4 5 5.1 Introduction Getting Started Overview Your FC-4046 Video MultiCoder® Installing on a Rack Before Installing on a Rack CAUTION!! 5.1.1 1 1 1 2 6 6 6 5.2 6 6.1 6.2 7 7.1 Instructions for Rack-Mounting Connecting the FC-4046 Video MultiCoder® Connecting a PC Dipswitch Settings Operating Your FC-4046 Video MultiCoder® Using the Front Panel Buttons 6 7 8 9 10 10 7.1.1 7.1.2 7.1.
Introduction 1 Introduction Welcome to Kramer Electronics (since 1981): a world of unique, creative and affordable solutions to the infinite range of problems that confront the video, audio and presentation professional on a daily basis. In recent years, we have redesigned and upgraded most of our line, making the best even better! Our 500-plus different models now appear in 8 Groups1, which are clearly defined by function.
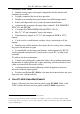
Your FC-4046 Video MultiCoder® In addition, the FC-4046: Includes analog inputs and outputs compatible with the formats and standards in use today Is highly automated for hassle-free operation Includes user-friendly front panel buttons for full Procamp control Labels each dipswitch for easy and convenient identification Automatically recognizes the input video standards1: PAL B/D/G/H/I, NTSC3.58 and SECAM Can output PAL B/D/G/H/I/Nc/60 and NTSC3.58/4.
Figure 1: FC-4046 Video MultiCoder® Your FC-4046 Video MultiCoder® 3
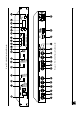
Your FC-4046 Video MultiCoder® Table 1: Front Panel FC-4046 Video MultiCoder® Features # Feature Function 1 2 3 4 5 6 7 POWER Switch STANDARD LEDs INPUT Button INPUT LEDs OUTPUT Button OUTPUT LEDs COMPONENT OUT Button COMPONENT OUT LEDs Illuminated switch for turning the unit ON or OFF 1 2 Indicates the input video standard , lighting the appropriate LED 3 Press to choose the input format Light the specific INPUT chosen via the INPUT button Press to select the output standard on CV and YC outputs Light
Your FC-4046 Video MultiCoder® Table 2: Rear Panel FC-4046 Video MultiCoder® Features # Feature Function 20 21 CV INPUT BNC Connector YC INPUT 4p Connector Connects to the composite video source Connects to the s-Video (Y/C) source when selecting Y/C as the input 22 23 24 25 26 27 28 29 30 31 32 33 34 35 G/Y INPUT BNC Connector B/B-Y INPUT BNC Connector R/R-Y INPUT BNC Connector SYNC INPUT BNC Connector CV OUTPUT BNC Connector YC OUTPUT 4p Connector G/Y OUTPUT BNC Connector B/B-Y OUTPUT BNC Connector
Installing on a Rack 5 Installing on a Rack This section describes what to do before installing on a rack (see section 5.1) and how to install on a rack (see section 5.2). 5.1 Before Installing on a Rack Before installing the machine in a 19" rack, be sure that the environment is within the recommended range: Table 3: Recommended Ambient Temperature and Humidity Range Operating temperature range Operating humidity range Storage temperature range Storage humidity range 5.1.1 +5 to +45 Deg.
Connecting the FC-4046 Video MultiCoder® 6 Connecting the FC-4046 Video MultiCoder® To connect the FC-4046, as the example in Figure 2 illustrates, do the following1: 1. Connect one or more of the following sources: A composite video source (for example, a camera) to the CV INPUT BNC connector A Y/C source (for example, an s-Video player) to the 4p INPUT connector A component video source (for example, a DVD Player) to the G/Y, B/B-Y, and R/R-Y INPUT BNC connectors 2.
Connecting the FC-4046 Video MultiCoder® Figure 2: Connecting the FC-4046 6.
Connecting the FC-4046 Video MultiCoder® 6.2 Dipswitch Settings Configure the FC-4046 unit by setting the 8 dipswitches, as Figure 4 and Table 4 define: Figure 4: Dipswitches (Factory Default) Table 4: Dipswitch Settings Dipswitch Set as follows: 1 1 PEDESTAL ON for pedestal; OFF for no pedestal (7.
Operating Your FC-4046 Video MultiCoder® 7 Operating Your FC-4046 Video MultiCoder® Operate your FC-4046 via: The front panel buttons RS-232 serial commands transmitted by a touch screen system, PC, or other serial controller 7.1 Using the Front Panel Buttons Section 7.1.1 describes how to convert (encode) RGB or YUV input signals to composite or Y/C video output signals and vice versa (decode). 7.1.
Technical Specifications To unlock the FC-4046: Press the PANEL LOCK button (for about 2 seconds) until the front panel controls unlock and the PANEL LOCK LED no longer illuminates. 8 Technical Specifications Table 6 includes the technical specifications: 1 Table 6: Technical Specifications of the FC-4046 Video MultiCoder® INPUTS: CV: 1Vpp / 75 on BNC connector; YC: 1Vpp / 75 (Y); 0.
LIMITED WARRANTY Kramer Electronics (hereafter Kramer) warrants this product free from defects in material and workmanship under the following terms. HOW LONG IS THE WARRANTY Labor and parts are warranted for seven years from the date of the first customer purchase. WHO IS PROTECTED? Only the first purchase customer may enforce this warranty. WHAT IS COVERED AND WHAT IS NOT COVERED Except as below, this warranty covers all defects in material or workmanship in this product.
For the latest information on our products and a list of Kramer distributors, visit our Web site: www.kramerelectronics.com, where updates to this user manual may be found. We welcome your questions, comments and feedback. Safety Warning: Disconnect the unit from the power supply before opening/servicing. Caution Kramer Electronics, Ltd. Web site: www.kramerelectronics.com E-mail: info@kramerel.