K R A ME R E LE CT R O N IC S L T D .
Contents 1 Introduction 1 2 2.1 Getting Started Achieving the Best Performance 2 2 3 3.1 Overview Defining the ESD Ceiling Speaker 3 5 4 4.1 4.2 4.3 4.4 4.5 4.
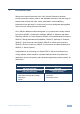
1 Introduction Welcome to Kramer Electronics! Since 1981, Kramer Electronics has been providing a world of unique, creative, and affordable solutions to the vast range of problems that confront the video, audio, presentation, and broadcasting professional on a daily basis.
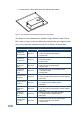
2 Getting Started We recommend that you: • Unpack the equipment carefully and save the original box and packaging materials for possible future shipment • Review the contents of this user manual Use Kramer high performance high resolution cables i 2.1 Go to http://www.kramerelectronics.com to check for up-to-date user manuals, application programs, and to check if firmware upgrades are available (where appropriate).
3 Overview The ESD™ (Equal Sound Dispersion) Ceiling Speaker is a high- performance complete K-overage ESD ceiling speaker that can be mounted on the ceiling and appears as a suspended ceiling tile. The ESD ceiling speaker is constructed with a central driver and four pivoting tweeters and is housed in an enclosed shallow enclosure. The Kramer complete K-overage ESD provides unmatched sound response in a suspended ceiling device for the professional (PRO) and educational (EDU) markets.
• A bass port for a bass reflex effect (for educational models) Figure 1: Tile Size ESD Ceiling Speaker (that fits into the ceiling) The speaker is easily installed and is available in eight different models: PRO or EDU, stereo or mono, tile size or half-tile size configurations, and a slightly smaller size (for any region with suspended ceiling tiles of 595mm) as defined here: Complete K-overage ESD® Ceiling Speakers Available Models Model Name Part Number Description Professional tile size stereo S
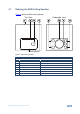
3.1 Defining the ESD Ceiling Speaker Figure 2 defines the ESD Ceiling Speaker: Underside View Top View Figure 2: ESD Ceiling Speaker Flat Ceiling Speaker Features # Feature Function 1 Speaker Tile Base Half-tile size or tile size 2 Speaker Steel Enclosure Shallow fireproof enclosure 3 INPUT Terminal Block Connector Connect to the audio source (see Section 4.
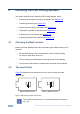
4 Installing the ESD Ceiling Speaker This section explains how to install the ESD Ceiling Speaker, that is: 4.1 • Choosing the best place to locate your speaker (see Section 4.1) • Connecting the wires (see Section 4.2) • Determining the number of speakers (see Section 4.3) • Preparing the speaker for operation (see Section 4.4) • Installing the tile size speaker (see Section 4.5) • Installing the half-tile size speaker (see Section 4.
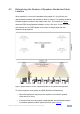
4.3 Determining the Number of Speakers Needed and their Location When installed in a room with a standard ceiling height of 2.7m (8.8 feet), the optimal distance between the speakers is about 10 meters. The speaker should be installed lengthwise relative to the shape of the room. The example in Figure 4 shows the ESD Ceiling Speaker installed in a 10m x 5m room. A 10m x 5m room size requires only one ESD speaker for full room coverage rather than four standard ceiling speakers.
• If the size of the room requires more than one speaker, use two mono speaker models.
4.4 Preparing the ESD Ceiling Speaker for Operation Once the location of the speaker is fixed, prepare the speaker for operation as follows: 1. Move each of the pivoting tweeters outward in an angle that is suited to the room shape and size. 2. Run the wires from the amplifier through the ceiling. 3. Remove the ceiling tile at the place where you plan to install the speaker. 4. Connect the speaker wires to the speaker terminals (see Figure 3) from the adjacent ceiling tile opening. 5.
Figure 7: Fitting the Tile Size Speaker 2. Secure the speaker by connecting the speaker support ring to an independent secure ceiling anchor point (see Figure 8) as appropriate. The anchor prevents the speaker from falling if the tile itself comes out or falls apart.
3. If required, daisy-chain the next speaker (see Section 4.3). Note: Do not over-tighten the screws. It may cause damage to both the speakers and the surface. 4.6 Installing the Half-Tile Size Speaker When installing the half-tile size model: 1. Remove the ceiling tile. 2. Cut the ceiling tile in half (to 30x60cm). 3. Place the ceiling mounting bracket (supplied with the half-tile unit only) between the ceiling rails, as illustrated in Figure 9. Figure 9: Placing the Ceiling Mounting Bracket 4.
Figure 10: Fitting the Half-Tile Size Speaker 5. Replace half of the ceiling tile (see Figure 11). Figure 11: Replacing the Ceiling Tile 6. Secure the speaker by connecting the speaker support ring to an independent secure ceiling anchor point (see Figure 8). The anchor prevents the speaker from falling if the tile itself comes out or falls apart.
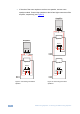
Figure 12 shows an example of how the ESD Ceiling Speaker can be installed in a boardroom setup: Figure 12: ESD Ceiling Speaker in a Boardroom Setup ESD Ceiling Speaker - Installing the ESD Ceiling Speaker 13
5 Technical Specifications Technical Specifications of the PRO ESD Ceiling Speakers INPUT POWER: 40W RMS; max.
LIMITED WARRANTY We warrant this product free from defects in material and workmanship under the following terms. HOW LONG IS THE WARRANTY Labor and parts are warranted for one year from the date of the first customer purchase. WHO IS PROTECTED? Only the first purchase customer may enforce this warranty. WHAT IS COVERED AND WHAT IS NOT COVERED Except as below, this warranty covers all defects in material or workmanship in this product. The following are not covered by the warranty: 1.
For the latest information on our products and a list of Kramer distributors, visit our Web site where updates to this user manual may be found. We welcome your questions, comments, and feedback. Web site: www.kramerelectronics.com E-mail: info@kramerel.