
User's Manual


KRAMER: SIMPLE CREATIVE TECHNOLOGY
Connecting the VP-727T
10
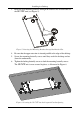
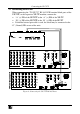
7 Connecting the VP-727T
To connect the VP-727T to up to four VP-727 machines, as the example in
Figure 7 illustrates
1
, do the following
2
:
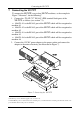
1. Connect the “TO VP-727” RS-485 3-PIN terminal block ports of the
VP-727T, as follows (see section 7.1):
MACH. # 1 to the RS-485 port of the VP-727 which will be recognized as
machine # 1
MACH. # 2 to the RS-485 port of the VP-727 which will be recognized as
machine # 2
MACH. # 3 to the RS-485 port of the VP-727 which will be recognized as
machine # 3
MACH. # 4 to the RS-485 port of the VP-727 which will be recognized as
machine # 4
2. Connect the 12V DC power adapter to the power socket and connect the
adapter to the mains electricity (not illustrated in Figure 7).
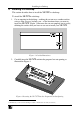
Figure 7: Connecting the VP-727T
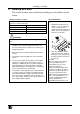
1 The RS-232 port is for firmware upgrade only, see section 7.2
2 Switch OFF the power on each device before connecting it to your VP-727T. After connecting your VP-727T, switch on its
power and then switch on the power on each device