K R A ME R E LE CT R O N IC S L TD .
Contents 1 Introduction 1 2 2.1 2.2 2.3 3 3.1 3.2 Getting Started Achieving the Best Performance Safety Instructions Recycling Kramer Products Overview Defining the KDS-MP1 Digital Media Player About KDS-MP1 Setup 2 2 2 3 4 6 7 4 Connecting the KDS-MP1 8 5 5.1 5.2 5.3 5.4 Configuring the KDS-MP1 Accessing the Menu The Main Menu Set the Resolution Setting the Time Zone 10 10 11 12 12 6 6.1 KDS-MP1 Manager Installation Setup Process 15 15 7 7.1 7.2 7.
Figures Figure 1: KDS-MP1 Digital Media Player Figure 2: Connecting the KDS-MP1 Digital Media Player Figure 3: Connecting the KDS-MP1 Digital Media Player for Configuration Figure 4: The Configuration Main Menu Figure 5: The KDS-MP1 Manager Setup Wizard Figure 6: The KDS-MP1 Manager Welcome Window Figure 7: Selecting the Schedule Mode Figure 8: KDS-MP1 Player Looping Mode Figure 9: The Looping Schedule Figure 10: Looping Playlist Timeline Figure 11: Setting the Weekly Schedule Figure 12: Proceeding to Expor
1 Introduction Welcome to Kramer Electronics! Since 1981, Kramer Electronics has been providing a world of unique, creative, and affordable solutions to the vast range of problems that confront the video, audio, presentation, and broadcasting professional on a daily basis.
2 Getting Started We recommend that you: Unpack the equipment carefully and save the original box and packaging materials for possible future shipment i 2.1 Review the contents of this user manual Go to http://www.kramerelectronics.com/support/product_downloads.asp to check for up-to-date user manuals, application programs, and to check if firmware upgrades are available (where appropriate).
2.3 Recycling Kramer Products The Waste Electrical and Electronic Equipment (WEEE) Directive 2002/96/EC aims to reduce the amount of WEEE sent for disposal to landfill or incineration by requiring it to be collected and recycled. To comply with the WEEE Directive, Kramer Electronics has made arrangements with the European Advanced Recycling Network (EARN) and will cover any costs of treatment, recycling and recovery of waste Kramer Electronics branded equipment on arrival at the EARN facility.
3 Overview The KDS-MP1 is a high quality LAN-based digital signage media player. The KDS-MP1 receives content streamed from the Network, saved in its internal memory or from an external USB memory stick and shows it with up to 1080p HD image quality on a display (via HDMI, VGA or AV 3.5mm outputs). The KDS-MP1 Digital Media Player features: 1080p full HD support High quality video and audio output via the HDMI output connector MPEG-1, MPEG-2, MPEG L2, MP3, H.
KDS-MP1 Manager: Lets you create or modify content playback schedules Introduces seven Smart Widgets that allow players that support HTML5 to schedule dynamic contents Lets you publish multiple PowerPoint slides directly to the Player (2003/2007/2010, static only) Supports Video Input sequence in playlist scheduling Supports full screen portrait mode (auto rotates content) Supports Looping or Weekly schedule Schedules energy saving video display on/off Auto detects IP, MAC add
3.1 Defining the KDS-MP1 Digital Media Player This section defines the KDS-MP1. Figure 1: KDS-MP1 Digital Media Player # Feature Function 1 VESA Mounting Bracket Connect to the rear panel screw-holes of a VESA standard display 2 12V DC Connector Connect to the power adapter 3 HDMI Connector Connect to an HDMI acceptor (for video) 4 PC Connector Connect to a VGA display (for computer graphics) 5 AV OUT 3.
3.2 About KDS-MP1 Setup To prepare the KDS-MP1 for operation, you need to: Connect the machine, see Section 4 Connect the KDS-MP1 to play media; connect a USB keyboard to configure the KDS-MP1 Configure the machine, see Section 5 Before using the KDS-MP1 you have to configure it. When powering the unit, the machine boots up to the configuration mode if it does not recognize content for playback.
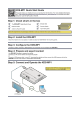
4 Connecting the KDS-MP1 ! Always switch off the power to each device before connecting it to your KDS-MP1. After connecting your KDS-MP1, connect its power and then switch on the power to each device. To connect the KDS-MP1, as illustrated in the example in Figure 2, do the following: 1. Connect the acceptor to one of the following outputs. The: HDMI connector to an HDMI acceptor (for example, an LCD display) VGA 15-pin HD connector to a VGA acceptor (for example, a VGA display) A/V 3.
Figure 2: Connecting the KDS-MP1 Digital Media Player i If you need to configure the system (see Section 5), connect a USB keyboard to one of the USB connectors (see Figure 3). The KDS-MP1 will identify only a true USB keyboard. A keyboard that is connected via a PS/2 to USB adapter will not be identified.
5 Configuring the KDS-MP1 After connecting the power, the system will start a booting process and upon its completion (after about 90 seconds), the KDS-MP1 will begin playback if the media content has already been uploaded or if you are using the USB memory stick as the source. If not, the menu system will open to let you configure the system. i 5.1 Whenever you connect the USB keyboard, the setup menu appears within 30 seconds.
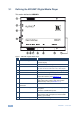
5.2 The Main Menu This section describes the configuration main menu. Figure 4: The Configuration Main Menu Feature Function Device information Shows the device information: Model, Device ID, Firmware version, Ethernet IP and the Current Time. Press the ENTER button () Video Setting Shows the current resolution. Click using the ENTER button to set to a different resolution (see Section 5.
Feature Function Remote assistance: enabled/disabled Install license Change password: to allow access to authorized people only. Security Once the password is set, you can access the menu by pressing Alt + Ctrl + Del To enter the menu without using the password, you have to reset the unit (see Section 5.1.1) Undo changes 5.3 Reset to previous settings Set the Resolution For best results, set the resolution so it matches the display’s native resolution.
(GMT - 07:00) Mexico (Chihuahua, La Paz, Mazatlan St) (GMT - 06:00) Central America (GMT - 06:00) Central US and Canada (GMT - 06:00) Mexico (Mexico City, Monterrey, Guadalajara) (GMT - 06:00) Saskatchewan (GMT - 05:00) Eastern Indiana (GMT - 05:00) Eastern US and Canada (GMT - 05:00) Lima, Bogota, Quito, Rio Branco (GMT - 04:00) Atlantic (GMT - 04:00) Bolivia (La Paz), Santo Domingo (GMT - 04:00) Chile (Santiago) (GMT - 04:00) Canada (Newfoundland) (GMT - 03:00) Brazil East (GMT - 03:00) Argentina (Buenos
(GMT + 06:30) Cocos (Keeling) Islands (GMT + 06:30) Myanmar (GMT + 07:00) Cambodia, Western Indonesia, Laos, Thailand, Vietnam (GMT + 07:00) Pacific Ocean (Christmas Island) (GMT + 07:00) Russia Zone 06 (Krasnoyarsk, Kemerovo) (GMT + 08:00) Taiwan (GMT + 08:00) Hong Kong, Singapore, Philippines, Malaysia (GMT + 08:00) Western Australia (GMT + 08:00) China (GMT + 08:00) Russia Zone 07 (Irkutsk, Ulan-Ude) (GMT + 09:00) Eastern Indonesia (GMT + 09:00) Japan (GMT + 09:00) Korea (GMT + 09:00) Palau (GMT + 09:00)
6 KDS-MP1 Manager Installation Insert the KDS-MP1 Manager software CD and the installer should pop up automatically. If it does not start, double-click on “setup.exe” located on your CD using Windows Explorer. You can also download the latest version of KDS-MP1 Manager from http://www.kramerelectronics.com. The KDS-MP1 requires the following minimum system requirements (or higher): Microsoft Windows XP/Vista/Windows 7 DirectX 9 Microsoft .Net Framework version 3.
6.1.1 For Windows XP only: .Net Installation Windows .NET Framework 3.51 is included on the CD and will be installed if absent from your system. Click Yes and follow the prompts to install it. Figure 5: The KDS-MP1 Manager Setup Wizard Run the installer and follow the step-by-step instructions. Close the installer to finish the installation.
7 KDS-MP1 Manager Operation KDS-MP1 Manager lets you: Select a playlist which can include a video (downloaded from the PC), audio, widgets, a ticker or an image Widget –small interactive application that provides functionality and content online.
7.1 Schedule Modes Two schedule modes are available: the Looping mode which is the default (see Figure 7) or the Weekly schedule, which determine the appearance and settings of the KDS-MP1 Manager. Selecting a different schedule mode will remove all the items from the current playlist. Figure 7: Selecting the Schedule Mode Select one of the following schedules: Select looping for a single-playlist repeating playback (see Section 7.1.1).
7.1.1 The Looping Mode After selecting the Looping mode, the following window appears (see Figure 8): Figure 8: KDS-MP1 Player Looping Mode The Looping window left side, Recent Items, lists recently uploaded files, and the preview window below lets you drag and drop selected files to preview in window.
The right side of the looping window, illustrated in Figure 9, includes the tools required to let you create the desired playlist: Figure 9: The Looping Schedule # 1 Feature and Function Aspect Ratio Drop Down Box Set the aspect ratio to 4:3, 3:4 clockwise, 3:4 counter-clockwise, 16:9 (default), 9:16 clockwise or 6:19 counter-clockwise The display can also be set vertically clockwise or counter-clockwise 20 KDS-MP1 - KDS-MP1 Manager Operation
# 2 Feature and Function Layout Editor Button (click to expand) Select one of the available screen layouts. You can select one full window or various screen layouts that are divided into windows, each defined to present a different playlist. Other options let you present widgets and tickers. The following are examples of different layouts: This screen layout shows one large window, two smaller windows on the side and a ticker area below.
# Feature and Function You can also select a one-screen layout that will show up to 10 playlists in sequence: Selecting the widgets layout lets you insert widgets to any of the windows: 3 Add Button Click the Add button to add the playlist items. The Open window appears: Select video, image and audio files and/or tickers and images and then click Open.
# Feature and Function You can change the order in the list by dragging and dropping files into different locations. KDS-MP1 supports only baseline JPEGs. Progressive/interlaced JPEG images are not supported.
# Feature and Function For each widget you can select an option or change the setting via the option button. Clock: Select the background color and the duration of the widget. Calendar: Select the background color and the duration of the widget. Weather: Select location, the units (Centigrade or Fahrenheit), the background color and the duration of the widget. If your city does not appear in this list, type the name of the city or go to this Web site: www.worldweatheronline.com/country.
# Feature and Function mp3 File: Select either full duration or the number of seconds you want this piece to play. jpg File: Select the duration of the image appearance on the screen and one of the three display options below. Power Point File: Select the time duration of each slide (only if it is not specified in the PPT presentation) and set to one of the three display options below. 7 Preview Button Click to preview the playlist.
7.1.1.1 Looping Example The following example shows the timeline of a looping playlist: Figure 10: Looping Playlist Timeline 7.1.2 The Weekly Schedule Mode The weekly schedule mode lets you set an hourly schedule for each day of the week which can include different screen layouts and playlists to be played at different times of the day and week. To access the weekly schedule, click the Looping icon on the top part of the KDS-MP1 Manager main window and select Weekly schedule.
Figure 11: Setting the Weekly Schedule # 1 Feature and Function Aspect Ratio Drop Down Box Set the aspect ratio to 4:3, 3:4 clockwise, 3:4 counter-clockwise, 16:9 (default), 9:16 clockwise or 6:19 counter-clockwise. The display can also be set vertically clockwise or counter-clockwise If you are preparing the weekly schedule without using a template (located on the left side of the window), you have to set the aspect ratio first.
# Feature and Function Set the scheduled block (defines the time and day/s) for which the selected playlist will be active; set the days and the screen layout for the selected block and click Add to add the desired files. You can change the order of the playlist items by dragging and dropping certain lines and remove items by selecting an item and clicking remove or by pressing the delete button on your keyboard.
# Feature and Function The scheduled block appears colored on the weekly schedule: You can select the scheduled block and drag it to a different location within the weekly schedule as shown below: KDS-MP1 - KDS-MP1 Manager Operation 29
# Feature and Function Different scheduled blocks have different colors.
# Feature and Function You can make changes to each scheduled block by selecting it and clicking Edit or moving it about. You can delete a scheduled block by selecting it and clicking the remove button or by pressing the delete button on your keyboard. You can alter the schedule as required: 4 Proceed to Export Button After setting the weekly schedule, you can export it. To do so click the Proceed to Export button (or click the Export icon on the top part of the window), see Section 7.2.
7.2 Export the Schedule After the schedule is prepared for each defined window in the layout, you need to export it to the media player. To export a file, click the Export icon on the top part of the window or click the Proceed to export button on the lower right side of the window.
The playlist to export is listed on the lower left side of the Export window. Select the export method via: 7.2.1 Network: connect the machine to the Ethernet (see Section 7.2.1) USB: connect the memory stick to your PC (see Section 7.2.2) Exporting via the Network To export via the network, connect the KDS-MP1 via the Ethernet (see Figure 2) and click Scan to search for the KDS-MP1 IP number (see Figure 14) or click Add to manually add the IP number (see Figure 15).
Or click the Add button to manually add a machine: Figure 15: Manually Entering the IP Number After clicking the Scan button, the media players list appears: Figure 16: The media player list The media player is checked green () if the player is online and checked red () if it was previously detected but is currently offline.
Select the media player to which you want to export the playlist (you can also select the entire list or deselect the list using the Select all or Select none buttons, respectively). i Each time you connect a media player or change its network settings, a new entry is added to the list of possible network devices in KDS-MP1 Manager. The program runs a background check to verify that the players listed are online and a “Please Wait” message appears on the display.
Figure 18: Completion of Export You can click the Log button to review the export process: Figure 19: Export Log Once the export process is complete, the media player transmits the data to the output and starts playing the playlist. In the same way you can export the playlist for each window in the layout.
7.2.2 Exporting via USB To export the playlist without using the network, you can connect a memory stick to a USB port on your PC. i Note that the USB memory stick must be formatted using FAT/FAT32. Check via USB, browse to find the memory stick and type the password (if set in the configuration setup, see Section 5.2): Figure 20: Locate USB Memory Stick 1. Click the “Prepare USB drive” button. 2. You will be prompted to keep or delete previous contents.
Figure 21: USB Content Warning 3.
4. Upon completion, remove the USB drive and insert it into the KDS-MP1 Digital Media Player (see Figure 23). The on-screen display will prompt that files are being copied: “Copying from USB drive. After all files are copied, this screen will disappear and you may then remove the USB drive”. 5. The KDS-MP1 begins to play the new playlist once the files are copied. 6. Remove the USB drive from the player.
7.
8 Firmware Update This section describes how to update the KDS-MP1 firmware. KDS-MP1 Manager checks for program updates via the Internet connection, if available. You can also manually check if a new firmware version exists. i The latest firmware version can be downloaded from the Kramer Web site at www.kramerelectronics.
8.
8.2 Firmware Update via USB If you wish to perform firmware update via the USB memory stick, select the USB icon. The following window appears: Figure 27: Firmware Update Window (via USB) To update the firmware via USB: 1. Connect a USB memory stick to the USB port of your PC. The USB drive should be formatted using FAT/FAT32 and preferably empty 2.
Figure 28: Select Firmware 3. Click the Prepare USB drive button.
4. Wait until the files are copied and then disconnect the USB memory stick. 5. Turn On the power on the display that is connected to the output of the KDS-MP1 Digital Media Player. 6. Connect the USB keyboard to the USB port on the KDS-MP1 Digital Media Player. The KDS-MP1 Media Player will boot up into the configuration mode. 7. Go to the firmware update menu (see Section 5.2) and follow the instructions on the display. 8. When prompted, connect the memory stick to the USB port on the KDS-MP1.
9 Technical Specifications INPUTS: 1 Ethernet on an RJ-45 connector 2 USB connectors OUTPUTS: 1 HDMI connector 1 VGA on a 15-pin HD connector 1 composite video/audio on a 3.5mm mini jack connector RESOLUTIONS: Up to 1080p Full HD video/stills CONTROLS: STATUS LEDs NETWORKING: Ethernet PROGRAMMING: SMIL + HTML5 VIDEO CODECS: H.
For the latest information on our products and a list of Kramer distributors, visit our Web site where updates to this user manual may be found. We welcome your questions, comments, and feedback. Web site: www.kramerelectronics.com E-mail: info@kramerel.