
Instruction Manual

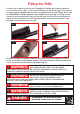
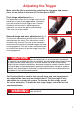
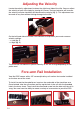

First-stage adjustment (g. 1)
The adjustment screw for rst stage travel can be
found just in front of the trigger blade. Clockwise
turns will shorten the rst stage travel. Counter
Clockwise will increase it. Adjusting too far
clockwise can cause the gun to stop cocking.
Take care not to over adjust.
Second-stage and sear adjustment (g. 2)
To reach this adjustment, the rie action must be
removed from the stock. This adjustment screw is
situated in the sear bar. Turn the screw clockwise
to decrease the amount of second-stage travel and
sear engagement. Turn the screw counterclockwise
to increase the amount of second-stage travel and
sear engagement.
Adjusting the Trigger
9
WARNING:
!
KEEP YOUR FINGER OFF THE TRIGGER WHILE COCKING
THE AIR RIFLE.
CAUTION:
!
THIS ADJUSTMENT AFFECTS SEAR ENGAGEMENT. IT
MAY BE NECESSARY TO ALTER BOTH ADJUSTMENTS
TO ACHIEVE THE DESIRED SETTING. ADJUSTMENT OF ONE SCREW MAY AFFECT OTHER
SETTINGS. DO NOT OVER-ADJUST, AS THIS MAY CAUSE THE GUN TO FIRE PREMA-
TURELY OR NOT OPERATE CORRECTLY AND MAKE THE RIFLE UNSAFE. ALWAYS CHECK
YOUR SETTINGS TO ENSURE CORRECT AND SAFE OPERATION OF THE RIFLE. ALWAYS
ENSURE THAT OPERATION OF THE SAFETY IS UNAFFECTED BY ANY ALTERATIONS YOU
MAY MAKE TO THE TRIGGER MECHANISM.
g. 2
For Puncher Breaker models, the second stage and sear engagement
are adjusted the same way as detailed above. The rst stage is only
adjustable via a screw/nut system. To shorten the rst stage, screw
the nut in clockwise. To make the rst stage longer, screw the nut out
counterclockwise.
g. 1
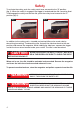
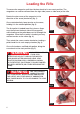
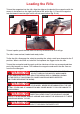
Make sure the rie is unloaded by removing the magazine and ensure
there are no pellets in the breech. Put the gun on SAFE.