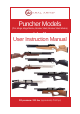
Puncher Models (Pro, Mega, Mega Marine, Breaker Silent, Breaker Silent Marine) ddsdfs User Instruction Manual Fill pressure: 200 bar (approximately 2,900 psi)
Contents Rules of safe shooting .............................................3 Safety .........................................................................4 Filling the rifle ...........................................................5 Loading the rifle.................................................... 6-7 Adjusting the trigger ................................................9 Adjusting the velocity..............................................10 Fore-arm Rail installation ............................
Rules of Safe Shooting Ɣ NEVER point the airgun at any person. Ɣ NEVER point the airgun at anything you do not intend to shoot. Ɣ ALWAYS treat the airgun as if it was loaded and handle it with the same respect you would a ¿UHDUP Ɣ ALWAYS aim in a SAFE DIRECTION. ALWAYS keep the muzzle pointed in a SAFE DIRECTION. Ɣ NEVER put any part of your hand over the muzzle. Ɣ ALWAYS keep the airgun ON “SAFE" until you are ready to shoot in a SAFE DIRECTION. Ɣ &KHFN EHKLQG DQG EH\RQG \RXU WDUJHW WR EH FHUWDLQ \RX K
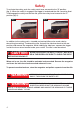
Safety To activate the safety, push the safety catch lever rearward to the "S" position (fig. 1). When the safety is engaged, the trigger is locked and the rifle cannot be fired. To disengage the safety and fire the rifle, push the safety lever forward to the "F" position (fig. 2). fig. 1 fig. 2 In addition to the safety catch, a loaded and cocked rifle can be made safe by decocking (uncocking). To decock the rifle, first pull the side lever back to the rear position and remove the magazine.
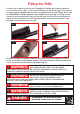
Filling the Rifle 1) Attach the fill probe to the correct fill equipment. Rotate the fill port’s protective cover to allow access (fig. 1). Insert the fill adapter into the fill port (fig. 2). Do not use any other type of adapter other than the one supplied with the rifle. Slowly fill the rifle to a MAXIMUM of 200 bar (approximately 2,900 psi) pressure (fig. 3). Filling the rifle too fast is unsafe and creates excess heat that may result in a low or inaccurate fill pressure.
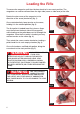
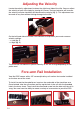
Loading the Rifle To remove the magazine, pull the side lever back to its rear most position. The magazine can now be removed from the right side (same as side lever) of the rifle. Rotate the clear cover of the magazine in the direction of the arrow (clockwise) (fig. 1). Once rotated entirely, keep tension on the cover, holding it in the rotated position (fig. 2).
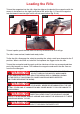
Loading the Rifle To load the magazine into the rifle, align the ridge on the back of the magazine with the recess in the breech on the right hand side of the action (fig. 1). Press the magazine into the breech from the right until it will not move further (fig. 2 & 3). fig. 1 fig. 2 fig. 3 To load a pellet, push the side lever all the way forward as far as it will go. The rifle is now cocked, loaded and ready to fire.
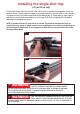
Installing the single shot tray (.177 and .22 cal. only) To load the single shot tray into the rifle, you must first remove the magazine. Once the breech is clear, simply align the ridge in the single shot tray with the recess in the breech and push the tray in from the right side of the breech (fig. 1). Push the tray from right to left until it cannot be pushed further and the hole in the tray is aligned with the breech opening and bolt pathway (fig. 2).
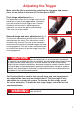
Adjusting the Trigger Make sure the rifle is unloaded by removing the magazine and ensure there are no pellets in the breech. Put the gun on SAFE. First-stage adjustment (fig. 1) The adjustment screw for first stage travel can be found just in front of the trigger blade. Clockwise turns will shorten the first stage travel. Counter Clockwise will increase it. Adjusting too far clockwise can cause the gun to stop cocking. Take care not to over adjust. fig. 1 Second-stage and sear adjustment (fig.
Adjusting the Velocity Locate the velocity adjustment knob on the right hand side of the rifle. You can adjust the velocity of your rifle simply by turning this screw. Turning clockwise will increase the velocity, counter-clockwise will decrease the velocity (fig. 1). This adjustment can be made at any time without risking damage to the rifle. fig. 1 On the left hand side of the rifle is an indicator to help select your most common velocity settings. - = Low (fig. 2) + = High (fig. 3) fig. 2 fig.
Troubleshooting DO NOT use this rifle until you have read and understood this owner's manual. In the unlikely event your rifle malfunctions or exhibits reduced performance, DO NOT attempt to fix the problem yourself. Please call Air Venturi so we can address any issues or have you return the gun for repair.
Warranty One-Year Limited Warranty This product is warranted to the retail consumer for one year from date of retail purchase against defects in material and workmanship. In the unlikely event there are any defects in materials or workmanship in the first twelve (12) months after retail purchase, we will repair or replace the defective items under warranty. What is covered: Replacement parts and labor. Transportation charges to consumer for repaired product.
Notes
Notes
Notes
$,5 9(1785, 1DLPDQ 3DUNZD\ &OHYHODQG 2+ ID[