
User's Manual


Disk P1: Audio CD 1–1: Make Audio CD
699
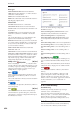
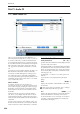
1–1b: Audio CD Track List
Track [(01…99)]
Displays the track numbers of the WAVE files arranged
in the audio CD track list. (1–1a “Track (Track Select)”)
WAVE File
Displays the names of the WAVE files.
To add a WAVE file, place the cursor at the WAVE file
of the audio CD track that follows the audio CD track
you want to add, and press the Insert button. To delete
an audio CD track, place the cursor at the audio CD
track that you want to delete, and press the Cut button.
Note: When you select a WAVE file (highlighted) and
press the Play button, or SAMPLING START/STOP
switch, the WAVE file will play back.
Size, Rate, Time
This area displays information on the WAVE files in the
audio CD track list.
Size: Data size (bytes)
Rate: Sampling frequency (Hz)
Time: Time (minutes: seconds)
This information will not be displayed if you used
“Load .KCD” etc. to load an audio CD track list, and
the WAVE file is not found in the specified directory.
In this case, use the Cut button to delete that audio
CD track, or check whether the media is connected
correctly.
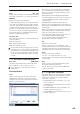
1–1c: Drive Select, Command buttons
Drive Select [CDD: Name]
Selects the CD-R/RW drive that contains the media
that you will use to create an audio CD. (0–1a)
Drives other than a CD-R/RW drive cannot be
selected here.
Command buttons
Insert
Adds an audio CD track to the audio CD track list.
Highlight the “WAVE File” edit cell following the
audio CD track you want to add, and press the Insert
button to open the dialog box.
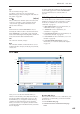
Use “Drive Select” to select the drive containing the
file you want to add, use the Open button and Up
button to navigate to the appropriate directory, and
select the Wave file.
Insert: Adds the selected (highlighted) WAVE file.
Note: If the “Multiple Select” (0–1a) box is checked, you
can select multiple WAVE files and insert them in a
single operation.
Insert All: Adds all WAVE files in the selected
directory whose sampling frequency is 44.1 kHz or 48
kHz. The files will be added in the order in which they
are displayed.
When you execute Insert or Insert All, the WAVE file(s)
will be added, and any subsequent audio CD tracks
will be moved toward the end of the list.
If you press the Exit button, the dialog box will close,
and no further WAVE files will be added.
You can continue adding as many WAVE files as
desired until you press the Exit button.
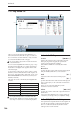
Cut
Deletes the audio CD track.
When you place the cursor at “WAVE File” of the
audio CD track that you want to delete, and press the
Cut button, that audio CD track will be deleted. Any
subsequent audio CD tracks will be moved forward.
Clear
This clears the audio CD track list.
Note: Use “Save Audio CD Track List” to save
important audio CD track lists to the internal hard disk
or other media.
Play
When you select a 48 kHz WAVE file and press the
Play button, that file will play back.
The file will also play if you press the SAMPLING
START/STOP switch.
▼ 1–1: Page Menu Commands
The number before each command shows its ENTER +
number-key shortcut. For more information on these
shortcuts, see “ENTER + 0-9: shortcuts for menu
commands” on page 138.
• 0: Swap Track. For more information, see “Swap
Track” on page 724.
• 1: Write to CD. For more information, see “Write to
CD” on page 725.
• 2: Finalize Audio CD. For more information, see
“Finalize Audio CD” on page 725.
• 3: Erase CD-RW. For more information, see “Erase
CD-RW” on page 725.