
User's Manual

Sampling mode
616
Unmapped Samples: All samples that are not
mapped (used) in a multisample or drum kit will be
deleted.
All Samples: All samples in memory will be
deleted. The sample assignments of all
multisamples will change to
---No Assign---.
3. To execute the Delete Sample command, press the
OK button. To cancel, press the Cancel button.
If the sample data (waveform data) of the sample
you delete is being used by another sample, the
sample data itself will not be deleted. Only the
sample will be deleted.
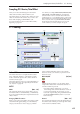
Copy Sample
This command copies the currently selected sample to
another sample.
Note: The copy destination sample number will
automatically be included in the resulting sample
name. If necessary, use the “Rename Sample” menu
command to rename it. When doing so, make sure that
the name is not identical to any other sample name.
For more information, please see “About stereo
multisamples and stereo samples” on page 569.
1. Use “Sample Select” (0–1b) to select the copy-
source sample.
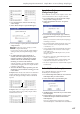
2. Select “Copy Sample” to open the dialog box.
3. Specify the sample number of the copy
destination.
When copying a stereo sample, specify both
the L and R channels for the copy destination
sample number.
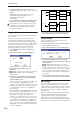
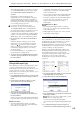
4. If you check “with Sample Data”: Executing the
copy will simultaneously copy the sample data
(waveform data) as well.
The copy source and copy destination samples will
exist as completely independent samples. For
example, you would use this when you wish to start
with the same sample data, and edit it separately in
P1: Sample Edit to create two or more different
types of sample.
If you do not check “with Sample Data”: Executing
the copy will not copy the sample data (waveform
data). The newly created sample will share the
sample data of the copy source sample. For
example, you would use this when you wish to use
P2: Loop Edit to create two or more versions of the
same sample data with different loop addresses.
Sample memory area will not be consumed by this
type of copy. If you use P1: Sample Edit to edit the
sample data, the results will affect all samples that
share this sample data.
5. To execute the Copy Sample command, press the
OK button. To cancel, press the Cancel button.
Rename Sample
This command lets you modify the name of the
currently selected sample.
1. Use “Sample Select” (0–1b) to select the sample
whose name you want to edit.
2. Select “Rename Sample” to open the dialog box.
3. Press the text edit button to open the text edit
dialog box, and input the desired sample name (up
to 24 characters).
If the multisample is stereo and a stereo
sample is selected, you can input up to 22 characters
for the sample name. This is because the last two
characters are reserved for -L and -R. If you rename
up to 22 characters of the sample of either the L or
the R channel, the other sample will automatically
be renamed.
4. To execute the Rename Sample command, press
the OK button. To cancel, press the Cancel button.
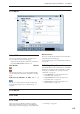
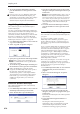
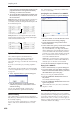
Move Sample
This command lets you move the currently selected
sample to the specified number (i.e., to change the
sample number), or to rearrange the sample numbers
so that they start from 0000 after samples have become
discontinuous as a result of creating or editing. (See
diagram below)
When you reassign the sample numbers, the sample
numbers within the multisamples and drum kits
(according to the setting of step 4) that use these
sample will also be automatically reassigned. (This
means that the samples of the multisamples and drum
kits need not be reassigned following this operation.)
0000: NewSample_0000
0001: NewSample_0001
"Copy Sample"
with Sample Data
Sample Data
Sample Memory
Sample Data
0000: NewSample_0000
0001: NewSample_0001
"Copy Sample"
Sample Data
Sample Memory