
User's Manual


Sampling P0: Recording 0–8: Audio Input
573
• 4: Sample Mono To Stereo. For more information,
see “Sample Mono To Stereo (Change Sample
Type)” on page 617.
• 5: Delete MS. For more information, see “Delete
MS (Delete Multisample)” on page 617.
• 6: Copy MS. For more information, see “Copy MS
(Copy Multisample)” on page 618.
• 7: Rename MS. For more information, see “Rename
MS (Rename Multisample)” on page 618.
• 8: Move MS. For more information, see “Move MS
(Move Multisample)” on page 619.
• 9: Convert MS To Program. For more information,
see “Convert MS (Multisample) To Program” on
page 618.
• 10: MS Mono To Stereo. This will appear only if
the current MS is Mono. For more information, see
“MS Mono To Stereo/MS Stereo To Mono (Change
Multisample Type)” on page 619.
• 10: MS Stereo To Mono. This will appear only if
the current MS is Stereo. For more information, see
“MS Mono To Stereo/MS Stereo To Mono (Change
Multisample Type)” on page 619.
• 11: Optimize RAM. For more information, see
“Optimize RAM” on page 139.
• 12: Select Directory. This applies only when Save
to is set to Disk. For more information, see “Select
Directory” on page 140.
• 13: Auto Sampling Setup. For more information,
see “Auto Sampling Setup” on page 620.
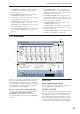
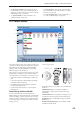
0–8: Audio Input
Here you can specify the output destination and input
level etc. for the external audio signals being input
from the INPUT jacks. Here you can also specify the
source that will be sampled, and specify how sampling
will be initiated. You can also specify a metronome
count-down before sampling begins.
Using the control surface to adjust Audio Input
You can use the control surface to adjust the Audio
Input Send1 (to MFX1), Send2 (to MFX2),
PLAY/MUTE, Solo On/Off, Pan, and “Level.”
For more information, please see “0–9c: Audio Inputs”
on page 22.
0–8a: Input
Input1, Input2, Input3, Input4
These are settings for analog inputs 1/4. Inputs 1/2 are
mic/line; inputs 3–4 are line-level only.
S/P DIF L, S/P DIF R
Here you can make settings for the digital audio input
from the S/P DIF IN jack. Connect the digital output of
your instrument or DAT etc. to the S/P DIF IN jack.
The S/P DIF input and output of the OASYS support
48 kHz and 96 kHz sample rates. Make this selection in
“S/P DIF Sample Rate” (Global 0–1d). 96 kHz sample
rate data is converted to 48 kHz when it is sampled.
0–8a
0–8c
0–8PMC
0–8d
0–8b