
User's Manual


Sequencer mode
530
3. The settings for the rest of the procedure will
depend on what you selected in step 2. (For
details, refer to the explanations below.)
If you selected Initialize:
1. Refer to Auto HDR/Sampling Setup steps 1 and 2,
and select Initialize.
2. Press the OK button to execute the command. If
you decide not to execute, press the Cancel button.
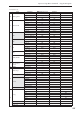
For more information, see “Auto HDR/Sampling
Setup: Automatically-set parameters and their
values” on page 533.
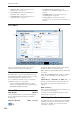
If you selected HDR (Audio Track Recording):
1. Refer to Auto HDR/Sampling Setup steps 1 and 2,
and select HDR (Audio Track Recording). Then
press the OK button to open the dialog box.
2. In “Source Audio,” select the external audio input
source.
If the external audio input source is monaural:
Audio Input1 (Mono)…4 (Mono): Selects the
analog audio signal from a mic, musical instrument
or other device connected to the AUDIO INPUT 1–4
jacks.
S/P DIF L(Mono), R(Mono): Selects the digital
audio signal from an instrument or DAT deck etc.
connected to the S/P DIF jack.
If the external audio input source is stereo:
Audio Input1/2(Stereo)…3/4(Stereo): Selects the
stereo analog audio signal from a musical
instrument or other device connected to the AUDIO
INPUT1/2 and 3/4 jacks.
S/P DIF L/R(Stereo): Selects the stereo digital audio
signal from an instrument or DAT deck etc.
connected to the S/P DIF IN jack.
If “Source Audio” is set to S/P DIF, change the
System Clock setting (Global 0–1d).
3. Specify whether you want to apply an insert effect
to the input source (i.e., to record the processed
signal). Choose the insert effect you want to use. If
you don’t want to use an effect, turn this Off.)
Note: If you’re using more than one insert effect,
make settings for the Insert FX page Chain
parameters after you execute Auto HDR/Sampling
Setup. For the last insert effect in the chain, set the
REC Bus to 1 (for a mono source) or 1/2 (for a
stereo source). (At this time, you will normally set
Bus Select to Off–but you don’t have to do so.)
Note: You can also record the input source to an
audio track without applying an insert effect, and
then send the output of the audio track through an
insert effect. Make the appropriate Bus Select
setting in the P8– Audio Routing 1 page for the
audio track you recorded.
4. Use “Recording Track” to specify the track(s) that
will be recorded.
If “Source Audio” is set to Audio Input 1 (Mono)–
Audio Input 4 (Mono), S/P DIF L (Mono), or R
(Mono), choose from Audio Track 1–16.
If “Source Audio” is set to Audio Input 1/2 (Stereo),
Audio Input 3/4 (Stereo), or S/P DIF L/R (Stereo),
choose from Audio Tracks 1&2–15&16. When you
execute the command, the “Stereo Pair setting will
be made automatically so that you can record in
stereo.
5. Press the OK button to execute the command. If
you decide not to execute, press the Cancel button.
For more information, see “Auto HDR/Sampling
Setup: Automatically-set parameters and their
values” on page 533.
Recording to the audio track(s) after executing the
command
1. Connect your instrument etc. to the AUDIO
INPUT jack you selected in “Source Audio,” and
use “Audio Track Recording Level” to adjust the
recording level.
2. Set “Location” to the location that you want to
record.
3. Press the SEQUENCER REC/WRITE switch and
then the SEQUENCER START/STOP switch.
(Recording will begin.)
4. Play the musical instrument etc. that is connected
to the AUDIO INPUT jack(s) you selected for
“Source Audio.”
5. When you have finished performing, press the
SEQUENCER START/STOP switch. (Recording
will stop.)
Check the audio track(s) that you recorded
• To listen to the audio track you recorded, press the
SEQUENCER START/STOP switch to play back
the track.
If you selected Bounce Audio Track:
1. Refer to Auto HDR/Sampling Setup steps 1 and 2,
and select Bounce Audio Track. Then press the OK
button to open the dialog box.