
User's Manual


Program P1: Basic/Vector 1–5: Vector Control
41
Finally, you can also assign +X to control the Master
Volume.
–X [Off…MIDI CC#119]
This assigns the controller sent by the –X vector. It will
be grayed out if the VJS X Mode, above, is set to
Positive.
The selections are the same as for +X, above.
VJS Y Mode [Positive, Negative, Xfade, Split]
This controls the Vector CC pattern for the Y axis. For
more information, see the description under VJS X
Mode, above.
+Y [Off…MIDI CC#119]
This assigns the controller sent by the +Y vector. It will
be grayed out if the VJS Y Mode, above, is set to
Negative.
The selections are the same as for +X, above.
–Y [Off…MIDI CC#119]
This assigns the controller sent by the +Y vector. It will
be grayed out if the VJS Y Mode, above, is set to
Positive.
The selections are the same as for +X, above.
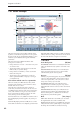
1–5c: Vector Graphic
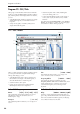
Vector Graphic
This is a diagram of the vector space, including the five
points of the Vector EG (labeled 0–4) and the current
position of the Vector Joystick (labeled J).
The transitions between the EG’s points are shown by
black lines, and the loop transition is shown by a gray
line.
Show Volume Image [Off, On]
The vector graphic includes an image representing the
current Vector Volume Control settings. You can use
the Show Volume Image check-box to toggle this part
of the graphic on and off.
Show Point [Vector Joystick,
Vector Envelope Point 0…4]
You can view the volume and CC values for the
current position of the Vector Joystick, or for any of the
EG’s five points.
Oscillator Volume & CC Display
This read-only display shows the volume and CC
values for the current Vector point, as selected by the
Show Point parameter, above.
▼ 1–5: Page Menu Commands
The number before each command shows its ENTER +
number-key shortcut. For more information on these
shortcuts, see “ENTER + 0-9: shortcuts for menu
commands” on page 138.
• 0: Write Program. For more information, see “Write
Program” on page 138.
• 1: Exclusive Solo. For more information, see
“Exclusive Solo” on page 138.
• 2: Copy Oscillator. For more information, see
“Copy Oscillator” on page 144.
• 3: Swap Oscillators. For more information, see
“Swap Oscillator” on page 144.