
User's Manual


Program P0: Play 0–1: Main
5
0…7: The programs will be shown by sub-category.
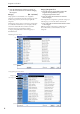
4. Select a program from the list.
You can touch a Program’s name directly, or use the Inc
and Dec buttons.
If there are more Programs than can be shown on the
screen at one time, use the scroll bar to browse through
the entire Category.
The Favorite button trims the list to show only
Programs you’ve marked as favorites. If the selected
Category contains no Programs marked as Favorites,
the button can’t be turned on.
5. Press the OK button to confirm your choice, or
press the Cancel button to exit without changing
the Program.
You can assign a category to a Program in the “Write
Program” dialog. For more information, see “Saving
your edits” on page 54 of the Operation Guide, and
“Writing a program or combination” on page 164 of
the Operation Guide.
Favorite [Off, On]
This button marks the Program as a “favorite,” which
makes it easy to find in the Bank/Program Select and
Category/Program Select dialogs.
Note that you must write the Program in order to save
changes to this setting.
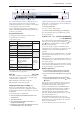
Tempo ( ) [040.00…240.00, EXT]
This is the tempo for the current Program, which
applies to tempo-synced LFOs and Wave Sequences,
the Vector EG, KARMA, and tempo-synced effects.
EXT means that the tempo will sync to external MIDI
clocks. You’ll see this if the Global MIDI page MIDI
Clock parameter is set to External MIDI, or if it’s set to
Auto and the OASYS is currently receiving MIDI
clocks. For more information, please see “MIDI Clock
(MIDI Clock Source)” on page 652.
040.00…240.00 allow you to set a specific tempo in
BPM, with 1/100 BPM accuracy. In addition to using
the standard data entry controls, you can also just turn
the TEMPO knob, or by playing a few quarter-notes on
the TAP TEMPO button.
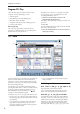
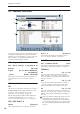
0–1b: Overview and Page Jump
This section shows an overview of the most important
Program settings, such as the selected Multisamples or
Wave Sequences and their velocity ranges, filter
settings, EGs and LFOs, and so on.
The graphics give you a quick way to check all of these
settings at a glance. They also let you jump instantly to
any of the displayed parameters. Just touch one of the
graphics, and you’ll jump to the page containing its
parameters. For instance, if you touch the Filter EG
graphic, you’ll go to the Filter EG page.
OSC1
OSC1 Multisample/Wave Sequence/Drum Kit
This area shows OSC1’s four Multisamples or Wave
Sequences. Colors and abbreviations are used to
distinguish between the various possibilities, as
detailed below.
• Red: ROM Multisamples
• Green: RAM Multisamples
• Blue: Wave Sequences
• Orange: Drum Kits
• Grey: Off
• Mn: Mono
• St: Stereo
Touch this area to jump to the corresponding Program
P2– OSC1 Basic page.
Key Zone
This indicates the key zone in which OSC1 will sound.
The 76- or 88-note keyboard region is also shown.
Touch this area to jump to the corresponding Program
P1– Program Basic page.
MS1…4, Velocity Zone Graphic
This shows the velocity zones for OSC 1 multisamples
1–4.
Touch this area to jump to the corresponding Program
P2– OSC1 Basic page.
OSC1 LFO1, OSC1 LFO2 Graphic
This shows the waveforms of OSC1 LFO1 and OSC1
LFO2. If “MIDI/Tempo Sync” is selected, this will
indicate “MIDI.”
Touch this area to jump to the corresponding Program
P5– OSC1 LFO1 page or OSC1 LFO2 page.
Filter 1
Filter Routing & Type
This shows the filter 1 routing and filter type.
Touch this area to jump to the corresponding Program
P3– Filter1 page.
Filter Page Graphic
This shows the cutoff frequency.
Touch this area to jump to the Program P3– Filter1
page.
Filter EG Graphic
This shows the shape of the filter 1 EG.
Touch this area to jump to the corresponding Program
P3– Filter1 EG page.
Amp 1
Drive, Low Boost, Pan, Amp Level
This area shows the Amp 1 Driver, Low Boost, Pan,
and Amp Level values.
If Bypass is on, Drive and Low Boost are not shown.
Touch this area to jump to the corresponding Program
P4– Amp1/Drive1 page.
Amp EG Graphic
This shows the shape of the amp 1 EG.
Touch this area to jump to the corresponding Program
P4– Amp1 EG page.