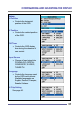
CONFIGURING AND ADJUSTING THE DISPLAY Configuring and Adjusting the Display : ANALOG(PC) Mode Using the system’s OSD menus, you can adjust and refine your monitor’s image. The following table describes the initial set-up steps and the other menus available. Remember, when using the buttons on the front of your monitor: Press the AUTO button to activate the auto adjustment function. Press the MENU button to display the main menu.
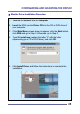
CONFIGURING AND ADJUSTING THE DISPLAY ★ Monitor Driver Installation Procedure 1. Turn on the monitor and the computer. 2. Insert the KDS monitor Driver CD into the CD or DVD drive of your computer. 3. If the Main Menu screen dose not appear, click the Start button, click RUN and go to Step 4. Otherwise, go to Step 5. 4. Type X:\ install.exe (replace the letter “X” with the letter representing your CD or DVD drive), and click OK. 5.
CONFIGURING AND ADJUSTING THE DISPLAY 6. To Change the Resolution or Refresh Rate: Right Click on your desktop to open the pop-up menu(for Windows 95/98/2000/XP). With the left mouse button, click on Properties to open the Display Properties menu. Click on the Setting tab and change to resolution desired. Click Apply or OK button, then click OK to keep the selected resolution. Go back to the Display Properties menu and click on the Setting tab. Select Advanced Properties and then click on Adapter.
CONFIGURING AND ADJUSTING THE DISPLAY Adjust the Initial Image: Vertical and Horizontal Alignment 7. If it is necessary to adjust the vertical position of the initial display: Vertical Position: Press the MENU button to display the main menu. Press the ◀▶buttons repeatedly to scroll to the Position icon. Press the SELECT button to select this menu item. Press the ◀▶buttons (repeatedly) to scroll to the Vertical Position icon on the sub-menu.
CONFIGURING AND ADJUSTING THE DISPLAY Adjust the Clarity of the lmage: Phase 9. If it is necessary to adjust the clarity of the image: Phase: Press the MENU button to display the main menu. Press the ◀▶buttons repeatedly to scroll to the Image icon. Press the SELECT button to select this menu item. Press the ◀▶buttons repeatedly to scroll to the Phase icon on thesub-menu. In the Phase sub-menu, press the ◀▶buttons to adjust the clarity of the image.
CONFIGURING AND ADJUSTING THE DISPLAY Adjust the Brightness and Contrast: 11. To change the overall image and brightness of the background screen: Brightness Press the MENU button to display the main menu. Press the ◀▶buttons repeatedly to scroll to the Brightness icon. Press the SELECT button to choose this menu item. Press the ◀▶buttons to adjust the brightness of the image. Once you have the brightness set to your liking, press the SELECT button. 12.
CONFIGURING AND ADJUSTING THE DISPLAY Explanation of Remaining Menu Items : ANALOG(PC) Mode The following table describes the other menus available. Figure 9: The Main Menus: Color Fine-tunes the viewing of color images and background settings. Preset 1 Sets the background as bluishwhite. Preset 2 Sets the background as plain white. User Color Controls the individual levels of red, green and blue.
CONFIGURING AND ADJUSTING THE DISPLAY Setup H Position Controls the horizontal position of the OSD. V Position Controls the vertical position of the OSD. Off Timer Controls the OSD display time during the absence of user control. Input Source Change of input signal into PC(ANALOG), DIGITAL, COMPOSITE, S-VIDEO, TUNER(TV) Language Controls the language used by the OSD menu promts. Available languages are English, Deutsch, Français, Español, Italiano. V-Chip Setting See page 40.
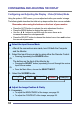
CONFIGURING AND ADJUSTING THE DISPLAY Configuring and Adjusting the Display : Video(S-Video) Mode Using the system’s OSD menus, you can adjust and refine your monitor’s image. The following table describes the initial set-up steps and the other menus available. Remember, when using the buttons on the front of your monitor: Press the AUTO button to activate the auto adjustment function. Press the MENU button to display the main menu.
CONFIGURING AND ADJUSTING THE DISPLAY Explanation of Remaining Menu Items : Video(S-Video) Mode The following table describes the other menus available. Figure 9: The Main Menus: Color Fine-tunes the viewing of color images and background settings. Color Control of color thickness signal level. Tint Control of color tone signal level. Sharpness Control of sharpness signal level.
CONFIGURING AND ADJUSTING THE DISPLAY Setup H Position Controls the horizontal position of the OSD. V Position Controls the vertical position of the OSD. Off Timer Controls the OSD display time during the absence of user control. Select Input Change of input signal into PC(ANALOG), DIGITAL, COMPOSITE, S-VIDEO, TUNER(TV) Language Controls the language used by the OSD menu promts. Available languages are English, Deutsch, Français, Español, Italiano. V-Chip Setting See page 40.
CONFIGURING AND ADJUSTING THE DISPLAY Configuring and Adjusting the Display : TUNER(TV) Mode Using the system’s OSD menus, you can adjust and refine your monitor’s image. The following table describes the initial set-up steps and the other menus available. Remember, when using the buttons on the front of your monitor: Press the AUTO button to activate the auto adjustment function. Press the MENU button to display the main menu.
CONFIGURING AND ADJUSTING THE DISPLAY ★ Select the Proper Antenna: AIR/CATV 5. At the initial display, select the antenna appropriate for your system by: Pressing the MENU button to display the Main Menu. Pressing the CHANNEL ▲▼buttons (repeatedly) to scroll to the CHANNEL option. Press the SELECT button to select the item. 6. At the CHANNEL sub-menu: If the AIR/CATV item is not highlighted, use CHANNEL ▲▼buttons to scroll to it. Press the SELECT button to fully highlight the AIR/CATV item.
CONFIGURING AND ADJUSTING THE DISPLAY ★ Other Sub-Menu Options: Manually Add/Remove Channels: 9. While in this sub-menu: Use the CHANNEL ▲▼buttons, to scroll to the MANUAL CHANNEL item. Press the SELECT button to fully highlight and view the options for this item. Use the CHANNEL ▲▼❂uttons, to choose the ADD or DELETE option as desired. Refining the Video Image: 10. While in this sub-menu: Use the CHANNEL ▲▼buttons, to scroll to the FINE item.
CONFIGURING AND ADJUSTING THE DISPLAY Explanation of Remaining Menu Items : TUNER(TV) Mode The following table describes the other menus available. Figure 9: The Main Menus: Color Fine-tunes the viewing of color images and background settings. Color Control of color thickness signal level. Tint Control of color tone signal level. Sharpness Control of sharpness signal level.
CONFIGURING AND ADJUSTING THE DISPLAY Setup H Position Controls the horizontal position of the OSD. V Position Controls the vertical position of the OSD. Off Timer Controls the OSD display time during the absence of user control. Input Source Change of input signal into PC(ANALOG), DIGITAL, COMPOSITE, S-VIDEO, TUNER(TV) Language Controls the language used by the OSD menu promts. Available languages are English, Deutsch, Français, Español, Italiano. V-Chip Setting See page 40.
CONFIGURING AND ADJUSTING THE DISPLAY ★ V- Chip Setting The Telecommunications Act of 1996 in USA requires that every television made, starting in 1998, must be equipped with the technological device named V - Chip. The V - Chip can block certain rated television shows off television (if chosen) so children cannot watch programs that their parents do not approve. With this device, program-rating information will be transmitted along with the television signal, and be decoded by the chip in each television.
CONFIGURING AND ADJUSTING THE DISPLAY 4. Setting up MPAA rating Mode E. Use Up/Down/Left/Right arrow buttons to move around the matrix and press Menu button to change the value from "U" to "B" or "B" to "U" F. MPAA : Motion Picture Association (of) America [movie rating organization] G U General Guidance PG U Parental Guidance Suggested PG-13 U Parental Strongly Cautioned R U Restricted Under 17 Requires NC-17 U No Children Under 17 Admitted X U Adult Only NR U Not Rated 5.
TROUBLESHOOTING How to Resolve Potential Problems This section tries to anticipate potential problems that you may encounter in the day-to-day use of your monitor and aims to provide simple solutions to solve the problem before it becomes more severe. If, after trying the suggested solutions, your monitor’s continues to experience the same problems, contact your authorized service center or call technical support.
TROUBLESHOOTING Problems Corrective Actions PICTURE IS SCRAMBLED Check the signal cable connection between your computer and monitor. PICTURE IS FUZZY Perform auto-adjustment function. PICTURE BOUNCES OR HAS WAVY OSCILLATIONS Check the signal cable connection between your computer and monitor. PICTURE APPEARS TO BE “GHOSTING” Check the signal cable connection between your computer and monitor. COLOR IS NOT UNIFORM Adjust the color settings using the OSD color menu.
APPENDIX CT1702 Display Modes (Analog) For the display modes listed below, the screen image has been optimized during production. Preset Timing Modes (Analog) Mode VGA SVGA XGA SXGA Display Mode Horizontal Frequency (KHz) Vertical Frequency (Hz) Standard Type 640 x 350 31.5KHz 70Hz IBM 720 x 400 31.5KHz 70Hz IBM 640 x 480 31.5KHz 60Hz Industry Standard 640 x 480 37.9KHz 72Hz VESA Standard 640 x 480 37.5KHz 75Hz VESA Standard 800 x 600 35.
APPENDIX CT1702 Specifications (Type:G0H) Type Pixel Pitch LCD Viewable Size Viewable Angle (CR ≥ 5) Glass Surface 17" (43.18Cm) Viewable Diagonal TFT Type 0.264 mm (H) x 0.
APPENDIX CT1702 Specifications (Type : G0S) Type Pixel Pitch LCD Viewable Size Viewable Angle (CR ≥ 5) Glass Surface 17" (43.18Cm) Viewable Diagonal TFT Type 0.264 mm (H) x 0.
APPENDIX CT1702 Specifications (Type : G1H) Type Pixel Pitch LCD Viewable Size Viewable Angle (CR ≥ 5) Glass Surface 17" (43.18Cm) Viewable Diagonal TFT Type 0.264 mm (H) x 0.
APPENDIX Regulatory Compliance Canadian Department of Communications Compliance Statement DOC: This Class B digital apparatus meets all requirements of the Canadian Interference-Causing Equipment Regulations. C-UL: Bears the C-UL Mark and is in compliance with Canadian Safety Regulations according to C.S.A. C22.2 No. 950. U.S.A U.S.
APPENDIX Notice for Japan This is a Class B product based on the standard of the Voluntary Control Council for Interference from Information Technology Equipment (VCCI). If this is used near a radio or television receiver in a domestic environment, it may cause radio interference. Install and use the equipment according to the instruction manual. CE Conformity The device complies with the requirements of the EEC directive 89/336/EEC as amended by 92/31/EEC and 93/68/EEC Art.