
User's Manual


CONNECTING
20
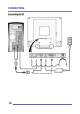
Other External A/V Devices to Your Monitor
1. Carefully unpack all the components and verify all the parts are present and
undamaged. (See page 8.)
2. Organize the cables you need and familiarize yourself with the connection
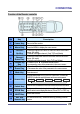
configuration for the CT1702, see pages 11 & 16.
3. With the Monitor laying screen-side down on a smooth, clean surface, flip
open the Monitor base.
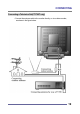
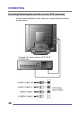
4. At the side of the Monitor, connect the RCA Cable and/or the S-Video Cable,
to the “AUD L”, “AUD R”, “VIDEO” and “S-VIDEO” locations, as appropriate.
5. Connect the round AC/DC Adapter Plug to the Monitor’s “PWR” connector.
6. Connect the Power Cord to the AC/DC Adapter.
7. If you are not connecting any more components (e.g. Tuner/Antenna),
continue with the remaining steps.
If you are connecting other components to the Monitor, continue to the next
appropriately labeled “CONNECTING” section.
8. On the external A/V device(s), if not done already, connect the RCA Cable
and/or the S-Video Cable, to the corresponding OUT “AUD L”,
“
AUD R”,
“VIDEO” and “S-VIDEO” locations, as appropriate.
9. Stand up your Monitor and adjust it for proper viewing. (See page 14.)
10. Plug in the Power Cord for the Monitor and other A/V devices to the wall
power outlet or surge protector.
11. Turn ON the Monitor and other A/V devices, as appropriate.
REMINDER:
Do not plug the Power Cord into the wall outlet/surg
e
protector yet.
TIP:
For easier access to the cable connections, keep th
e
monitor laying screen-side down on a smooth surface.