
Use and Care Manual
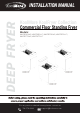

INSTALLATION
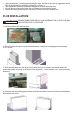
Setup:
• Remove all packaging material, tape, and protective plastic from the equipment.
• Position the equipment at your desired location and height.
• Attach the four (4) legs securely to the equipment.
• Prior to use, ensure the equipment is clean and completely dry.
• Follow these steps carefully to prepare and set up your equipment for safe and effective use.
Clearances and Location:
Clearances:
▪ Ensure proper space and accessibility for appliance servicing and operation.
▪ Minimum clearance from combustible construction: 6” (15 cm) from the SIDES of the fryer, 6”
(15 cm) from the BACK of the fryer. If using factory-approved leveling legs or casters, the
fryer may be installed on combustible floors; however, using any other mounting method
voids the warranty.
▪ Minimum clearance from noncombustible construction: 0” from the SIDES of the fryer, 0”
from the BACK of the fryer.
▪ Maintain a 16” (41 cm) clearance between the fryer and any open-top flame units or
unshielded heaters and burners. Consider using a Flame Guard if allowed by local codes and
officials.
Location:
▪ Installation must comply with local building codes and receive approval from authorized
building and fire inspectors before starting fryer operation.
▪ Install the fryer in an area with sufficient air supply for complete tube burner gas combustion.
▪ Do not obstruct the flow of the appliance’s combustion and ventilation air.
▪ Provide adequate clearance for air openings into the combustion chamber.
▪ Avoid fans blowing directly onto the fryer, which can impact burner or pilot valve
performance.
▪ Ensure proper room ventilation ducts to avoid any direct airflow on the appliance.
▪ Ensure the floor allows the fryer to sit level and securely for proper operation, service, and
cleaning.
▪ No electrical connection is needed; the standard control scheme uses millivolt components
and possibly a piezo igniter.
▪ If mobile, use an approved quick connect gas supply hose with a restraint cable to prevent
tipping and hot oil hazards.
▪ Install the fryer under an approved, operational, and properly sized ventilation exhaust hood
Before installing the fryer, verify that the type of gas (natural or liquid propane [LP]) agrees with the
specifications on the fryer data plate. The fryer data plate is located on the inside of the door panel.
Make
sure the fryer is configured for the proper elevation (height above sea level) of the facility.
Record the gas fryer model and serial number for future reference in the space provided below. This
information is on the fryer data plate. Also record the installation date.
Fryer Model No: ______________Installation Date:______________ Serial No:________________