
Installation Guide


10 of 10
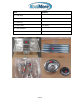
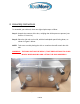
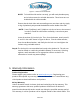
Figure 6 - Strainer Parts Breakdown
NOTE: To install the sink strainer correctly, you will need plumbers putty
and a locknut wrench or suitable alternative. These items are not
included with the sink assemble.
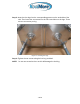
Ensure that the drain hole and surrounding areas are clean and dry. Apply
a ring of plumber’s putty around the drainhole on the inside of the sink.
NOTE: Parts E (tailpiece) and F (tailpiece nut) do not have to be removed
in order to install the sink strainer assembly. Leave these parts
attached.
Insert the strainer (A) into the hole. Then, from the bottom, attach parts B,
C and D in the order shown in Figure 6 above. First the rubber washer,
then the cardboard washer, and finally the the lock nut. Hand tighten the
locknut using a suitable wrench.
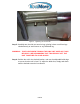
Step 8: The sink unit is now assembled and ready to be plumbed in. The unit can
now be affixed to a wall using suitable hardware, if necessary. If placing
against a wall, remember to use appropriate silicone sealant or an
alternative to contain any water spillage.
5. Warranty Information
Product Registration
Please register your product online at www.koolmore.com. Registering your
products will expedite any warranty claims and also allow us to communicate any
critical product-related notifications and updates.
90 Day Warranty
Unless otherwise stated, Koolmore sinks are backed by a 90-day warranty. This
warranty guarantees that new, qualified products will be free from defects in
material and workmanship under normal use during the specified warranty period.
This warranty is void on products sold or shipped outside of the United States. This