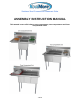
Stainless Steel Commercial Restaurant Sinks ASSEMBLY INSTRUCTION MANUAL This manual covers all Koolmore one compartment, two compartment and three compartment sinks.
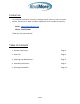
Contact us For assembly assistance, missing or damaged parts, please contact customer service. We’re here to help, customer satisfaction is our number one priority. Email: support@koolmore.com Phone: 718-576-6342 Thank you for your purchase! Table of Contents 1. General Information Page 3 2. Parts List Page 4 3. Cleaning and Maintenance Page 5 4. Assembly Instructions Page 6 5.
1. General Information This instruction manual covers the assembly procedures for all Koolmore one compartment, two compartment and three compartment sinks. The assembly instructions are identical for all three models of sink. NOTE: This manual does not include instructions for the plumbing of the faucets or drains. For those installations, please contact a qualified professional.
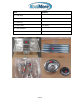
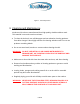
Item Quantity A. Sink Unit 1 B. Sink Legs 4 C. Hex Key 1 D. Set Screw 9 (1 spare) E. Sink Strainer 1 F.
Figure 1 - Sink Components 3. Cleaning and Maintenance Koolmore sink units are manufactured from high-quality, durable stainless steel. This material is rust and corrosion resistant. ● To clean the sink unit, use mild detergent and non-abrasive cleaning products. Pure white vinegar is also highly effective for cleaning stainless steel. Do not use products containing bleach. ● Do not use steel wool, brushes or scourers when cleaning the sink.
4. Assembly Instructions To assemble your sink unit, there are eight simple steps to follow. Step 1: Unpack the contents of the box, verifying that all the parts are present (see Section 2: Parts List). Step 2: Place the sink unit on its side, with the backsplash panel facing down, as shown in Figure 2 below. NOTE: Take care to avoid placing the sink on a surface that will scratch the sink unit. WARNING: THE SINK UNIT MAY BE HEAVY, TAKE PRECAUTIONS TO AVOID INJURY WHEN MOVING AND LIFTING THE SINK ASSEMBLY.
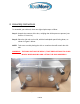
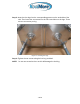
Step 3: Insert the four legs into the corresponding gussets on the underside of the sink. Then insert the set screws into the set screw holes on the legs. There are two set screws per leg. Figure 3 - Inserting the Legs Step 4: Tighten the set screws using the hex key provided. NOTE: Do not use excessive force as this will damage the sink leg.
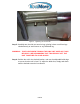
Figure 4 - Tightening the Set Screws Step 5: Carefully turn the sink over onto its legs, placing it down on all four legs simultaneously to avoid stress on any individual leg. WARNING: TAKE CARE WHEN TURNING THE SINK UNIT OVER AS IT MAY BE HEAVY. WE RECOMMEND THAT TWO PEOPLE LIFT THE UNIT TOGETHER TO AVOID INJURY. Step 6: Position the unit in the desired location, and use the adjustable bullet legs to ensure that the unit is level.
Figure 5 - Adjusting the Bullet Feet Step 7: The sink strainer consists of six parts, as shown in Figure 6, on the next page.These are: A. Strainer B. Rubber Washer C. Cardboard Washer D. Locknut E. Tailpiece Nut F.
Figure 6 - Strainer Parts Breakdown NOTE: To install the sink strainer correctly, you will need plumbers putty and a locknut wrench or suitable alternative. These items are not included with the sink assemble. Ensure that the drain hole and surrounding areas are clean and dry. Apply a ring of plumber’s putty around the drainhole on the inside of the sink. NOTE: Parts E (tailpiece) and F (tailpiece nut) do not have to be removed in order to install the sink strainer assembly. Leave these parts attached.
warranty is only valid to the original purchaser of Koolmore products. If a qualified product is found to be defective during this period, Koolmore will repair the defective product, replace any defective parts, or replace the defective product. What This Warranty Does Not Cover Koolmore will not warrant coverage for product failure or damages that arise under the following conditions: • Failure to install and/or use the unit within proper operating conditions.