
User Manual


SETUP
19793 Tablet PC stand
- The best way to present your Tablet
- Write, read, surf, look at pictures or watch videos - made easy
- Equally suited for the stage, home and studio.
- For tablets of all manufacturers - not bound to a specific brand
- Screen sizes (width: 163 - 242 mm, height: 102 - 189 mm)
- Helpful settings for quick setup and adjustments
- Provides any number of adjustments:
- Tablet Size, Adjustment Angle, Direction, Portrait/Landscape
SAFETY NOTES
Thank you for choosing this product. The instructions provide directions
to all of the important setup and handling steps. We recommend you
keep these instructions for future reference.
When mounting the Tablet PC ensure that it is property
placed and secured according to the instructions. K&M
is not liable in the case of improper use and associated
consequences i.e. damages!
- The stand surface must be suitable: even, load bearing
- and hard.
- Prior to use ensure that the stand is in working order
- Tighten the clamp screws by hand as far as they will go
- Place the Tablet PC carefully in position and
- tighten the screws, then check that the
- Tablet PC is securely in place
- Handle the holder with care, in particular
- when adjusting settings (angle, format)
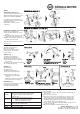
FIRST TIME PLACEMENT of the Tablet (3-10)
ATTACH Tablet to the STAND (2)
SETUP STAND (1)
* Scale settings are only examples (Selection of various Tablets see
* Supplementary Sheet)
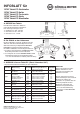
SETUP STAND (1)
1 a. Flip open the legs
1 b. Remove the base screw and drive the base
1 b. downwards as far as it will go; tighten the screw
1 c. Release the clamping bracket, Extend the
1 c. extension tubes and tighten the clamping bracket.
ATTACH Tablet to the STAND (2)
2 a. Turn the the stand's knurled disc as far
2 a. as it will go onto the stand’s threaded bolt
2 b. Screw the Tablet holder onto the threaded bolt
2 c. Tighten the knurled screw to the mount
FIRST TIME PLACEMENT of the Tablet (3-10)
3 First open the three knurled pins until
3 there is enough room to place the tablet
4 a. Release the upper support arm,
4 b. extend it out as far as it goes and
4 c. tighten the clamping screw.
5 a. Release side support arms and...
5 b. ...with the help of the scale symmetrically
5 b. extend to a rough position,
5 c. tighten both clamping screws.
6 Place the tablet into the corner supports to
6 ensure that it fits
6 a. Tablet is too narrow: Retract the support
6 a. arms a bit (symmetrically) until it fits.
6 b. Tablet is too wide: Extend the support
6 b. arms (symmetrically) until it fits.
6 c. Tablet fits, if the corner supports do not show
6 c. any space between the tablet and the holder
6 c. when looking at it from the side.
7 a. Place the tablet in both corner supports...
7 b. ...and hold the tablet
8 Retract the upper support arm
8 a. Release the clamp screw and retract the support arm...
8 b. ...until the tablet is securely held in place.
8 c. Tighten the clamping screw.
9 Gently clamp the tablet into the corner
9 supports by tightening the knurled pins
10 Your Tablet should be securely positioned now.
10 Please ensure that this is the case.
10 a. Does the Tablet sit securely in the holder
10 a. without any play?
10 b. Are the three knurled handles properly tightened?
10 c. Are the three plastic finger screws properly tightened?
If this is not the case, please refer to points 3-9.
fits fits
fits
Tab too narrow Tab too wide Tab fits
0