DVB-S2 REC20 MANUAL (p.
ENGLISH High definition DVB-S2 receiver Introduction: • We recommend that you read this manual before installing/using this product. • Keep this manual in a safe place for future reference. Contents GENERAL INFORMATION.............................................................................................................................. 4 MAIN FEATURES.......................................................................................................................................
4.5 Conditional Access (Not active for this model) ........................................................................ 19 4.6 Upgrade by USB...................................................................................................................... 20 4.7 Media Player............................................................................................................................ 21 4.8 Remove USB device safely .................................................................
GENERAL INFORMATION A Digital Satellite Receiver is a convenient product that allows you to view a variety of programmes via satellite. This user guide covers the installation of the DSR and the necessary steps to implement various features. This also explains special features available only in this DSR in detail, which will allow you to make full use of these features. Information presented in this document is subject to change.
7. Do not block any ventilation openings. Install in accordance with the manufacturer’s instructions. 8. Do not install near any heat sources such as radiators, heat registers, stoves, or other apparatus (including amplifiers) that produce heat. 9. If the provided plug doesn’t fit into your outlet, consult an electrician for replacing of the obsolete outlet. 10.
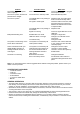
Problem The display on the front panel does not light up No sound or picture, but the front panel shows a red light. No sound or picture. Possible causes Main cable is not connected. The receiver is in stand-by mode. The satellite dish is not pointing at the satellite No signal or weak signal. The satellite dish is not pointing at the satellite. Signal is too strong. Bad picture/blocking error. The picture is not showing on the screen when switched on.
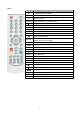
RCU Key Function Turns the DSR power ON/OFF When watching a channel, mutes the sound 0~9 TV/RADIO PR Enter the number of the required menu item or select a channel number to search Switches between TV and Radio mode Switches back to previous channel FAV Displays the favourite groups list SAT Displays the satellite window FIND Displays the Find window INFO Information on the current channel MENU To open the menu Page up and page down OK/LIST Executes the selected item in the menu screen or ent
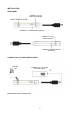
CONNECT TO POWER SUPPLY AND EXTERNAL IR-SENSOR External IR-sensor CONNECT TO THE POWER SUPPLY CONNECTING TO A USB DEVICE Satellite Dish USB or other removable device Note: Pictures are only for reference.
INSTALLATION REAR PANEL CONNECT TO A PC FOR S/W UPGRADE LNB IN: CONNECT TO LNB CONNECT TO A REMOVABLE DEVICE CONNECT TO THE POWER SUPPLY CONNECT TO AN INFRARED RECEIVER CONNECT TO A TV USING HDMI SUPPORT Satellite Dish CONNECT TO A TV USING AN HDMI CABLE Note: Pictures are for reference only.
MENU INFORMATION MAIN MENU Make sure that you have properly installed and connected the receiver cables. If the receiver is in factory status or there is no programme list (when the power is on), the Main Menu window will be displayed on the screen. During the normal TV/Radio mode, press the MENU key on the RCU to enter into the Main Menu window.
1 Edit Channels 1. Press the OK or key to pop up the “Input Password” dialogue box. You cannot enter the menu unless the correct password is input. The default password is “0000”. 2. Press the PR+, PR- keys to move the cursor up or down. 3. Press the EXIT or key to move the selection to the left menu. 1.1 TV Channel list 1. Press the keys to select the satellite. 2. Press the PR+, PR- keys to select the programme that you want to play and then press the OK key to view it in the small window.
7. Press the blue key to enter the Edit channel window. i. Sort (red key) Press the red key to open the Sort drop-down list. Name (A-Z): The ascending order, omitting the $ Character. The numbers are at the beginning, then capital letters, and finally lowercase letters. Name (Z-A): The opposite order from the above Name (A-Z). Free/Scramble: All FTA programmes are listed at the beginning, while all scrambled programmes are listed last. Lock: all locked programmes are listed last. ii.
1.2 Radio Channel List Same operation as 1.1 TV Channel List. Please look there for operation. 1.3 Delete All Move cursor to Delete All Items, and press the OK key to pop up the dialogue box “Warning! Do you really want to delete all channels?”. Press the EXIT key to pop up the dialogue box “Are you sure you want to save?”. Select the Yes option and press the OK key to save, or select the NO option and press the OK key to exit without saving. 2. Installation 1.
4. Press the green key to pop up the satellite window. Since it’s the same operation as the above Edit Satellite Window, Please read there for operation instructions. 5. Press the blue key to pop up the dialogue box “Are you sure you want to delete?”. Select the Yes option and press the OK key to delete the selected satellite. You can cancel this operation by selecting the NO option. 2.3 Antenna Setup Part A: Fixed Suppose that you have selected Fixed Antenna in the Antenna Connection window. 1.
Go to X: Press the OK key to open the drop-down list, select the proper position (reference or from 1 to 63), in order to activate the selected position. key to turn west, or press the key to turn east. West East: Press the Press the OK key to pop up the dialogue box “Are you sure you want to change this satellite’s position?”. Press the OK key on the Yes option to save the current position, or press the OK key on the NO option to cancel the operation.
2.5 Multi Satellite Search From the Multi Satellite Search window you can search several satellites at the same time. 1. Satellite: All selected satellites in the satellite list window are displayed in the lower section. You can press the keys to switch between them. 2. FTA Only: Press the keys to select between Yes and No. 3. Scan Channel: Press the keys to select between TV+Radio, TV Channel, Radio. 4. Network Search: Select between Yes and No.
5. Press the blue key to pop up the Search window. FTA only, Scan Channel, Network Search: Press the keys to select the proper option. Press the OK key to start searching. 3. System Setup 1. Press the OK or key to move the cursor to the right menu. 2. Press the PR+, PR- keys to move the cursor up or down. 3. Press the EXIT or key to move the selection to the left menu. 3.1 Language 1. Press the OK key to enter the Language window.
screen. In the wakeup message, you can select between Birthday, Anniversary, General. At the same time the duration item will turn grey. 3. Wakeup Date, On Time: Use the numeric keys to input the valid date. Duration: Set the gap time. After waking up, system will power off automatically after the duration time. Press the MENU or EXIT key to save and exit. 3.6 Parental Lock Before entering the Parental Lock window, you need to input the correct password. The default password is 0000. 1.
4.1 Information Press the OK key on the Information window. 4.2 Factory Setting Press the OK key to enter the Factory Setting window. Select the Yes option and press the OK key to return to the factory setting. All searched channels and set information will be erased. Select the No option and press the OK key to cancel this operation, or press the MENU or EXIT key to cancel and exit. 4.3 Upgrade By RS232 1.
4.5.1 About CA Info In the About CA Info sub-menu, you can view the basic information about this conditional access such as Card Status, CAS System ID, Interface Version, Card Number, Number of sessions, Country Indicator, and Maturity Level. 4.5.2 Change PIN The Change PIN window is designed for changing the smart card’s PIN, which is required if you want change the maturity level settings. In order to change the PIN, you must know the current PIN, also called the old PIN.
Select the upgrade mode and upgrade file, then you can start to upgrade by USB. 3. Press the OK key on the start button to start receiving data from the USB device. When the USB device is not connected, this item is grey, and you cannot edit it. 4.7 Media Player The USB menu will be automatically shown when inserting a U disk to the USB port except auto scan, multi picture, upgrade. Or open the USB menu via to Menu -> Tools-> USB. Press the OK button to enter this window.
4.8 Remove USB device safely Press OK on this item to pop up a dialogue box: “You can safely remove the USB device now!”, then you can remove your USB device safely. 5. Game 1. 2. 3. 4. Press the OK or key to open the game. Press the PR+, PR- keys to move the cursor up or down. Press the EXIT or key to move the selection to the left menu. Select the game that you want to play and press the OK key to enter the window. 6. REC (Not available for this model) 6.
7.2 EPG Press the EPG key to enter the EPG window. 1. Press the PR+, PR-, keys to select up or down, left or right. 2. Press the red key to pop up the Time Bar window. Press the PR+, PRkeys to select up or down, while pressing the keys to select left or right in the time bar. : Press the OK key on this button to return to the EPG window. : Press the OK key on this button to move the cursor to the current time line. : Press the OK key to push the time forward or backward by half an hour.
7.10 OK 1. During viewing or listening, press the OK key to pop up the TV programme list or the Radio programme list. 2. Press the PR+, PR- keys to select the channel up or down, and then press the OK key to play this channel in full-screen. 3. Press the keys to select the satellite. 4. Press the MENU or EXIT key to close this window. 7.11 Audio 1. Press the keys to enter the Audio window. 2. Press the keys to select between Left, Right, Stereo and Mono. 3.
6. Press the OK key on the star button to begin updating. Press the green key to delete the number or characters and press the red key to switch the input mode. 8.4 Weather forecast Press the green key to enter city Press the yellow key to delete city Press the red key to update 8.5 RSS reader RSS channel list is on the left side of the window. RSS news list is on the right side of the window.
Safety precautions: To reduce risk of electric shock, this product should ONLY be opened by an authorized technician when service is required. Disconnect the product from mains and other equipment if a problem should occur. Do not expose the product to water or moisture. Maintenance: Clean the product only with a dry cloth. Do not use cleaning solvents or abrasives. Warranty: Any changes and/or modifications to the product will void the warranty.
Declaration of conformity We, Nedis B.V., De Tweeling 28, 5215MC, ’s-Hertogenbosch The Netherlands Tel.: 0031 73 5991055 Email: info@nedis.