Digital Still Camera Thank you for your purchase. For the correct usage of this product, please read this User's Manual and warranty card carefully and keep them in a safe place for future reference. Before accepting the warranty card, please make sure that the date of purchase and the dealer's details have been completed.
122mm+-2 Table Of Contents Table Of Contents Getting Started ------------------------------------------------------------------------04 Important Safety Precautions ------------------------------------------05- 09 Overall Introduction---------------------------------------------------------- 10- 14 Accessories ---------------------------------------------------------------------------------10 External View ------------------------------------------------------------------------11-1 2 Mode Dial (Working
122mm+-2 Important Safety Precautions Getting Started Please be sure to read this manual before use. Test shooting Be sure to take some test shots before taking important pictures (such as business or weddings) to make sure that the camera is working properly. Results are not guaranteed In the unlikely event that a problem arises in shooting or reproducing pictures due to the camera or memory card used, please understand that no compensation can be made.
122mm+-2 Important Safety Precautions Important Safety Precautions Warning Warning Should any of the following occur, stop using the product immediately. Remove the batteries from the unit and disconnect the AC adapter. If using the AC adapter, disconnect the power plug from the wall outlet. Consult the dealer from whom you bought the product for further assistance. Continued use of the product may result in fire or electrical shock.
122mm+-2 Important Safety Precautions Important Safety Precautions Caution Caution When taking a picture, wipe off the flash surface and be careful not to cover the flash. If the flash surface is dirty or you take a shot with the flash covered, it is possible for the flash surface quality or color to change, due to the high temperature of the flash. Check that the polarity is correct when inserting batteries.
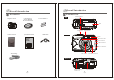
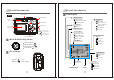
122mm+-2 Overall Introduction Overall Introduction Accessories External View Shutter Button Digital Camera CC LE NS Camera Driver & User Manual & Ulead Software 2 x AA Batteries Top MIC D SE N S O R f = 5. 1 m m 1 :2. 9 Mode Dial Camera Pouch Quick Start Guide USB Cable View Finder Front Flash Quick Start Guide KO Self-timer LED Focus Switch N I C A L E NS USB Connector CC LE NS D SE N S O R f = 5. 1 m m 1 :2 .
122mm+-2 Overall Introduction Overall Introduction Icon Display View Finder Back Menu Button Battery Status ( ) Battery full ( ) Battery half drained ( ) Battery drained Strap Eyelet Focus Range ( )Macro Power Switch LED Indicator TFT LCD Monitor Digital Zoom Up ( )Direction Button Down ( )Direction Button Left ( )Direction Button Right ( )Direction Button Working Mode ( )Shooting mode ( )Playback mode ( )Movie clip mode ( )Setup mode TFT LCD Button Mode Dial(Working Mode) Shooting Mode ( ) )
122mm+-2 Overall Introduction Getting Ready Icon Index Table Switch On or Off the Camera Slide the "POWER" switch sideways and hold it awhile to switch on the camera. Repeat the action above to switch off the camera. Working Mode Focus Range Flash Modes X4 Digital Zoom Loading the Batteries X1 1. Check if the camera is switched off. 2. Slide the Battery / Memory Card Cover out to open it. 3. Load 2 x AA batteries into the battery chamber, following the polarity indications. 4.
122mm+-2 Getting Ready Getting Ready Note 1. Do not change the battery with wet hands, as there is a danger of electric shock. 2. Warning When you continue using the camera for a long time, the batteries become hot. Contact with the batteries can lead to burns. Never open the battery/card cover while the camera is accessing the card or processing images. Do not leave the battery anywhere where the temperature 0 0 may reach 60C (140 F), such as inside a car, in the sun, near a heater, etc.
122mm+-2 Getting Ready Getting Ready Note If a new SD card is used, it is necessary to format it first. Please refer to page 33 for details. Note Images can be stored either in the camera's built-in flash memory or in the memory card. If a memory card is inserted, images will automatically be stored in it . If no memory card is inserted, images will automatically be stored in the built-in flash memory. Removing an SD Card 1. 2. 3. 4. Ensure that the camera is switched off.
122mm+-2 Getting Started Getting Started Basic Photography Important Ÿ Ÿ Ÿ Ÿ Ÿ In the event of malfunction or damage, it is possible that data may be lost. Konica can not accept responsibility in any way for such data loss. Ÿ Always back-up important data. Ÿ When using SD Memory Cards on a PC, do not change the attributes(read-only, etc.) of the files (image data) on the card. Doing so may prevent the camera from working properly when deleting images, etc.
2mm+-2 Advanced Functionality Settings Under Shooting Mode ( ) Advanced Functionality Settings Setting Self-timer (Preset: Off) Setting Focus Range 9 SET Macro ( Normal ( ) : 0.2m ) : 0.8m~infinity Turning the TFT LCD Monitor On or Off (Preset: On) You can change the icon display on the TFT LCD Monitor, turn it off, and turn it on again by pressing the LCD button repeatedly. The self-timer starts and counts down for 10 seconds.
122mm+-2 Advanced Functionality Settings Advanced Functionality Settings Setting Image Quality (Preset: Fine Quality) Setting Image Size (Preset: 2048 x 1536) STILL IMAGE 1/2 STILL IMAGE 1/2 IMAGE SIZE QUALITY VOICE MEMO EXPOSURE EXIT:MENU IMAGE SIZE QUALITY VOICE MEMO EXPOSURE EXIT:MENU 10 SEC 0.0 CHANGE: STILL IMAGE 1/2 IMAGE SIZE 2560X1920(XL) 2048X1536(L) 1600X1200(M) 1280X960(S) EXIT:MENU SET: Step Step :To enter the setting mode 10 SEC 0.
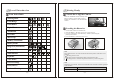
122mm+-2 Advanced Functionality Settings Advanced Functionality Settings Setting Voice Memo (Preset: 10 SEC) Four resolutions can be selected as shown below: STILL IMAGE 1/2 Image Size Compression Ratio SD Memory Card Sandisk 64MB 2560x1920(XL) SUPER FINE FINE NORMAL About About About 33 Photos 70 Photos 99 Photos 2048x1536 (L) SUPER FINE FINE NORMAL About 43 Photos About 91 Photos About 142 Photos 1600x1200 (M) SUPER FINE FINE NORMAL About 84 Photos About 179 Photos About 264 Photos IMAGE
122mm+-2 Settings Advanced Functionality Setting Advanced Functionality Settings Setting Exposure (Preset: +- 0) Setting White Balance (Preset: Auto) STILL IMAGE 1/2 STILL IMAGE 1/2 IMAGE SIZE QUALITY VOICE MEMO EXPOSURE EXIT:MENU IMAGE SIZE QUALITY VOICE MEMO EXPOSURE EXIT:MENU 10 SEC 0.0 CHANGE: STILL IMAGE 1/2 STILL IMAGE 2/2 WHITE BALANCE 10 SEC 0.0 CHANGE: EXIT:MENU EXIT:MENU SET: WHITE BALANCE AUTO AUTO EXIT:MENU AUTO CHANGE: STILL IMAGE 2/2 WHITE BALANCE +0.
122mm+-2 Advanced Functionality Setting Settings Under Playback Mode( Advanced Functionality Settings Displaying Information about an Image ) Exploring an Image 100-0002 100-0002 x4 100-0002 SIZE: 2048x1536 DATE: 2003/01/27 TIME: 17:16:56 FLASH: FIRED x1 EXIT:MENU SET: Playback of a Movie Clip 100-0002 EXIT:MENU Step :To enter the setting mode Step :To explore the image 100-0002 100-0002 100-0002 EXIT:MENU Step :To zoom in/out and enter the option Step :To exit from the setting No
122mm+-2 Advanced Functionality Settings Advanced Functionality Settings Thumbnail Images (Small Images) Display 100-0002 Deleting Image(s) 100-0002 PLAY DELETE SLIDE SHOW PROTECT PRINT EXIT:MENU PLAY DELETE SLIDE SHOW PROTECT PRINT EXIT:MENU 1 SEC LOCK XO CHANGE: Note Press the Up ( ) and Down ( ) Direction Buttons to search for images or movie clips and press Right ( ) Direction Button to view a movie clip.
122mm+-2 Advanced Functionality Settings Advanced Functionality Settings Setting Image Protection Formatting the Built-in Flash Memory Ensure that there is no memory card inserted into the camera. Refer to page 33 and follow the steps, selecting "FORMAT" in step 3 , "YES"in step 4.
122mm+-2 Advanced Functionality Settings Advanced Functionality Settings Under Movie Clip Mode( Printing Out Images without a PC(Preset : X0) PLAY DELETE SLIDE SHOW PROTECT PRINT EXIT:MENU PLAY DELETE SLIDE SHOW PROTECT PRINT EXIT:MENU 1 SEC LOCK XO CHANGE: PLAY 1 SEC LOCK XO CHANGE: MOVIE CLIP TIME 10 SEC 20 SEC 30 SEC MANUAL EXIT:MENU MOVIE CLIP TIME 10 SEC 20 SEC 30 SEC MANUAL EXIT:MENU SET: SET: PRINT XO EXIT:MENU Step Setting the Recording Time of a Movie Clip PLAY PRINT Step )(Prese
122mm+-2 Advanced Functionality Settings Under Setup Mode ( ) Setting Date Stamp (Preset : On) Setting Beep Sound (Preset : On) SETUP 1 / 2 BEEP POWER OFF DATE STAMP DATE TYPE SETUP 1 / 2 SETUP 1 / 2 ON 2 MIN ON YMD CHANGE: BEEP POWER OFF DATE STAMP DATE TYPE SETUP 1 / 2 BEEP ON YES EXIT:MENU SET: Advanced Functionality Settings ON 2 MIN ON YMD CHANGE: Step :To enter the setting mode Step :To select and enter the option Step :To select and confirm the option Step :To exit from the setting
122mm+-2 Advanced Functionality Settings Setting Date Setting Language SETUP 2 / 2 DATE SET QUICK VIEW LANGUAGE RESET SETUP 2 / 2 DATE SET QUICK VIEW LANGUAGE RESET ON ENGLISH CHANGE: SETUP 2 / 2 ON ENGLISH 2003/01/06 14 : 19 EXIT:MENU SET: Step :To enter the setting mode Step :To select and enter the option Step :To set up the date Step :To exit from the setting Setting Quick View SETUP 2 / 2 DATE SET QUICK VIEW LANGUAGE RESET ON ENGLISH CHANGE: ON ENGLISH CHANGE: SETUP 2 / 2 LANGUAGE
122mm+-2 PC Connection PC Connection Installing the Camera's Driver Under Microsoft Windows 98 / 98SE Step Step : Insert the CD into the CD- ROM Drive. The installation program should run automatically. Click Driver to start with the installation. Step : Please select "Yes" and click "Finish" to restart the computer . : A welcome window appears. Click "Next" to the next step. Note In certain circumstances, the installation program may not run automatically.
122mm+-2 PC Connection PC Connection Step Under Microsoft Windows 2000 Step : Step Insert the CD into the CD- ROM Drive. The installation program should run automatically. Click Driver to start with the installation. : Click "OK" to proceed the installation of DirectX8.1. Note In certain circumstances, the installation program may not run automatically. If this happens, please go to the Start Menu, click "Run"and key in "CD-ROM Drive :\Auto Run.
122mm+-2 PC Connection PC Connection Installing Ulead Photo Explorer Under Microsoft Windows ME / XP The camera's driver is not required under Windows ME and Windows XP. So, go to page 47 for installation of Ulead Photo Explorer or go to page 61 to download the stored image(s) onto the PC. Please click "OK" if the prompt below appears. Under Windows Operating System (Windows 98/98SE/2000/ME/XP) Step Step Under Mac OS9.X or later This camera supports only Mac 9.
122mm+-2 PC Connection PC Connection Step : Step : Step : Step : Please read the content of the agreement first and click "Yes" to go the next step. Please enter your name and your company's name, clicking "Next". As a new folder named "Ulead Photo Explorer 7.0 SE Platinum" is generated, click "Next" to go to next step. Set up the default TV system. Please select the country you are in.
122mm+-2 PC Connection Step PC Connection Under Macintosh Operating System (Mac 9.X or later) : If the operating system you are using is Windows 98, 98SE or ME, restarting the computer to complete the installation of Ulead Photo Exlorer 7.0 SE Platinum is required. Please click "Finish" to complete the installation and restart the computer. Step : Turn on the computer. Step : Insert the CD into the CD-ROM Drive. The computer will create an icon named "Driver CD" on the desktop.
122mm+-2 PC Connection Step PC Connection : Note If a warning window shows please visit Apple's official web-site http:// kbase.info. apple.com to download the latest version of CarbonLib. Choose "Ulead Photo Explorer" and copy this file to the desktop. About Ulead Photo Explorer Software license The software described in this document is furnished under a License Agreement which is included with the product. This Agreement specifies the permitted and prohibited uses of the product.
122mm+-2 PC Connection PC Connection The Browser System requirements Before installing Photo Explorer, make sure your computer meets these requirements: Intel Pentium processors (or 100% compatible processors) Microsoft Windows 95/98, NT 4.0, 2000 or higher 32 MB RAM (or more) 17.8 MB available hard drive space for program files True Color or HiColor display adapter and monitor (recommended) 800 X 600 minimum display resolution Windows compatible pointing device Microsoft Internet Explorer 4.
122mm+-2 PC Connection PC Connection Using the Ulead Photo Explorer Browser: Area Zoom in Zoom out Function Function Describe Icon Or igina l s i z e Open viewer F i t t o s c re e n Open new viewer R o t a t e l e ft Back P r e v i e w Pa n e Invert Forward R o t a t e r ig h t Rotate left Im a g e P r o p e r t i e s Rotate right Delete Slider of Zoom in/out Digit al ca mera wizard TWAIN acquire N u m b e r o f s e l e c t e d fi l e s Slide show New Main Toolbar Auto rename Open C
122mm+-2 PC Connection PC Connection Package Create Slide Show Disc The Viewer Photo Explorer has a built-in Viewer integrated with the Browser. You can use the built-in Viewer to: Stitch Panorama Share Show Slide Show Options Close Get a full-size or full-screen view of images. Navigate through images using the keyboard, toolbar buttons, or menu commands, or let Viewer automatically step through the images. Copy, rename or delete an image file. Copy an image for pasting onto your desired image editor.
122mm+-2 PC Connection PC Connection Downloading the Image(s) Using the Ulead Photo Explorer Viewer: Area Icon Function Describe Open E xplorer Open Print Image First image Previous Next Last image Main Toolbar Zoom In Under Windows Operating System (Windows 98/98SE/2000/ME/XP) Downloading Image(s) From Removable Disk 1. Turn on the PC. 2. Switch on the camera. 3. Connect the camera to the PC with USB cable under any working mode. Please make sure the USB cable is well connected to the PC and camera.
122mm+-2 PC Connection Appendix Downloading the Image(s) Under Macintosh Operating System (Mac 9.X or later) Downloading Image(s) From Removable Disk 1. Turn on the PC. 2. Switch on the camera. 3. Connect the camera to the PC with USB cable under any working mode. Please make sure the USB cable is well connected to the PC and camera. 4. When the USB cable is connected to the PC, it will create a new icon named "untitled" on the desktop. 5. Double click on the icon. 6.
122mm+-2 Appendix Appendix Specifications Specifications Image Sensor Lens LCD Display Viewfinder Focusing Shutter Exposure Flash I/2.7" CCD Approx. 3.3 Mega pixels Approx. 3. 14 Mega pixels f=5.1mm (35mm film equivalent: 34mm) F2.9 / F8.0 Capture Mode:4x (continuous) & Play Mode:4x (continuous) 1.6" color TFT LCD (80k pixels) Optical Viewfinder Optical virtual image viewfinder Fixed Focus with two steps manual adjustment Type Macro: 0.2m, Normal: 0.
122mm+-2 Warranty and After-sales Service For repair, handling and care, first consult the dealer from whom you purchased the camera. Warranty (separately attached) Before accepting the warranty card, please make sure that the date of purchase and dealer of purchase and the dealer's details have been completed. After reading the warranty, keep it in a safe place.
122mm+-2 Warranty and After-sales Service CANADA ONLY Industry Canada's Compliance Statement: This Class B digital apparatus complies with Canadian ICES-003.