
Operating Guide


14 34 590 01 Rev. AKohlerPower.com
Available Accessories
The most customizable generators the job site has ever seen.
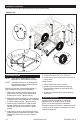
Mobility Kit
Install Mobility Kit
NOTE: Place blocks underneath to raise
generator to install wheels and legs.
NOTE: A clamping device or an assistant to
hold assembly while installing kit will
make process easier.
Mobility kit includes 2 solid rubber wheels, 2
legs, 4 handles and mounting hardware.
1. Align cross member holes at center and
place screw into hole. Insert washer and
thread nut to screw. Tighten loosely.
2. Assemble rubber bumpers to cross member
and axle brace. Insert washer and thread nut
to rubber bumper screw. Tighten loosely.
3. Position legs under frame. Install screws
through frame into cross member. Insert
washer and thread nut to screw. Tighten
loosely.
4. Align holes in axle to axle brace and frame.
Install screws through frame and axle. Insert
washer and thread nut to screw. Tighten
loosely.
5. Torque all nuts to 221 in. lb. (25 N·m).
6. Install wheels onto axle, push cotter pin into
hole in axle.
Install Handle:
1. Align handle with holes on frame.
2. Install screws with washers through leg.
Place another washer on other side and
thread nut on.
3. Tighten screws enough to allow handle to
move free.
Wireless Remote Kit
Wireless remote for starting or stopping
generator from a distance of up to 164 ft.
(50 m). No tools required for installation.
Wireless remote kit includes 1 wireless remote,
1 receiver which plugs into generator (AI) and
mounting hardware.