
Installation Guide

2
113425-2-CA (9501)
Kohler Co., Kohler, WI
TOOLS AND MATERIALS REQUIRED
• Assortment of screwdrivers
• Adjustable or open end wrenches
• Adjustable arc pliers
• Plumbers putty
• Supply tubes
• Tubing cutter
• Thread sealant
TOOLS & MATERIALS OPTIONAL
• Shut-off valves
INSTALLATION
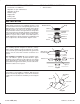
Slide shank escutcheon over end fittings and hose, and
over threaded shank of faucet body. Slide gasket over end
fittings and hose, and over threaded shank of faucet body
until the gasket seats into recess in shank escutcheon.
Feed inlet tubes and hose through sink hole and position
faucet onto sink. Faucet handle should face forward when
centered between full hot and full cold in the off position.
Pull hose up into faucet shank - flush with bottom of
shank. Slide washer, bracket and nut over end fittings and
hose. Tighten nut to threaded shank. Tighten screws.
Fig. #1
Body
Screw
Bracket
Gasket Groove
Gasket
Washer
Nut
Faucet
Shank
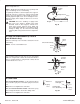
For installing optional elongated escutcheon, (3-hole):
Place a ring of plumbers putty on underside of escutch-
eon. Center the spacer with gasket attached, (gasket side
down), over the center hole. Position escutcheon over
spacer.
For installation on marble: Do not use plumbers putty.
Use self-adhesive gaskets provided. Remove paper
backing to expose adhesive. Center gaskets over outside
holes, apply adhesive side down. Center the spacer with
gasket attached, (gasket side down), over the center hole.
Position escutcheon over spacer.
Fig. #2
Body
Faucet
Shank
Optional
Escutcheon
Spacer
GasketGasket
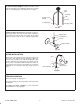
Unscrew the setscrew with a screwdriver. Slide the spout
into the faucet body. Tighten the setscrew. The hot water
supply valve is located on the left when you are facing the
sink.
Spout
Threaded
Hole
Setscrew
Fig. #3