
Installation Sheet

Installation Guide
SKU#27859
USA/Canada: 1-800-4 KOHLER 1446230_8_A
www.kohler.com
PREPARATION
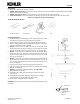
1. Record your model number for future reference.
2. DANGER: Risk of electric shock. To avoid electric shock, the power must be turned off at the circuit breaker or fuse box before
beginning the installation procedure.
3. DANGER: Risk of electric shock. To avoid electric shock, the outlet box must be properly grounded.
4. Important Information. Inspect the product for any damage. This product is for indoor use only. Observe all local codes.
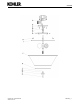
Please see next page for a larger installation image
TOOLS AND MATERIALS NEEDED
FIXTURE INSTALLATION
1. Remove the fixture and parts bag(s) from the carton. Put them onto a clean
and soft cloth to protect finish. Confirm all parts are included.
2. Loosen screws (G) and then remove mounting plate (B) from canopy (F).
3. Attach mounting plate (B) onto outlet box with screws (D). Ensure ground
screw (C) is attached to mounting plate (B).
4. NOTICE: To avoid short circuit, make sure wires are not exposed. Fasten
fixture green or bare ground wire to the green or bare copper wire in outlet
box with wire nut (A) or fasten onto ground screw (C) on mounting plate.
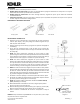
5. NOTICE: To avoid short circuit, make sure wires are not exposed. Fasten
fixture white wire to the white wire in outlet box with wire nut (A). Wrap
the wire connector with electrical tape so that the tape seals the end of
wire nut (A), see diagram 1.
6. NOTICE: To avoid short circuit, make sure wires are not exposed. Fasten the
fixture black wire to the black wire in outlet box with wire nut (A). Wrap the
wire connector with electrical tape so that the tape seals the end of wire
nut (A), see diagram 1.
7. Insert quick connector (E) into the opposing quick connector end.
8. Tuck wires carefully inside outlet box. Attach the canopy (F) onto mounting
plate (B) with screws (G).
9. NOTICE: Do not exceed recommended wattage. Rated Max 60 W,
Type A. (Bulb(s) not included).
10. Install bulbs into sockets, and then attach fabric shade (J) to frame (I)
with screw (H).
11. Install diffuser (K) onto fabric shade (J) with washer (L) and nut (M).
Install decorative cap (N) onto diffuser (K) with finial (O).
12. Restore power to circuit at breaker or fuse box.
CLEANING: Please clean fixture with a soft and dry cloth ONLY. Clean glass with
a mild soap.
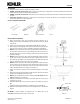
Phillips &
Flathead Screwdriver
Wire
Cutter/stripper
Electrical Current
Tester
Electrical
Tape
Approved fastener
(Wire nut)
Electrical ta
p
e
Diagram 1