
User`s guide


Appendix A
96 VirtualReScan (VRS) User’s Guide
sources by selecting the “Set as Default” option from the Scanner
Configuration Utility dialog box.
Help: Use this option to access the online Help topic for the Configure Sources
dialog box.
Close: Use this option to exit the Configure Sources dialog box.
Restoring VRS Default Settings
The VRS default settings have been carefully chosen to ensure that VRS excels with a
wide range of documents and scanners without requiring adjustments. A unique set
of VRS property settings is available for each VRS-certified scanner, and they go into
effect when that scanner is in use. In the day-to-day use of VRS, the default settings
may inadvertently be altered. From the Scanner Configuration Utility, you can use the
Restore VRS Defaults function to restore the VRS original default settings for the
selected device and also set it as the default scanner source.
In earlier versions of VRS, the Restore Default Values (RDV) utility was used to reset
VRS default values. The RDV utility has been discontinued and replaced with the
“Restore Default Values” function in the Scanner Configuration Utility.
If you have a copy of the RDV utility from an earlier release, the utility will
automatically be removed when you install Kofax Capture 8.0 or VRS 4.2.
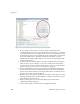
X To restore VRS default settings
1 From the Scanner Configuration Utility dialog box, use the “Available image
devices” list to locate the scanner that you have configured for use with VRS.
2 Select your scanner from the list.
3 Click Restore VRS Defaults.
Note The Restore VRS Defaults function is not available unless sources have
been configured for the selected scanner.
Notice that the “Current default scanner” and “Current default source”
entries will be updated at the bottom of the Scanner Configuration Utility
dialog box.
4 Click Close to exit the Scanner Configuration Utility.
When you start VRS, you will notice that the panels in the VRS Adjustment
Controls will be updated with the original default settings.