KOFAX Front-Office Server 2.
© 2007–2009 Kofax, Inc., 15211 Laguna Canyon Road, Irvine, California 92618, U.S.A. All rights reserved. Use is subject to license terms. Third-party software is copyrighted and licensed from Kofax’s suppliers. For information on third-party software included in this product, see “KFSTHIRDPARTYLICENSEREDME.txt.” This product is protected by U.S. Patent No. 6,370,277. THIS SOFTWARE CONTAINS CONFIDENTIAL INFORMATION AND TRADE SECRETS OF KOFAX, INC.
Contents How to Use This Guide ................................................................................................................................7 Introduction ............................................................................................................................................7 Related Documentation ........................................................................................................................7 Training ...........................................
Contents Registry Access ....................................................................................................................................20 Restarting the Server ...........................................................................................................................20 Invalid Drive Path ...............................................................................................................................
Contents Troubleshooting Migration ................................................................................................................39 Post-Installation and Upgrade Notes ......................................................................................................39 Licensing ...............................................................................................................................................39 Editing Default Roles after Migration ..........................
Contents 6 Kofax, Inc.
Kofax Front-Office Server Installation Guide How to Use This Guide Introduction This guide includes instructions on installing Kofax Front-Office Server. Read this guide completely before using the software. This guide was written with the assumption that you have a thorough understanding of Microsoft Windows and network configuration. Related Documentation In addition to this guide, Kofax Front-Office Server includes the following documentation.
Kofax Front-Office Server Installation Guide Multifunction Peripheral (MFP) Administrator Guides These guides show how to make Kofax Front-Office Server features available on MFP front panels. The MFP administrator guides are in the \setup\Guides folder on the Kofax Front-Office Server installation media. They are also installed with the software in the \Documentation\Guides folder.
Kofax Front-Office Server Installation Guide If you need to contact Kofax Technical Support, please have the following information available: Kofax Front-Office Server software version and build number Operating system and service pack version MFP or scanner make and model Kofax Document Scan Server version Destination type name, version, and configuration Special/custom configuration or integration information Overview Kofax Front-Office Server enables documents from a variety of sources, in
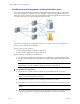
Kofax Front-Office Server Installation Guide Load Balancing with IIS Components for Kofax Front-Office Server You can use the integrated JK load balancer installed by Kofax IIS Components. You install the Kofax IIS components on an IIS Web server to distribute requests among multiple Kofax FrontOffice Server nodes. The Kofax IIS components installer installs and integrates the Apache Tomcat Connector (also known as mod-jk or JK) load balancer into IIS. Figure 2.
Kofax Front-Office Server Installation Guide 5 Accept the default installation path of C:\Program Files\Kofax\IIS Components for KFS, or browse and choose another location. Click Next. 6 Choose the folder that is shared by the Kofax Front-Office Server nodes. Click Next. 7 The Proxy Server screen notifies you that you must set the ProxyServer value after installation. Click Next. 8 Review the pre-installation summary. To start the installation, click Install.
Kofax Front-Office Server Installation Guide Figure 3. Scaled and Highly Available Enterprise Installation Specifying the ProxyServer Value Once your NLB cluster is configured, you need to specify the cluster information as the ProxyServer value in a configuration file. This will identify the cluster as the host address URL for connection to the Kofax Front-Office Server applications. X To specify the ProxyServer value 1 In the \conf folder, locate the des.properties file and open it in a text editor.
Kofax Front-Office Server Installation Guide 4 Copy and paste a section to create a new section for each new node, and edit each of the properties to match the host name of the node. See the example below. Caution Do not change the values of any of the properties except for the worker.[hostname]_node.host value. This value should be changed to match the host name of the new node. 5 Edit the property worker.loadbalancer.balance_workers, adding the new node to the comma-delimited list of nodes.
Kofax Front-Office Server Installation Guide worker.KFS03_node.host=KFS03 worker.KFS03_node.type=ajp13 worker.KFS03_node.lbfactor=1 worker.loadbalancer.type=lb worker.loadbalancer.balance_workers=KFS01_node,KFS02_node,KFS03_node, worker.loadbalancer.sticky_session=1 worker.list=loadbalancer worker.status.type=status Important Host names and IP addresses are not interchangeable in the workers.properties.minimal file. You must always use host names.
Kofax Front-Office Server Installation Guide To implement NLB, the following must be true of each Kofax Front-Office Server node: All nodes share the same scan jobs and inbox folders. All nodes share the same database. Each node must use a static IP address. Each node’s network adapter must have a unique adapter GUID. If you are using VM images, see NLB Using VM Images for instructions.
Kofax Front-Office Server Installation Guide 4 Stop and restart Kofax Front-Office Server. Adding Kofax Front-Office Server Nodes to an NLB Cluster You can add additional Kofax Front-Office Server nodes to an existing NLB cluster at any time. X To add a new node 1 Install Kofax Front-Office Server on the new node, following the instructions in Installing on Additional Servers in a Cluster. 2 In NLB Manager, add the new node as a new host to the NLB cluster.
Kofax Front-Office Server Installation Guide Table 2.
Kofax Front-Office Server Installation Guide Table 4. Databases Supported in an Enterprise Configuration (Cluster) Database Supported Microsoft SQL Server 2005 with Microsoft Cluster Services – 64-bit X Oracle Real Application Cluster (RAC) 10g – 32-bit X Oracle RAC 10g – 64-bit X Certified X Support for User Account Control (UAC) Kofax Front-Office Server 2.7 supports User Account Control (UAC) on Windows Server 2008.
Kofax Front-Office Server Installation Guide Port Configuration Ports 80 and 8080 must be available for use by Kofax Front-Office Server. If IIS, a Web server, or another application uses these ports, reconfigure it to use different ports. If IIS, a Web server, or an application cannot be reconfigured, disable or uninstall it or install Kofax Front-Office Server on another computer.
Kofax Front-Office Server Installation Guide Directory server. Depending on the type of installation you are using, you need to log on with the following user account to enable Kofax Front-Office Server to connect to Active Directory automatically: For an Enterprise installation, log on as a domain user. For a Departmental installation, log on as a local or domain user.
Kofax Front-Office Server Installation Guide Invalid Drive Path If you change the default path during installation, you must select an install path that includes a valid local drive letter. The following error appears if you select a drive letter that does not exist. You do not have write permissions to the chosen installation destination.
Kofax Front-Office Server Installation Guide X To install Kofax Front-Office Server with Kofax Capture 1 Install Kofax Capture 8 with Service Pack 4. 2 Install Kofax Capture Import Connector - Web Services that is provided with Kofax FrontOffice Server as follows: a Insert the Kofax Front-Office Server installation media into your drive. b Browse to the \OtherResources\Kofax Capture Import Connector - Web Services folder. c Open the readme.txt file and follow the instructions.
Kofax Front-Office Server Installation Guide Database Information for the Enterprise Configuration During installation, you are prompted to provide the following information for the database to which you are connecting: A user account in the database to be used by Kofax Front-Office Server for authentication. You will be prompted to provide the user name and password for this user account. Connection information.
Kofax Front-Office Server Installation Guide The C:\Program Files (x86) folder is still required for some components of Kofax Front-Office Server. To support these components, the installer does the following: Bonjour is installed in both C:\Program Files and C:\Program Files (x86). A Bonjour subfolder is created in each folder. VRS and PostgreSQL are installed in C:\Program Files (x86).
Kofax Front-Office Server Installation Guide Unsupported Upgrades Upgrades and migrations of the following configurations are not supported: Versions before 2.0 directly to 2.7. Versions 2.0 or 2.5 with the embedded database to Kofax Front-Office Server 2.7 with a Microsoft SQL Server or Oracle database. Versions 2.0 or 2.5 with WebLogic and an Oracle database to Kofax Front-Office Server 2.7 with Microsoft SQL Server. Any configuration of Kofax Front-Office Server 2.7 to a different database.
Kofax Front-Office Server Installation Guide Handling Disconnected User Accounts and Profiles If a user role is removed from an Active Directory user (either as an individual user or a member of a group), that user no longer has access to Kofax Front-Office Server, but that user’s profiles, documents, and shortcuts remain on the server.
Kofax Front-Office Server Installation Guide Documents in a Queue Documents in a queue are handled as follows during an upgrade or migrating: If the queue is on a separate local shared drive, the documents are moved to a subdirectory of the Inbox folder on the new computer. If the queue is on an external shared drive, the documents are used by the computer, but the original CDI files are moved into a folder named backup.
Kofax Front-Office Server Installation Guide The following are also backed up or exported: Database Registry (Web Client entries only) Workflows VRS and JRE are not backed up and cannot be rolled back. Note The backup may require large amounts of disk space. When the upgrade has been completed successfully, you have the option of deleting some or all of your backup files. Saving Custom Workflows Custom workflows are not upgraded.
Kofax Front-Office Server Installation Guide Upgrade Notes for Shortcuts Some global and personal shortcuts may need to be deleted and recreated after upgrading. Global shortcuts created for Ascent Capture are upgraded for Kofax Capture. After the upgrade, you need to redeploy the profiles for the global shortcuts in order for the shortcuts to work from the MFPs.
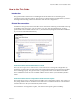
Kofax Front-Office Server Installation Guide Figure 5. Kofax Front-Office Server Installer Introduction Screen 5 Review the Kofax Front-Office Server license agreement and select “I accept the terms of the License Agreement” to continue with the installation. Click Next to continue. 6 If you have VRS installed on your computer that is not part of a previous Kofax FrontOffice Server installation, you have the option to upgrade it and clean up any leftover files. Click OK to do this.
Kofax Front-Office Server Installation Guide 12 Type the user name and password for the initial Kofax Front-Office Server administrator. Use this user account to log on to the Administration Console for the first time. The user name and password must meet the following rules: User names must be unique on the server. User names are case-insensitive, cannot include spaces, and the following characters are not permitted: ~ # % * \ ; / : & ? .
Kofax Front-Office Server Installation Guide Installing an Enterprise System If you are installing Kofax Front-Office Server on a single server, follow the procedure in Installing on One Server or the First Server of a Cluster. To install Kofax Front-Office Server on additional servers, refer to Installing on Additional Servers in a Cluster. To set up load balancing, refer to Scaling and High Availability Options.
Kofax Front-Office Server Installation Guide Note You need to specify a path to the same folder on each server in the cluster. 10 Select the database that you are connecting to and then click Next. 11 Enter the connection information for the database. For more information, refer to Database Information for the Enterprise Configuration. Click Next. 12 Enter the user name and password of a user in the database that Kofax Front-Office Server can use for authentication. Click Next.
Kofax Front-Office Server Installation Guide 2 Run setup.exe, which is in the root of the Kofax Front-Office Server installation media. Note The setup program detects a 32-bit or 64-bit computer and starts the correct installer. 3 You are prompted to confirm that the necessary ports are open. Refer to Port Configuration for more information. If the ports are available for Kofax Front-Office Server, click OK to continue the installation. 4 The introduction screen appears (Figure 5). Click Next.
Kofax Front-Office Server Installation Guide which type of upgrade is needed.) Follow the upgrade procedure that applies to the upgrade you need. Performing an In-Place Upgrade Run the installer to upgrade Kofax Front-Office Server. You must log on as a user with administrator rights to the local computer to upgrade Kofax Front-Office Server. Note Do not run the installer from a UNC path. X To perform an in-place upgrade 1 Insert the Kofax Front-Office Server installation media into your drive.
Kofax Front-Office Server Installation Guide The migration process does not remove information from your existing system. If your new installation already contains data, including user accounts and roles, it is overwritten by the imported data. Preliminary Steps before Migrating Before you export or import data, do the following: Have users release all documents in their inboxes. Files in the scanjobs folder are not migrated.
Kofax Front-Office Server Installation Guide Figure 7. Kofax Front-Office Server Export Migration Introduction Screen 3 If you have not shut down the cluster, you are prompted to do so. Stop the cluster, and click OK to continue with the export. 4 Enter the connection information for the database. Make sure that the server where the database is located is online and the network connection works. Click Next. 5 Enter the user name and password to connect to the database. Click Next.
Kofax Front-Office Server Installation Guide Figure 8. Kofax Front-Office Server Import Migration Introduction Screen 4 If you have not shut down the cluster, you are prompted to do so. Click OK. Then, stop the cluster and click Next. 5 Enter the user name and password for an administrator of the new Kofax Front-Office Server installation into which you are importing the data. Click Next. 6 Select the folder where the export files were saved by clicking Choose.
Kofax Front-Office Server Installation Guide Troubleshooting Migration The Import and Export generate log files that you can use to troubleshoot any problems. The files are located in the C:\Kofax Install Logs\Kofax Front-Office Server folder and have the following names: Kofax Front-Office Server Export Log.xml Kofax Front-Office Server Import Log.
Kofax Front-Office Server Installation Guide Viewing the Installation Log Files If you need to resolve a problem with the installation, you can view the installation log files for detailed information. The location of the log files depends on the result of the installation or upgrade. Refer to Table 6. Table 6.
Kofax Front-Office Server Installation Guide Managing MFPs after Migration After a migration, do the following to connect the MFP to the new Kofax Front-Office Server installation. Refer to the Kofax Front-Office Server administrator’s guide for your MFP for instructions. Fujitsu: At the front panel of each device, change the server host to the IP address or host name of the new Kofax Front-Office Server installation.
Kofax Front-Office Server Installation Guide Other Configuration Tasks Refer to the Kofax Front-Office Server Administrator’s Guide for instructions for modifying properties files and making other configuration changes. Stopping and Restarting Kofax Front-Office Server You may need to stop and restart Kofax Front-Office Server when changing configuration files or for routine maintenance. The process depends on which application server and configuration you use.
Kofax Front-Office Server Installation Guide Using the Services Console You can use the Services console to start and stop the KofaxServer service, or you can configure it to start manually or automatically. For more information about using the Services console, refer to its Help. X To control Kofax Front-Office Server through the Services console 1 Select Administration Tools | Services. Depending on the version and configuration of Windows, the Administration Tools are in the Control Panel or Programs.
Kofax Front-Office Server Installation Guide 3 Locate Kofax Front-Office Server in the list of currently installed programs. Click Change/Remove. The Uninstaller starts and displays an introduction screen (Figure 9). Click Next. Figure 9. Uninstall Kofax Front-Office Server Introduction Screen 44 4 A message explains what the uninstallation does and asks if you want to continue the process. Click OK to continue. 5 At the Uninstall Options window, make sure that Complete Uninstall is selected.
Index Numerics 32-bit version of Microsoft Windows starting and stopping Kofax Front-Office Server, 42 64-bit version of Microsoft Windows installation notes, 23 starting and stopping Kofax Front-Office Server, 42 A Active Directory connecting during installation, 19, 29 disconnected user accounts, 26 Kofax Capture users, 29 user accounts migrated or upgraded, 25 Administrator’s Guide, 7 Adobe Reader, supported versions, 19 B Backup before upgrade, 27 deleting during uninstallation, 43 folder used by Inst
Index redisplaying, 42 Kofax Front-Office Server service icon, 42 stopping and starting, 42 L Licensing, 39 Load Balancing with Kofax IIS Components, 10 Log files, installation, 40 M Microsoft Windows Network Load Balancer (NLB) adding nodes, 11, 16 removing nodes, 16 setting up, 14 Migration. See Upgrades, migration Monitor display resolution, 19 MS NLB.