KOFAX Front-Office Server 2.
© 2007-2009 Kofax, Inc., 15211Laguna Canyon Road, Irvine, California 92618, U.S.A. All rights reserved. Use is subject to license terms. Third-party software is copyrighted and licensed from Kofax’s suppliers. For information on third-party software included in this product, see “KFSTHIRDPARTYLICENSEREADME.txt.” This product is protected by U.S. Patent No. 6,370,277. THIS SOFTWARE CONTAINS CONFIDENTIAL INFORMATION AND TRADE SECRETS OF KOFAX, INC.
Contents How to Use This Guide ................................................................................................................................7 Introduction ............................................................................................................................................7 Additional Documentation and Resources ........................................................................................7 Kofax Front-Office Server Installation Guide ......................
Contents Changing the Location of the Master Configuration File .....................................................................19 Changing the Locations for Scanned Images and Inboxes ...................................................................19 Configuring a Watched Folder .................................................................................................................21 Sharing a Watched Folder .................................................................................
Contents CustomField Element (Required) ..............................................................................................44 Queues Element (Required) ........................................................................................................45 Queue Element (Required) .........................................................................................................45 Filters Element (Required) .................................................................................
Contents 6 Kofax, Inc.
Kofax Front-Office Server Administrator’s Guide How to Use This Guide Introduction This guide is intended to be used by the administrator who will configure and maintain the Kofax Front-Office Server installation. This guide assumes that you have a thorough understanding of application servers, Internet technologies and Web servers, your network configuration, and destination types (such as Kofax Capture) that you will use with Kofax Front-Office Server.
Kofax Front-Office Server Administrator’s Guide Multifunction Peripheral (MFP) Administrator Guides These guides show how to make Kofax Front-Office Server features available on MFP front panels. The MFP administrator guides are in the \setup\Guides folder on the installation media. They are also installed with the software in the \Documentation\Guides folder. Kofax Front-Office Server Configuration Guide for Kofax Capture This guide shows how to connect Kofax Front-Office Server with Kofax Capture.
Kofax Front-Office Server Administrator’s Guide The Kofax Web site also contains information that describes support options for Kofax products. Please review the site for details about the available support options.
Kofax Front-Office Server Administrator’s Guide In preparing to enable security with SSL, note the following: Kofax Front-Office Server ships with a default self-signed SSL certificate, with the file avalin.keystore which specifies “avalin” as the host name for the installation. The avalin.keystore file is located in the \conf folder. You can replace the file avalin.
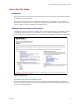
Kofax Front-Office Server Administrator’s Guide Note the following: In the URL, “KFSAdmin” and “KFSWebClient” may be typed in all uppercase or all lowercase, as in these examples: http://server/KFSADMIN http://server/kfsadmin You can omit the Web Client portion of the URL to start Kofax Front-Office Server Web Client, as in this example: http://server You can also run Kofax Front-Office Server applications from the server where Kofax Front-Office Server is running.
Kofax Front-Office Server Administrator’s Guide Figure 2. The Administration Console Log On Page Tip Bookmark the the Administration Console Log ON page to make it convenient to start it each time. 2 Type the user name and password of the administrator you defined during installation. Passwords are case-sensitive. After you have logged on successfully, the Administration Console appears (Figure 3). Figure 3.
Kofax Front-Office Server Administrator’s Guide Warning Before deleting a linked user from directory services, make sure that user’s Kofax FrontOffice Server Web Client Inbox is empty. Connecting to Active Directory By default, Kofax Front-Office Server will connect to Active Directory in the domain, and will use the account used to run the KofaxServer service.
Kofax Front-Office Server Administrator’s Guide #type=ActiveDirectory or #type=Ldap b Uncomment the property: type=None 2 Save the file. 3 Stop and restart Kofax Front-Office Server. Identifying Internal and Linked Users In the Administration Console, you can add internal users whose data is stored in the embedded database, and you can also link users from a directory service. For example, for Active Directory, a user can come from the default, child, or trusted domains.
Kofax Front-Office Server Administrator’s Guide Viewing Logs To view the logs, you can do either of the following: Use the Administration Console to view the server and console logs. You can filter the display of messages and delete them. Open the log files in a text editor. The files are located in the \log folder in \Avalin\jboss\server\avalin. To filter the messages that get included in the log files located the \log folder, locate the \conf\log4j.xml file. Edit the log4j.
Kofax Front-Office Server Administrator’s Guide 2 Create backup copies of the folders \Avalin, \Resources, and \PostgreSQL at the root of the Kofax Front-Office Server installation. 3 Verify that the backup was successful, and store in a safe location. With the backup data gathered, you can proceed with the restore. X To restore Kofax Front-Office Server 1 Remove the non-functional Kofax Front-Office Server installation from the computer.
Kofax Front-Office Server Administrator’s Guide 10 On 32-bit computers, you can display the Kofax Server Monitor in the system tray by selecting Start |Programs | Kofax | Kofax Server Monitor. Enterprise Configurations This section provides instructions for gathering backup data and restoring an Enterprise configuration. You may want to back up important data before upgrading, and regularly to be able to restore a failed system to a certain state.
Kofax Front-Office Server Administrator’s Guide 9 On 32-bit computers, you can display the Kofax Server Monitor in the system tray by selecting Start |Programs | Kofax | Kofax Server Monitor.
Kofax Front-Office Server Administrator’s Guide Changing the Location of the Master Configuration File During installation a shared folder is specified or created, and the file MasterConfig.properties is created in the root of the share. This file contains several properties that are used by other Kofax Front-Office Server components (for example, the migration utilities and the IIS component installer), so the components need to be able to find MasterConfig.properties when they are run.
Kofax Front-Office Server Administrator’s Guide Anytime after installation, you can specify a different location for these folders. Before changing the location, do the following: Make sure that the user account that runs the KofaxServer service has read/write access to the folders you specify. If you want to limit access, add the service user account as a user for that shared folder.
Kofax Front-Office Server Administrator’s Guide 6 Copy the file to the \conf folder on each machine in a cluster. 7 Stop and restart Kofax Front-Office Server on each machine in the cluster. Configuring a Watched Folder Note The watched folder feature is deprecated in Kofax Front-Office Server 2.7. In the Web Client, users can select a watched folder for bringing documents into their Inbox. Files that are copied into the folder are automatically imported into the Web Client.
Kofax Front-Office Server Administrator’s Guide Important To prevent two users from watching the same folder, have all your users enter the UNC path using either the host name or the IP address of the machine where the shared folder is located.
Kofax Front-Office Server Administrator’s Guide a Click Add. The “Select Users or Groups” window appears. b Add the KofaxServer service user account as shown in step 3d. The KofaxServer user account appears under “Group or user names.” c Select the user account for KofaxServer. The permissions that are currently assigned to the user are selected. d In the Allow column, select the box for Write and make sure that the Read permission is also selected in the Allow column.
Kofax Front-Office Server Administrator’s Guide Changing the Host Name The host name of a computer should not be changed after Kofax Front-Office Server has been installed. Changing the host name may cause problems with licensing and connecting to MFPs. You can restore licensing by changing the host name back to the one you used when you licensed Kofax Front-Office Server. The host name of an MFP also should not be changed after it has been added to Kofax Front-Office Server.
Kofax Front-Office Server Administrator’s Guide For each logged on user, only one of these options can be used at a time. When you have successfully connected to either a certified scanner or Kofax Document Scan Server, buttons for scanning documents are enabled in the Web Client. For a list of certified scanners, see the Kofax Front-Office Server Release Notes or go to the Kofax Web site (www.kofax.com).
Kofax Front-Office Server Administrator’s Guide Scanner Settings in the Web Client Prior to scanning with the scanner connected to your client workstation, access Kofax Front-Office Server Web Client, and in Inbox Options on the Scanner Settings tab, specify one of the following: Kofax Software VRS - TWAIN If you are scanning with VRS 4.
Kofax Front-Office Server Administrator’s Guide Setting Up the Appropriate Security Policy for an Enterprise To ensure all users within your enterprise can successfully scan with a connected scanner, the following items need to be completed: Kofax Front-Office Server As a Trusted Site Define a group policy in Active Directory to specify the Kofax Front-Office Server URL as a trusted site.
Kofax Front-Office Server Administrator’s Guide Figure 4. Microsoft .NET Framework 2.0 Configuration Tool X To distribute the MSI, assign the MSI to a group policy. To do so, on the domain controller, for the appropriate group policy, open the Group Policy Object Editor. Select Computer Configuration | Software Settings. Right-click Software Installation. Select New | Package. Then, browse to the MSI you created previously. Deploy the software. Figure 5.
Kofax Front-Office Server Administrator’s Guide Setting Up the Appropriate Security Policy on a Client Workstation Although it is recommended that you set up the security policy for your enterprise, you can set up the security policy for individual client workstations. To do so, you need to set up Kofax FrontOffice Server as a trusted site and a code access security policy on each applicable client workstation.
Kofax Front-Office Server Administrator’s Guide 2 Enter the following command: C:\Windows\Microsoft.NET\Framework\v2.0.50727\caspol -machine -addgroup All_Code -zone Trusted FullTrust -name "KofaxDesktopScan" Where: C:\Windows\Microsoft.NET\Framework\v2.0.50727 is the path where Microsoft .NET Framework 2.0 is installed. When prompted, confirm that you want to perform the operation. Note As an alternative to using caspol.exe (Code Access Security Policy Tool), you can use the Microsoft .
Kofax Front-Office Server Administrator’s Guide 5 Select File | Setup. 6 Specify your scanner settings. The settings you specify are used each time you scan with WebScan. It is not necessary to save the settings as a profile. Figure 7. Scanner Settings in Twacker Note If you want to specify image quality settings with VRS, click Advanced. In the VirtualReScan Interactive Viewer, specify your image quality settings. Then, save the settings as a new profile. Click OK to return to Twacker.
Kofax Front-Office Server Administrator’s Guide X To set up a scanner profile when scanning with a TWAIN driver (not VRS) 1 Determine the appropriate name to use when you save the scanner profile XML file. The file name must match the scanner name as it appears in the Web Client. To view the name: On a client workstation that the scanner is connected to, in the Web Client, go to Inbox Options | Scanner Settings tab. The name appears in the list box for the selected scanner.
Kofax Front-Office Server Administrator’s Guide X To set up to use to a Kofax Document Scan Server 1 Connect the Kofax Document Scan Server to a network that is available to Kofax FrontOffice Server. Then, connect a certified scanner to the Kofax Document Scan Server. Refer to the Kofax Document Scan Server documentation for instructions. 2 Create scan profiles for the Kofax Document Scan Servers. All of the Web Client users can select the scan profile they want to use.
Kofax Front-Office Server Administrator’s Guide files from the Errors subfolder to the Unprocessed folder. Kofax Front-Office Server then starts processing the scan job. You can change the properties for retry frequency and the maximum number of retries. X To change the frequency and number of retries 1 In the \conf folder, locate the shared_resources.properties configuration file and open it with a text editor. 2 Locate the following properties and change the values as follows.
Kofax Front-Office Server Administrator’s Guide X To change the number and frequency of retries 1 In the \conf folder, locate the shared_resources.properties file and open it in a text editor. 2 Locate the following properties and change the values as follows. All properties are optional. filesys.retry.timeout.millis Specify a timeout period before stopping retries if a file cannot be delivered to the storage destination, in milliseconds.
Kofax Front-Office Server Administrator’s Guide 3 Save and close the file. For the changes to take effect, stop and restart Kofax Front-Office Server.
Kofax Front-Office Server Administrator’s Guide Retrieving All Scan Jobs The following statement retrieves all scan jobs. The returned information includes the scan job ID, user name, and device. Destination information is also included if provided. select * from view_doctracking_20 Purging the Database Old document tracking records should be purged periodically to prevent the Kofax Front-Office Server database from growing too large and affecting performance.
Kofax Front-Office Server Administrator’s Guide Customization Resources for developing and implementing custom release connectors, data validation, and field lookup are provided on the Kofax Front-Office Server installation media. To view instructions for using these resources, browse to \OtherResources\DeveloperResources and open devindex.html. Figure 9. Developer Resources as Viewed in devindex.
Kofax Front-Office Server Administrator’s Guide For more information about how to develop and deploy your data validation class, refer to the readme and Javadoc that is part of the SDK. 2 In the \conf folder, locate the desportal.properties file and open it in a text editor. 3 In the validation.class element, specify the fully-qualified name of the validation class. For example, if the name of the validation class is FormValidation and the package is com.
Kofax Front-Office Server Administrator’s Guide the window, the search is performed against the following sources, and the items found are combined before returning the search results. An explanation of each of the sources follows. In the Web Client, Lookup fields retrieve email addresses and fax numbers from these sources as follows: A table in the Kofax Front-Office Server database: users with data for the particular search (email address or fax number) will be returned from the search.
Kofax Front-Office Server Administrator’s Guide Figure 11. Database table: customemailfaxlookup Active Directory or LDAP Lookup Based on the search entry, the directory service search returns user and group information, which includes email addresses and fax numbers. Of course, for configurations not using directory services nothing will be returned for this source. If you use Active Directory, there are no configuration steps: connection and lookup capability is automatic.
Kofax Front-Office Server Administrator’s Guide include his Contacts. If user mjames were to log on to the Web Client using another user’s credentials, the destination would become available but a Lookup List search would not include Max’s Contacts list. X To enable Microsoft Outlook Contacts search 1 Copy the file rs.connector.exchange2k3.properties from the \Resources\setup folder to the \Avalin\jboss\server\avalin\conf folder where Kofax Front-Office Server is installed. 2 Open rs.connector.
Kofax Front-Office Server Administrator’s Guide Within the file, edit the sample queue definition as needed to create one or more queue sets and one or more queues. To set up a single queue, the contents of the file would contain the following elements (where bold indicates attribute variables you specify): PAGE 44Kofax Front-Office Server Administrator’s Guide CustomFields Element (Required) Under the CustomFields element, define up to five CustomField elements. A custom field enables you to define the data element by which you will subsequently filter documents to appear in a queue, thereby associating certain documents with a queue within the queue set.
Kofax Front-Office Server Administrator’s Guide Queues Element (Required) Under the Queues element, define the elements for one or more queues within the queue set. Queue Element (Required) This element contains the following attributes enabling you to set up a queue within the queue set. Table 4. Queue Attributes Attribute Type Description Required? name NameType Specifies the name of the queue within the queue set.
Kofax Front-Office Server Administrator’s Guide Filter Element (Optional) This element contains the following attributes to define a filter. If this element is not included in the definition of a queue, then all documents appear in the queue. Table 5. Filter Attributes Attribute Type Description Required? customFieldName NameType Must be one of the named custom fields specified for the QueueSet element.
Kofax Front-Office Server Administrator’s Guide Roles Element (Required) Under the Roles element, define one or more Role elements for determining which users, based on roles defined in Kofax Front-Office Server Administration Console, have access to this queue. Role Element (Required) This element contains the following attributes to assign a role to a queue. Table 6. Role Attributes Attribute Type Description Required? name String.
Kofax Front-Office Server Administrator’s Guide Planning Your Queue Setup Use the following table to assist you in planning the setup of the desired queues. This particular plan also provides an example to help illustrate the process. Table 7. Queue Setup Plan Planning Item Example Identify the nature of the documents for a queue set. You receive applications in the Web Client that are needed for setting up new accounts.
Kofax Front-Office Server Administrator’s Guide Table 7. Queue Setup Plan (continued) Planning Item Example Identify the actual data for filtering documents to each queue, based on the custom fields identified earlier.
Kofax Front-Office Server Administrator’s Guide Figure 12. Roles in the Administration Console: Example Defining Queues in the DesQueueDefinition.xml File Use the following procedure to define queues in the DesQueueDefinition.xml file. The procedure includes references to the example provided in Planning Your Queue Setup on page 48. X To define queues in the DesQueueDefinition.xml file 1 In the \conf folder, locate and open the DesQueueDefinition.xml file (using an appropriate XML or text editor).
Kofax Front-Office Server Administrator’s Guide PAGE 52Kofax Front-Office Server Administrator’s Guide Figure 14. Queue Sets in the Administration Console: Example Kofax Queue, Queue Sets, and Queues in the Web Client. Kofax Queue and any queue sets defined in the DesQueueDefinition.xml file appear under Destinations. The defined queues appear in the Inbox and Queue Selection drop-down list. Figure 15.
Kofax Front-Office Server Administrator’s Guide Set up global queue shortcuts which you then deploy to your MFPs. The shortcuts are then used at the MFP to scan documents to the queue. Associate your queue shortcuts with user groups, to have these shortcuts appear in the Web Client, for moving documents to a queue within the Web Client. For instructions on setting up and managing shortcuts, see the the Administration Console Help.
Kofax Front-Office Server Administrator’s Guide Table 8. Planning Queue Setup: Example 2 (continued) Planning Item Example Name the queues in the queue set. HR-Employee Benefit 401K HR-Employee Benefit Medical HR-Employee Benefit Stock HR-Recruitment Professional HR-Recruitment Staff HR-All Identify the default display mode for documents in Get Next mode (the default) for the following: each queue.
Kofax Front-Office Server Administrator’s Guide Figure 17. Roles in the Administration Console: Example 2 Defining Queues in the DesQueueDefinition.xml File: Example 2 Use the same instructions for defining a queue in the DesQueueDefinition.xml file as found in Defining Queues in the DesQueueDefinition.xml File on page 50 For this example, the contents of the file would contain the following (specified attributes are noted with boldface).
Kofax Front-Office Server Administrator’s Guide PAGE 57Kofax Front-Office Server Administrator’s Guide Figure 19. Kofax Queue, HR Queue Set and Queues in Kofax Front-Office Server Web Client: Example Setting Up Queue Shortcuts in the Administration Console: Example 2 The following figures illustrates queue shortcuts for the example provided in Planning Queue Setup: Example 2 on page 53. Figure 20. Queue Shortcuts in Kofax Front-Office Server Administration Console Setting Up Queues: Example 3 This example illustrates the contents of the DesQueueDefinition.
Kofax Front-Office Server Administrator’s Guide PAGE 59Kofax Front-Office Server Administrator’s Guide
Considerations When Setting Up or Modifying Queues Consider the following when you are setting up new or editing existing queue sets or queues in the DesQueueDefinition.xml file.
Kofax Front-Office Server Administrator’s Guide It is highly recommended that you not modify the queue schema file. Modifying the file may cause undesirable results with the DesQueueDefinition.xml file. Troubleshooting This section provides troubleshooting information. Firefox Remembered Password Used in the Administration Console If you set Firefox to remember your logon password for the Administration Console, that password will be entered in the Password field whenever you create a new user.
Kofax Front-Office Server Administrator’s Guide Kofax Capture Limitations in Value Lists In Kofax Capture When using value lists with forced match selected, invalid values entered at the MFP do not get imported into Kofax Capture. Workaround: Edit the value in Kofax Capture after the document has been imported. Problems Transferring Large Image Files to Kofax Capture If you are unable to process large images, it is because ASP.
Kofax Front-Office Server Administrator’s Guide 62 Kofax, Inc.
Index A I Active Directory connecting to, 13 Administration Console logs, 15 starting, 11 URL, 10 using, 11 Inbox changing location of, 19 B Backing Up and Restoring a Departmental Configuration, 15 Backing Up and Restoring an Enterprise Configuration, 17 D Database for tracking document activity, 36 purging, 37 retrieving information from, 36 Deprecated features, documentation for, 8 Destinations configuring retries for storage, 34 Directory Services connecting to, 12 connecting to Active Directory, 1
Index database, 37 log entries, 15 Q Queue setup basics, 47 Queue XML file using, 42 Queuing planning, 48 setting up in the Web Client, 42 R Registration, 12 Related documentation, 7 Restarting Kofax Front-Office Server, 9 Retries configuring for destinations, 34 for database access, 34 for failed scan jobs, 33 S V Validation implementing custom, 38 VRS settings changing for DSS, 33 W Watched folder configuring, 21 setting up, 22 Watched folder, setting up, 21 Web Client Inbox location, 19 scanning di