KOFAX Document Exchange Server 2.
© 2007-2008 Kofax, Inc., 16245 Laguna Canyon Road, Irvine, California 92618, U.S.A. All rights reserved. Use is subject to license terms. Third-party software is copyrighted and licensed from Kofax’s suppliers. For information on third-party software included in this product, see “DESTHIRDPARTYLICENSEREADME.txt.” This product is protected by U.S. Patent No. 6,370,277. THIS SOFTWARE CONTAINS CONFIDENTIAL INFORMATION AND TRADE SECRETS OF KOFAX, INC.
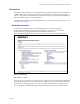
Contents Introduction ...................................................................................................................................................1 Related Documentation ........................................................................................................................1 Administrator’s Guide ...................................................................................................................1 Installation Guide for JBoss .............................
Contents Java configuration ........................................................................................................................12 OS Configuration ..........................................................................................................................12 Initial admin user to deploy license and workflow ................................................................12 Information about the WebLogic installation .........................................................
Kofax Document Exchange Server Installation Guide for WebLogic Introduction This guide includes instructions on installing Kofax Document Exchange Server with a WebLogic 9.2 MP3 (maintenance pack 3) application server. Read this guide completely before using the software. This guide was written with the assumption that you have a thorough understanding of Microsoft Windows and network configuration.
Kofax Document Exchange Server Installation Guide for WebLogic Multifunction Peripheral (MFP) Administrator Guides These guides show how to make Kofax Document Exchange Server features available on MFP front panels. The MFP administrator guides are in the setup\Guides folder on the Kofax Document Exchange Server installation media. If you select to install “Documentation” during the setup process, they are installed with the software in the Documentation\Guides folder.
Kofax Document Exchange Server Installation Guide for WebLogic Supported System Configurations The following system configurations are supported. WebLogic 9.2 MP3 administration server and managed server installed on one machine Oracle 10g Release 2 database or Oracle RAC Shared network storage or Microsoft Cluster Server shared storage WebLogic 9.
Kofax Document Exchange Server Installation Guide for WebLogic Open Ports Ports 80 and 8080 must be available for use by Kofax Document Exchange Server. If Internet Information Services (IIS), a Web server, or another application uses these ports, reconfigure it to use different ports. If IIS, a Web server, or an application cannot be reconfigured, disable or uninstall it or install Kofax Document Exchange Server on another computer.
Kofax Document Exchange Server Installation Guide for WebLogic Requirement for Free Hard Drive Space Make sure that there is sufficient space on the hard drive for the database. A minimum of 25 GB is recommended as an initial amount of free hard drive space for the database. Additional space will be needed as the database grows. You can manage the database size by periodically purging old records.
Kofax Document Exchange Server Installation Guide for WebLogic system administrator verify that the VRS component has been installed with the Kofax Document Exchange Server. If PDF is selected as the format for a destination file, scanned documents will not be sent to that destination. This setting also affects documents scanned from Kofax Document Scan Server. These documents may appear in Kofax Document Exchange without pages and preview images.
Kofax Document Exchange Server Installation Guide for WebLogic Setting Environment Variables WebLogic 9.2 MP3 and JRockit should be installed on the administration server and all machines that will be in the cluster. Important For 64-bit WebLogic installations, install JRockit first and to a path that does not have spaces, such as C:\bea. Kofax Document Exchange Server 2.
Kofax Document Exchange Server Installation Guide for WebLogic Sharing the Configuration Files There are many configuration files that are installed to the \conf folder in the root of the WebLogic domain. The Kofax Document Exchange Server Administrator’s Guide has instructions on how to use these files to customize your implementation. In a clustered environment, all managed servers in the cluster should use the same configuration settings.
Kofax Document Exchange Server Installation Guide for WebLogic User names cannot include spaces, and the following characters are not permitted: ~ # %*\;/:&?.',"`$<+> User names and passwords are case-sensitive. Passwords can include spaces, but not at the beginning or end. There can be no repeating spaces.
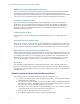
Kofax Document Exchange Server Installation Guide for WebLogic 4 On the Choose Features screen, select all features except “DES Prerequisites” (however, selecting to install Documentation is optional) and click Next to continue. Figure 4. Custom Installation Set: DES Prerequisites Unselected 5 On the Initial Administrator screen, type the user name and password for the initial Kofax Document Exchange Server administrator.
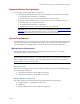
Kofax Document Exchange Server Installation Guide for WebLogic Figure 5. Custom Installation Set: OpenLDAP Unselected 4 On the Choose Installation Location screen, accept the default installation path, or choose another location. Click Next to continue. 5 On the Pre-Installation Summary screen, review the installation parameters and click Install to begin the installation. Note the following while the Installer is running: 6 Do not close the Installer window until the installation is complete.
Kofax Document Exchange Server Installation Guide for WebLogic Important If you have more than one WebLogic or Kofax Document Exchange Server cluster on your network, refer to Multicast Configuration: Avoiding Conflicts for instructions on making your multicast ports and addresses unique. Mandatory Settings This section explains the properties you must set for a successful implementation. Properties are listed under their commented grouping title in the file. Java configuration avalin.java.
Kofax Document Exchange Server Installation Guide for WebLogic Domain configuration avalin.domain.host Set this property to the name of the machine that will run the administration server. If the machine name is bound to more than one IP Address, set this to the appropriate fixed IP Address instead of the machine name. Important The installation for WebLogic does not support machine names with the underscore “_” character in the name. Use only machine names that have letters, numbers, dashes, or periods.
Kofax Document Exchange Server Installation Guide for WebLogic Set this property to the computer name of a machine that will be a managed server. By default, this section of the install.properties file is set up by default to name three managed servers, so there is one set of properties in this section for each server. Each set of properties begins with the line “avalin.managed.server.n=myservern” and ends with “avalin.managed.server.1.channel1.client.certificate.enforced=false”as shown here: avalin.
Kofax Document Exchange Server Installation Guide for WebLogic avalin.managed.server.1.bea.home=${bea.home} avalin.managed.server.1.channel1.name=Channel-http-80 avalin.managed.server.1.channel1.protocol=http avalin.managed.server.1.channel1.listen.port=80 avalin.managed.server.1.channel1.external.listen.port=80 avalin.managed.server.1.channel1.enabled=true avalin.managed.server.1.channel1.client.certificate.enforced=false Two managed servers: avalin.managed.server.1=myserver1 avalin.machine.1.
Kofax Document Exchange Server Installation Guide for WebLogic avalin.machine.1.nodemgr.host=${avalin.managed.server.1} avalin.machine.1.nodemgr.port=5556 avalin.managed.server.1.host= avalin.managed.server.1.port=8080 avalin.managed.server.1.ssl.port=8443 avalin.managed.server.1.cluster=1 avalin.managed.server.1.machine=1 avalin.managed.server.1.replicationgroup=group1 avalin.managed.server.1.multicastinterfaceaddress= avalin.managed.server.1.domain.home=${avalin.domain.dir} avalin.managed.server.1.java.
Kofax Document Exchange Server Installation Guide for WebLogic avalin.managed.server.3.channel1.name=Channel-http-80 avalin.managed.server.3.channel1.protocol=http avalin.managed.server.3.channel1.listen.port=80 avalin.managed.server.3.channel1.external.listen.port=80 avalin.managed.server.3.channel1.enabled=true avalin.managed.server.3.channel1.client.certificate.enforced=false If you have fewer than three managed servers, delete extra sets accordingly.
Kofax Document Exchange Server Installation Guide for WebLogic ${avalin.managed.server.1}:${avalin.managed.server.1.port} Two managed servers: ${avalin.managed.server.1}:${avalin.managed.server.1.port}|${avalin.managed. server.2}:${avalin.managed.server.2.port} Three managed servers: ${avalin.managed.server.1}:${avalin.managed.server.1.port}|${avalin.managed. server.2}:${avalin.managed.server.2.port}|${avalin.managed.server.3}:${avali n.managed.server.3.
Kofax Document Exchange Server Installation Guide for WebLogic Note By default, Oracle may use port 8080. That port must be reserved for Kofax Document Exchange Server, so be sure to change the Oracle port to one other than 8080. db.avalin.ora.sid Set this property to the SID for the Kofax Document Exchange Server Oracle database instance or Oracle RAC node. db.avalin.ora.
Kofax Document Exchange Server Installation Guide for WebLogic avalin.nodemgr.port Used to set the port for the administration server NodeManager service. The default value is 5556. avalin.cluster.1.multicast.ip Used to set the IP multicast address used by the Kofax Document Exchange Server WebLogic Cluster domain. The default value is 238.0.100.100. avalin.managed.server.proxyserver.ssl.port Used to set the SSL listen port for the proxy server. The default value is 8443. avalin.managed.server.1.
Kofax Document Exchange Server Installation Guide for WebLogic Important Before starting to run the scripts, be sure that the completed install.properties file has been copied to the same location (AppServer\install) on every machine in the cluster. Also, if the avalin.nodemgr.logon.user account is not the same on all machines that will be in the cluster be sure to edit the install.properties file on each machine with the appropriate account.
Kofax Document Exchange Server Installation Guide for WebLogic 2 Type “ant install-proxy-server”. X On the machine hosting the administration server 1 Open a Command Prompt window and browse to the folder \AppServer\install where Kofax Document Exchange Server was installed. 2 Type “ant deploy-proxy”. Deploy Document Exchange Server If you are installing on a non-English operating system, see Special Instructions for Installing on Non-English Operating Systems before proceeding.
Kofax Document Exchange Server Installation Guide for WebLogic If you are not using a proxy server, at the folder \AppServer\install where Kofax Document Exchange Server was installed, type “ant stop-avalin-cluster”. 2 On each machine in the cluster, at the folder \AppServer\install where Kofax Document Exchange Server was installed, type “ant stop-nodemanager”, then “ant deletenodemanager” to delete the WebLogic nodemanager service.
Kofax Document Exchange Server Installation Guide for WebLogic Securing the install.properties File The install.properties file contains plain text user names and passwords for the: Kofax Document Exchange administrator WebLogic administration console Nodemanager logon Oracle database The file is only used during the installation process, so to maintain security after installation it can be deleted.
Kofax Document Exchange Server Installation Guide for WebLogic cluster with all four managed servers. Once you are done editing install.properties, copy it to the AppServer\install directory of all machines in the cluster, including the ones you are adding. Note If you begin with an install.properties file from a previous installation, be sure to double-check values for any names or passwords that might have changed, for example your WebLogic Administration Console or database administrator.
Kofax Document Exchange Server Installation Guide for WebLogic Create the XA Data Sources During installation, one JDBC XA data source named OraDS is created based on the values in the install.properties file. However, since you need to create a multi data source named OraDS—and because you cannot have a duplicate named in a data source and a multi-data source—you will begin the connection tasks by deleting the OraDS data source.
Kofax Document Exchange Server Installation Guide for WebLogic 6 Click Next. The Test Your Connection screen appears where you can test your connection and then click Next. The Select Targets screen appears. 7 In the Clusters group, select the check box of your cluster (for example, avalinCluster_1 as shown in Figure 7) as the target and click Finish. You are returned to the Summary of JDBC Data Sources screen. Figure 7.
Kofax Document Exchange Server Installation Guide for WebLogic 4 In the Clusters group, select the check box of your cluster (for example, avalinCluster_1 as shown in Figure 7) as the target and click Next. The Select Data Source Type screen appears. 5 Select “XA Driver” and click Next. The Add Data Sources screen appears. Figure 8. Add Data Sources Screen 6 Move all the nodes to the Chosen column and click Finish. 7 Under Change Center, click the Activate Changes button.
Kofax Document Exchange Server Installation Guide for WebLogic Figure 9. Summary of JDBC Data Sources Screen 2 Under the Change Center, click the Lock & Edit button. 3 Click New. The JDBC Data Source Properties screen appears. Complete the fields as follows: Name: A name of your choosing, for example OracleNonXA_1. This is to identify the data source: it is not the information about your RAC node, which comes later. JNDI name: A name of your choosing, which can be same as Name above.
Kofax Document Exchange Server Installation Guide for WebLogic 12 For an additional node in the cluster, under Domain Structure, expand Services, expand JDBC, and select Data Sources. The Summary of JDBC Data Sources screen appears. 13 Repeat the process from step 3 to create a non-XA data source for each node in the RAC cluster. When all nodes have a non-XA data source, create the non-XA multi data source.
Kofax Document Exchange Server Installation Guide for WebLogic Figure 10. Reset Data Source to non-XA Multi Data Source 3 Repeat the steps above to reset the data source for each of your persistent stores. Note If you change the prefix name, you must restart the associated managed server for the change to occur. 4 To verify the configuration, go into the database, and for each managed server you should see a table WL-Store where is the prefix from a Persistent Store.
Kofax Document Exchange Server Installation Guide for WebLogic ###### Java configuration avalin.java.home=c:/bea/jrockit_150_12 ###### OS Configuration os.version=5.2 des.scanjobsdir=//SDadmin1/DESshares/scanjobs des.inboxdir=//SDadmin1/DESshares/inbox ###### Initial admin user to deploy license and workflow startup.deployer.username=admin startup.deployer.password=admin ########################################### # Weblogic Configuration Properties # Modify if server.
Kofax Document Exchange Server Installation Guide for WebLogic avalin.managed.server.1.machine=1 avalin.managed.server.1.replicationgroup=group1 avalin.managed.server.1.multicastinterfaceaddress= avalin.managed.server.1.domain.home=${avalin.domain.dir} avalin.managed.server.1.java.home=${avalin.java.home} avalin.managed.server.1.bea.home=${bea.home} avalin.managed.server.1.channel1.name=Channel-http-80 avalin.managed.server.1.channel1.protocol=http avalin.managed.server.1.channel1.listen.port=80 avalin.
Kofax Document Exchange Server Installation Guide for WebLogic ###### Administration server configuration avalin.domain.admin.host=${avalin.domain.host} ###### Cluster URL configuration wls.cluster.url=${avalin.managed.server.1}:${avalin.managed.server.1.port},$ {avalin.managed.server.2}:${avalin.managed.server.2.port},${avalin.managed.s erver.3}:${avalin.managed.server.3.port} ###### Proxy server configuration avalin.machine.proxyserver.addresses=SDadmin1 avalin.machine.proxyserver.ip=172.22.15.44 avalin.
Kofax Document Exchange Server Installation Guide for WebLogic db.avalin.ora.sid=orcl db.avalin.ora.user=myoracleuser db.avalin.ora.password=myoraclepassword # LDAP configuration ############################ avalin.ldap.host=SDadmin1 avalin.ldap.
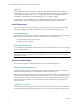
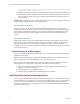
Kofax Document Exchange Server Installation Guide for WebLogic JDBCStore-1 JDBCStore-2 Multi Data Sources DESOracleNonXA OraDS Data Sources JDBCStore-3 temp OracleNonXA_1 OracleNonXA_2 OracleNonXA_3 RAC_1 OraDS_1 OraDS_2 RAC_2 RAC_3 OraDS_3 Figure 12.
Kofax Document Exchange Server Installation Guide for WebLogic Figure 13. Lock & Edit Button 2 In the Deployments table, click Install, and then on the Install Application Assistant page click the link “upload your file(s)”. 3 Click the Deployment Archive Browse button. Browse to the DES\setup folder where Kofax Document Exchange Server was installed and select the connector file. 4 Click Next. The connector name appears in the Location table (Figure 14).
Kofax Document Exchange Server Installation Guide for WebLogic Figure 15. Cluster Target 8 Click Next. You can view the optional settings, but no optional changes are needed so you can click Next. 9 Review the summary and then click Finish to complete the installation. 10 Under Change Center, click Activate Changes to complete the connector deployment. Figure 16. Activate Changes Button 11 The connector state is Prepared, so you need to activate it.
Kofax Document Exchange Server Installation Guide for WebLogic Figure 17. Deployments Table with Connector Selected 12 Click Start | “Servicing all requests”. Click Yes when prompted. The connector should now be deployed and active. 13 In Kofax Administration Console, be sure the connector is enabled. X To delete a connector 1 In the WebLogic Server Administration Console in your Document Exchange Server domain, select Deployments and click the Lock & Edit button.
Kofax Document Exchange Server Installation Guide for WebLogic Other Configuration Tasks Refer to the Kofax Document Exchange Server Administrator’s Guide for instructions for modifying properties files and making other configuration changes. Stopping and Restarting Kofax Document Exchange Server You may need to stop and restart a managed server or your cluster when changing configuration files or for routine maintenance.