KODAK SLICE Touchscreen Camera Extended user guide Model R502 www.kodak.com For interactive tutorials: www.kodak.com/go/howto For help with your camera: www.kodak.
Eastman Kodak Company Rochester, New York 14650 © Eastman Kodak Company, 2009 All screen images are simulated. Kodak, Pulse, and Slice are trademarks of Eastman Kodak Company. Navteq is a trademark in the U.S. and other countries. microSD and microSDHC are trademarks of the SD Card Association.
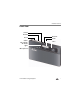
Product features Front view Power Shutter Zoom Review Flash Video Recording/ AF Assist light Lens Microphone www.kodak.
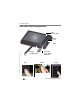
Product features Back view, touchscreen gestures LCD touchscreen Strap post USB Battery compartment Tap ii microSD, microSDHC Card slot Swipe Drag www.kodak.
Table of contents 1 1 Getting started ......................................................................................1 Attaching the strap ....................................................................................... 1 Loading the rechargeable battery .................................................................. 1 Charging the battery ..................................................................................... 2 Turning on the camera .........................................
Table of contents Cropping pictures........................................................................................ 26 Editing videos ............................................................................................. 27 Selecting multiple pictures/videos ................................................................ 28 4 Using your SLICE Album ......................................................................29 Deleting pictures from the SLICE Album................................
1 Getting started Attaching the strap Loading the rechargeable battery Notch KODAK Li-Ion Rechargeable Digital Camera Battery, KLIC-7000 Charge the battery see page 2 Know when your battery needs charging see page 9 Purchase extra batteries for your special event www.kodak.com/go/sliceaccessories www.kodak.
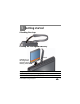
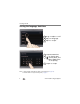
Getting started Charging the battery If your package included Then see An in-camera battery charger Using the in-camera battery charger An external battery charger Using the external battery charger Using the in-camera battery charger Charge the battery whenever necessary. Battery Charging light: • Blinking: charging • Steady: finished 1 Turn OFF the camera. 2 Connect the KODAK Camera USB Cable, Micro B / 5-Pin and charger. Your adapter may differ.
Getting started Using the external battery charger Charge the battery whenever necessary. Purchase extra batteries www.kodak.com/go/sliceaccessories Know when your battery needs charging see page 9 Turning on the camera www.kodak.
Getting started Setting the language, date/time 1 Drag or swipe to scroll. 2 Tap your language. 3 Tap X to accept. 1 2 3 Tap Set Date/Time. to change date format, date, and time. (Tap/hold to scroll quickly.) Tap X to accept. NOTE: To change language or date/time in the future, use the Setup menu (see page 35). For more information on using touchscreen gestures, see page ii. 4 www.kodak.
Getting started Storing pictures on a microSD/SDHC Card Your camera has internal memory. You must purchase a microSD or microSDHC Card to store more pictures and videos. (Maximum supported card size is 32 GB.) CAUTION: A card can only be inserted one way; forcing it may cause damage. Inserting or removing a card when the camera is on may damage the pictures, the card, or the camera. 1 Turn off the camera. 2 Insert or remove the card. 3 Turn on the camera. Notch Purchase accessories www.kodak.
2 Taking pictures/videos Taking a picture When you turn on the camera, it’s ready to take pictures in Smart Capture mode . 1 Press the Shutter button halfway to lock the focus. 2 When the framing marks turn green, press the Shutter button completely down.
Taking pictures/videos Using the framing marks Framing marks indicate the camera focus area. 1 Press the Shutter button halfway. If the camera is not focusing on the desired subject, release the Shutter button and recompose the scene. 2 Press the Shutter button completely down to take the picture. NOTE: Multiple framing marks may appear when faces are detected. Taking a video 1 Tap the Capture icon. 2 Tap the Video icon . 3 Press the Shutter button completely down and release.
Taking pictures/videos Reviewing the picture/video just taken After you take a picture/video, the LCD displays a quickview for several seconds. (To dismiss the quickview sooner, press the Shutter button halfway or touch the screen.) The picture/video is saved unless you tap the Delete icon. Delete Play a video To review pictures/videos anytime, see page 17. 8 www.kodak.
Taking pictures/videos Using picture-taking shortcuts If shortcuts are hidden, tap the top of the LCD to show them. Self timer/Burst Exposure Compensation Focus mode Flash mode Menu Tag Capture mode Hide shortcuts Battery level NOTE: Shortcuts vary, depending on the current capture mode. Know when your battery needs charging The battery level icon works like the gas gauge in your car but appears only when the battery requires your attention. Charge the battery whenever necessary.
Taking pictures/videos Capture modes Tap the Capture icon, then tap the mode that suits your subjects and surroundings. Capture mode Smart Capture For General picture taking—it offers excellent image quality and ease of use. ■ Faces are detected. ■ The scene is analyzed for other content and for lighting. You can choose the best picture size and aspect ratio for your needs—tap the Menu icon and choose Picture Size.
Taking pictures/videos Scene modes Scene modes take the guesswork out of programming your camera. They let you take incredible pictures in a variety of unique situations. 1 Tap the Capture icon (see page 10), then tap Scene . 2 Tap a Scene mode to read its description. NOTE: If the description turns off before you finish reading it, tap it again. 3 Tap X to choose a Scene mode. SCN mode For Portrait Full-frame portraits of people. Sport Fast action. Landscape Far-away scenes.
Taking pictures/videos Using zoom Use optical zoom to get up to 5X closer to your subject while taking pictures. Press Telephoto (T) to zoom in. Press Wide Angle (W) to zoom out. Zoom out (Wide) Zoom in (Telephoto) Use digital zoom to get up to 5X beyond optical zoom while taking pictures and videos. Press the zoom lever past Telephoto (T) the maximum optical zoom. NOTE: You may notice decreased image quality when using digital zoom. 12 www.kodak.
Taking pictures/videos Using the flash Use the flash when you take pictures at night, indoors, or outdoors in heavy shadows. Flash settings are limited in some capture modes. 1 Tap the Flash icon to view flash modes. 2 Tap the desired Flash mode. Flash modes Flash fires Auto When the lighting conditions require it. Fill Every time you take a picture, regardless of the lighting conditions. Use when the subject is in shadow or is “backlit.” In low light, hold the camera steady.
Taking pictures/videos Using the self-timer Use the self-timer when you want to be included in a picture or to ensure a steady Shutter button press. Place the camera on a steady surface. 1 Tap the Self-timer/Burst icon, then tap a self-timer setting: 10 seconds— 10 A picture is taken after a 10-second delay (so you have time to get into the scene). 2 seconds— 2 release). A picture is taken after a 2-second delay (for a steady, shutter 2 shot— 2x The first picture is taken after a 10-second delay.
Taking pictures/videos Taking panoramic pictures Use panorama to “stitch” up to 3 pictures into a panoramic scene. NOTE: Individual pictures are not saved, even if panorama capture is cancelled before stitching occurs. (Exposure Compensation, White Balance, Focus/Exposure Zone, AF Control, Color Mode, and Sharpness are set with the first picture. The flash is set to Off.) You can use the self-timer (2- and 10-second delays) while taking panoramic pictures. See page 14. 1 Tap the Mode icon, then tap SCN.
Taking pictures/videos Using Program mode Program mode gives access to exposure compensation (how much light enters the camera), focus mode, and ISO. The camera automatically sets the shutter speed and aperture (f-stop) based on the scene lighting. NOTE: Settings you change in P mode apply only to pictures taken in P mode. The settings, including Flash, are maintained for P mode—even when you change modes or turn off the camera. Use Reset Camera (see page 36) to reset P mode to its default settings.
3 Reviewing, tagging, editing When you take a picture, your camera saves: ■ full-size pictures on your card, and ■ smaller copies in the SLICE Album 1 2 For previous/ next picture... tap the left/right side of the LCD or swipe If the microSD Card icon is displayed, the newest picture/video from the card appears. (If the SLICE Album icon is displayed, tap it, then tap the microSD Card icon.) www.kodak.
Reviewing, tagging, editing Viewing pictures as thumbnails Thumbnail Bar ■ Tap (or drag up) the thumbnail bar to show thumbnails. ■ Tap a thumbnail to see it in the main view. ■ Double-tap (or drag down) the thumbnail bar to hide thumbnails. 18 www.kodak.
Reviewing, tagging, editing Using the review shortcuts When you press the Review button, shortcut and status icons appear. Share Select Delete Picture card or SLICE Album Tag Edit Menu Hide shortcuts Battery level Thumbnail Bar Know when your battery needs charging. See page 9. www.kodak.
Reviewing, tagging, editing Magnifying a picture during review Zoom out (Wide) Zoom in (Telephoto) 1 Press Telephoto (T) to magnify 1X–8X. 2 Drag the picture to view the desired area. ■ To return to 1X, press Wide Angle (W) or view the previous/next picture. Playing a video 1 Press the Review button. 2 Tap the left/right side of the screen (or swipe) to find a video. 3 Tap 20 to play the video. ■ Tap the Volume icon, then drag the slider to adjust the volume. ■ Tap anywhere to pause/resume.
Reviewing, tagging, editing Deleting pictures/videos 1 Press the Review button. 2 Tap the left/right side of the screen (or swipe) to find a picture/video. 3 Tap the Delete icon, then follow the screen prompts. (If shortcuts are hidden, tap the top of the LCD to show them.) Using the undo delete feature If you accidentally delete a picture/video, you may be able to use Undo Delete to retrieve it. This feature is only available immediately after you delete a picture/video.
Reviewing, tagging, editing Tagging pictures so that they are easier to find Tag pictures to make them easy to find, later. You can tag people, locations, or keywords. For example, the camera can find all pictures that contain “Mary,” or “Philadelphia,” or “Dad’s 60th Birthday.” Assigning people tags to pictures 1 Press the Review button. Tap the left/right side of the screen (or swipe) to find a picture that contains faces. 2 Tap the Tag icon, tap Tag People, then tap Apply Tags.
Reviewing, tagging, editing Assigning location tags to pictures 1 Press the Review button, then find a picture to tag. 2 Tap the Tag icon, then tap Location. 3 Tap Enter New Location (see Adding a new location)or tap Recent Locations. 4 Repeat these steps to assign a location to other pictures. When finished, tap X. Adding a new location The keyboard appears when you need to type. 1 Begin typing. The camera find matches. Keep typing, or tap the desired location.
Reviewing, tagging, editing Pre-tagging, for pictures/videos you take next Use the Preset Keyword Tag feature to assign a keyword tag to the next pictures/videos you take. First, create a new keyword tag. See page 22. Then: 1 Tap the Menu icon. 2 Tap Preset Keyword Tag or Preset Location Tag. 3 Tap a Keyword (or add one, page 22) or a Location (or add one, page 23). 4 Tap X to return to the main menu. Tap X again to exit the menu. The selected tag is displayed on the LCD.
Reviewing, tagging, editing Using the Search feature to find pictures Tag pictures to make them easy to find, later. (See page 22.) You can tag people, locations, or keywords. For example, the camera can find all pictures that contain “Mary,” or “Philadelphia,” or “Dad’s 60th Birthday.” All By faces By date 1 Press the Review button. 2 Tap the microSD Card or SLICE Album icon. The last picture taken is displayed.
Reviewing, tagging, editing Editing pictures 1 Press the Review button, then tap the Menu icon. 2 Tap a tab: ■ Review to tag people, keywords, locations, favorites, and more ■ Edit to edit pictures/videos ■ Setup for other camera settings (see page 35) 3 Tap a setting. 4 Tap an option. To access the camera Help system, see page 43. Cropping pictures You can crop a picture so that only the desired portion of the picture remains.
Reviewing, tagging, editing Editing videos Making a picture from a video You can choose a single frame from a video, then make a picture suitable for printing. 1 Press the Review button. Tap the left/right side of the screen (or swipe) to find a video. 2 Tap the Menu Video icon, then tap the Edit tab. 3 Tap Make Picture. Picture 4 Tap the Play icon to play the video. Tap anywhere to pause/resume. (Tap the left/right side of the screen for previous/next frame.).
Reviewing, tagging, editing Selecting multiple pictures/videos Use the multi-select feature when you have two or more pictures/videos to print or delete. (Multi-select can also be used when viewing thumbnails, page 18.) 1 Press the Review button. Tap the left/right side of the screen (or swipe) to find a picture/video. Selected pictures 2 Tap the Select shortcut. You can tap the shortcut a second time to remove a check mark.
4 Using your SLICE Album The KODAK SLICE Touchscreen Camera stores a copy of every picture you take, so your collection—your SLICE Album—is always complete and portable! When you take pictures, your camera saves: ■ full-size pictures on your card, and ■ smaller copies in the SLICE Album When you transfer pictures to your computer, only the full-size versions are transferred.
Using your SLICE Album Deleting pictures from the SLICE Album 1 Press and hold the Review button (even if the camera is off). Or tap the microSD Card or SLICE Album icon, then tap SLICE Album to view your SLICE Album. 2 Locate the picture to delete. 3 To delete the picture, tap Delete. Backing up the SLICE Album Safeguard the pictures in your SLICE Album—create a backup file on your computer and update it often. 1 Install the KODAK Share Button App on your computer.
5 Using the Menus You can change settings to get the best results from your camera. To access the camera Help system, see page 43. Using the Capture menu 1 Tap the Menu icon. 2 Tap a tab: ■ Capture/Video for the most common picture/video-taking settings ■ Setup for other camera settings 3 Tap a setting. 4 Tap an option. (Some options let you tap .) NOTE: Some modes offer limited settings. Some settings remain until you change them; others, until you change modes or turn off the camera.
Using the Menus Setting More information AF Control (Still) Continuous AF—Camera is always focusing; uses more Choose an auto-focus setting. battery power than Single AF. Single AF—Camera focuses when the Shutter button is pressed halfway down, using less battery power than Continuous AF. Exposure Compensation See Specifications, starting on page 50. Make a picture lighter or darker. (Available in Program and Panorama modes.) To access this feature with a shortcut, see page 16.
Using the Menus Setting More information Focus Mode Auto—For general picture-taking. Select a large or concentrated Macro—For sharpness and detail in pictures at close range. area of focus. Use available light instead of flash, if possible. The camera automatically sets the focus distance depending on the zoom position. Infinity—For distant subjects; auto-focus framing marks are unavailable.
Using the Menus Using the Video menu Setting More information Video Size Choose a video resolution. See Specifications, starting on page 50. AF Control (Video) Choose an auto-focus setting. Continuous AF—Camera is always focusing. Single AF—Camera focuses once, when the Shutter button is pressed. Self-timer Choose a self-timer feature. See page 14. Preset Keyword Tag Create keyword names and assign them to pictures/videos. See page 22.
Using the Menus Using the Setup menu Setting More information Date & Time See page 4. The format chosen is used for all date/time features. LCD Brightness Auto—LCD brightness is automatically adjusted according to environment. High Power—Brighter LCD; uses more battery power. Power Save—Dimmer LCD; uses less power. Show or hide: Share Settings Choose what is displayed when the Share button is pressed in Review.
Using the Menus More information Setting Camera Sounds Sound Volume (High, Medium, Low, Mute) Choose volume and choose sound Touch Tone effects for each function. Focus Lock Shutter Self-timer Error Power On Image Storage Auto—The camera uses the card if one is in the camera. If Choose a storage location for not, the camera uses internal memory. pictures/videos. Internal Memory—The camera uses internal memory, even if a card is installed. Language Choose your language.
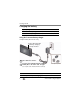
6 Transferring and printing Download KODAK Software—so it’s easy to transfer and share pictures and videos. Make sure the computer is connected to the Internet. When you connect the camera to the computer, the KODAK Software Downloader automatically runs. Follow the prompts to download and install KODAK Software.* 1 Turn off the camera. 2 Use the KODAK Camera USB Cable, Micro B / 5-Pin to connect camera to computer. 3 Turn on the camera.
Transferring and printing Printing pictures Direct printing with a KODAK All-in-One Printer Your camera is compatible with PICTBRIDGE Technology, so you can print directly to PICTBRIDGE enabled Printers. You need a camera with a fully charged battery, a PICTBRIDGE enabled Printer, and a USB cable. 1 Turn off the printer. Turn on the camera. 2 Connect the appropriate USB cable from the camera to the printer. The PICTBRIDGE Logo is displayed, followed by the current picture and menu.
Transferring and printing Using a printer that is not PICTBRIDGE enabled After you transfer pictures from the camera to your computer, you can print them. Ordering prints online With the KODAK Gallery (www.kodakgallery.com), you can easily: ■ Upload your pictures. ■ Edit, enhance, and add borders to your pictures. ■ Store pictures, and share them with family and friends. ■ Have prints, photo greeting cards, frames, and albums delivered to your door.
7 Sharing pictures and videos Sharing via social networking sites It’s never been easier to share pictures on your favorite social networking sites. IMPORTANT: To use the camera social networking features, you need to download KODAK Software (page 37). 1 Press the Review a picture. 2 Tap the Share button. Tap the left/right side of the screen (or swipe) to find icon. 3 Drag or swipe to see available social networking sites. Tap one or more sites. A check mark appears for each chosen site.
Sharing pictures and videos Marking pictures/videos for emailing It’s simple to mark pictures so that they’re ready to email. First, create a new email address. (See Add a new email address.) 1 Press the Review a picture. button. Tap the left/right side of the screen (or swipe) to find 2 Tap the Share icon, then tap the desired email address. (Drag or swipe to find an email address.) To send the pictures/videos to more than one address, repeat the previous step.
Sharing pictures and videos Assigning the favorite mark to pictures/videos To make your favorite pictures/videos easier to locate, you can assign the favorite mark. 1 Press the Review button. 2 Tap the left/right side of the screen (or swipe) to find a picture/video. 3 Tap the Menu icon. 4 Tap Favorite, then tap X. The favorite mark appears with the picture. To access the camera Help system, see page 43. 42 www.kodak.
8 Getting help Getting help from your camera You want the most from your camera. You want to understand: ■ What it can do for you ■ And how to take the best possible pictures and videos Great news! Your camera offers a built-in Help system. It describes every setting for every menu choice. If you learn nothing else about your camera, learn how to use on-camera Help. Turning on camera Help 1 Tap the Menu icon. 2 On a main menu, Tap/hold a menu item. (Or, when an icon is available, tap it.
Getting help Troubleshooting For step-by-step product support, go to www.kodak.com/go/slicesupport and choose Step-by-Step Solutions and Repair. Camera problems If Try one or more of the following Camera does not turn on. If battery power is extremely low, the camera may turn off. In most cases, this is normal and can be corrected by recharging the battery. In the U.S. and other countries where the Step-by-Step Solutions and Repair tool is available: ■ Recharge the battery or install a new one.
Getting help If Try one or more of the following Stored pictures are ■ Retake pictures. (Do not remove card while the camera is on. Keep rechargeable battery charged.) corrupted. ■ Transfer the pictures to the computer (page 37), then format the card or internal memory (see page 36). Caution: Formatting a card deletes all pictures and videos, including protected files. In Review mode, ■ Check the image storage location setting (page 36).
Getting help If Try one or more of the following Picture is too dark. ■ Turn on the flash (page 13). ■ Stay within the flash distance (Camera specifications, page 50). ■ Use Fill flash (page 13) or change your position so light is not behind the subject. ■ Increase Exposure Compensation (page 16). Camera does not recognize the microSD/SDHC Card. ■ Purchase a certified microSD/SDHC Card. ■ Format the card (see page 36).
Getting help Camera/computer communications If Try one or more of the following Cannot transfer pictures. (The Add New Hardware Wizard cannot locate drivers.) ■ Disconnect the USB cable. Close all open applications. The computer does not communicate with the camera. ■ Turn on the camera (page 3). Re-install the software (page 37). ■ Install new battery (page 1) or charge rechargeable battery (page 2). ■ Connect the USB cable to the camera and the computer (page 37).
Getting help LCD messages If Try one or more of the following No images to display ■ Change image storage location setting (see page 36). Memory card requires ■ Insert a new card (page 5) or format the card (see page 36). formatting Caution: Formatting a card deletes all pictures and videos, including protected files.
Getting help Helpful links Email, write, or phone customer support www.kodak.com/go/contact Get support for your product (FAQs, troubleshooting information, etc.) www.kodak.com/go/slicesupport Arrange for repairs www.kodak.com/go/itg Purchase camera accessories (lenses, cards, etc.) www.kodak.com/go/sliceaccessories Download the latest camera firmware and software www.kodak.com/go/slicedownloads See online demonstrations of your camera www.kodak.
9 Appendix Camera specifications For more specifications, go to www.kodak.com/go/slicesupport. CCD—1/2.3-type (4:3 aspect ratio) Effective Pixels—4352 x 3240 (14 MP) Lens—5X optical zoom lens, 35–175 mm (35 mm equivalent); f/4.8–f/5.2 Image stabilizer—Lens shift type Digital zoom—5X continuous Shutter speed—1/2–1/2000 sec. (8 seconds in long time exposure) LCD—8.9 cm (3.5 in.) capacitive touch, color LCD; 230 K (960 x 240) dots; 30 fps External storage—Optional microSD/SDHC Card.
Appendix Auto Exposure/Auto Focus—TTL-AE; Multi-zone, Center-zone, Face Priority Exposure compensation—+/-2.0 EV with 1/3 EV steps White balance—Smart Capture: Auto; P mode: Auto, Daylight, Tungsten, Fluorescent, Open Shade Electronic flash—Auto flash; Guide no. 6.3 @ ISO 100; working range, Red eye reduction turned off: 2.6 m (8.5 ft) @ ISO 400 wide; 2.4 m (7.
Appendix Output image size: Pictures— 14 MP (4:3): 4288 x 3216 pixels 12 MP (3:2): 4288 x 2848 pixels 10 MP (16:9): 4288 x 2416 pixels 6 MP (4:3): 2880 x 2160 pixels 3 MP (4:3): 2048 x 1536 pixels 2 MP (16:9): 1920 x 1088 pixels 1 MP (4:3): 1280 x 960 pixels Output image size: SLICE Album— 4:3: 1280 x 960 pixels 3:2: 1280 x 848 pixels 16:9: 1280 x 720 pixels Communication with computer—USB 2.
Appendix Upgrading your software and firmware Make sure you are using the latest versions of KODAK Software and camera firmware (the software that runs on the camera). Go to www.kodak.com/go/slicedownloads. Important safety instructions CAUTION: Do not disassemble this product; there are no user-serviceable parts inside. Refer servicing to qualified service personnel. KODAK AC Adapters and Battery Chargers are intended for indoor use only.
Appendix ■ Remove the battery when the product is stored for an extended period of time. In the unlikely event that battery fluid leaks inside the product, contact Kodak customer support. ■ In the unlikely event that battery fluid leaks onto your skin, wash immediately with water and contact your local health provider. For additional health-related information, contact your local Kodak customer support. ■ See www.kodak.
Appendix ■ Blow gently on the lens or LCD to remove dust and dirt. Wipe gently with a soft, lint-free cloth or an untreated lens-cleaning tissue. Do not use cleaning solutions unless designed specifically for camera lenses. Do not allow chemicals, such as suntan lotion, to contact painted surfaces. ■ Service agreements may be available in your country. Contact a dealer of KODAK Products for more information. ■ For digital camera disposal or recycling information, contact your local authorities.
Appendix Limitations This warranty does not cover circumstances beyond Kodak's control.
Appendix Regulatory compliance FCC compliance and advisory This equipment has been tested and found to comply with the limits for a Class B digital device, pursuant to Part 15 of the FCC Rules. These limits are designed to provide reasonable protection against harmful interference in a residential installation. This equipment generates, uses, and can radiate radio frequency energy and, if not installed or used in accordance with the instructions, may cause harmful interference to radio communications.
Appendix MPEG-4 Use of this product in any manner that complies with the MPEG-4 visual standard is prohibited, except for use by a consumer engaging in personal and non-commercial activities. CE Hereby, Eastman Kodak Company declares that this KODAK Product is in compliance with the essential requirements and other relevant provisions of Directive 1999/5/EC.
Appendix China RoHS Russian GOST-R Eastman Kodak Company Rochester, NY 14650 www.kodak.
1 Index A about this camera, 36 accessories battery, 54 buying, 49 microSD/SDHC card, 5 add keywords, names, 22, 41 AF control, 32 AF control (video), 34 AF zone, 33 appendix, 50 auto flash, 13 focus control, 34 focus framing marks, 7 auto focus (AF) zone, 33 B backlight, 11 battery charging, 2 life, 54 loading, 1 purchase, 9 status, 9 burst, using, 14 button burst, 14 delete, 8 flash, 13 zoom, 12 60 C camera sounds, 36 capture modes, 10 caring for your camera, 54 charging the battery, 2 cities, 23 clock,
Index error messages, 48 exposure compensation, 16 long time, 32, 35 exposure compensation, 32 battery, 1 microSD/SDHC card, 5 software, 37 internal memory, storage capacity, 52 ISO speed, 32 F faces, tagging, 22 favorites tagging, 42 fireworks, 11 firmware, upgrading, 53 flash settings, 13 flower, 11 focus framing marks, 7 focus mode, 33 format, card or internal memory, 36 K keyboard, 22, 41 keywords, 22 KODAK Software installing, 37 upgrading, 53 KODAK Software, installing, 37 Kodak web sites, 49 G g
Index inserting card, 5 storage capacity, 52 microSD/SDHC card inserting, 5 modes, capture SCN (scene), 10 smart capture, 10 video, 10 multiple picture selections, 28 N names, tagging, 22 night landscape, 11 night portrait, 11 O online prints, ordering, 39 optical zoom, 12 orientation sensor, 35 P P mode, 16 panoramic pictures, 15 people, tagging, 22 PICTBRIDGE enabled Printer, 38 picture size, 32 pictures copying, 28 cropping, 26 deleting, 21 emailing tagged, 41 from video, 27 printing, 39 printing tagged
Index protecting, 21 S scene modes, 11 backlight, 11 fireworks, 11 flower, 11 landscape, 11 night landscape, 11 night portrait, 11 panorama, 15 portrait, 11 self-portrait, 11 snow, 11 sunset, 11 SCN (scene), 10 scroll, touchscreen, ii SD/SDHC card printing from, 39 storage capacities, 52 select multiple pictures/videos, 28 self-portrait, 11 self-timer, 14 setting about this camera, 36 AF control, 32 AF zone, 33 auto-focus, 34 camera sounds, 36 color mode, 32 date and time, 4 flash, 13 image storage, 36 ISO
Index T tagging favorites, 42 for email, 41 keywords, 22 locations, 23 people, faces, 22 pre-tagging, 24 tap, touchscreen, ii time, setting, 4 timer, shutter delay, 14 touchscreen gestures, ii transferring pictures, videos, 37, 40 trash can, deleting, 8 troubleshooting, 43 camera, 44 camera/computer communications, 47 error messages, 48 turning camera on/off, 3 typing, 22, 41 storage capacities, 52 transfer, 37, 40 viewing, 17 video size, 34 viewing picture/video after taking, 8, 17 W warranty, 55 WEEE, 5