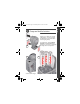
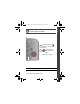
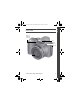
urg_01119.book Page 1 Wednesday, March 3, 2010 6:29 AM ENGLISH Charge and load the batteries Lights are on while the charger is plugged in. (See the charger documentation for instructions and charging times.) For longer life, charge KODAK Ni-MH Rechargeable Batteries AA prior to use, and occasionally discharge them to depletion. 1 2 3 www.kodak.
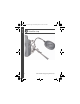
urg_01119.book Page 2 Wednesday, March 3, 2010 6:29 AM ENGLISH Attach the strap 2 www.kodak.
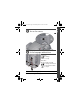
urg_01119.book Page 3 Wednesday, March 3, 2010 6:29 AM ENGLISH Turn on the camera Set the language and date/time Language: OK to change. to accept. Date/Time: At the prompt, press OK. to change current field. OK for previous/next field. to accept. See the Extended user guide www.kodak.com/go/z981support www.kodak.
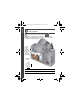
urg_01119.book Page 4 Wednesday, March 3, 2010 6:29 AM ENGLISH Take a picture . 1 Turn the Mode dial to Smart Capture 2 Press the Shutter button halfway to lock the focus. When the framing marks turn green, press the Shutter button completely down. To save battery power, press the EVF/LCD button and use the electronic viewfinder. Framing marks See other modes see page 10 See the Extended user guide www.kodak.com/go/z981support 4 www.kodak.
urg_01119.book Page 5 Wednesday, March 3, 2010 6:29 AM ENGLISH Review pictures/videos the Review 1 Press button to enter/exit Review. 2 View previous/ next picture or video. OK Play a video. Review See the Extended user guide www.kodak.com/go/z981support www.kodak.
urg_01119.book Page 6 Wednesday, March 3, 2010 6:29 AM ENGLISH Download software, transfer pictures When you connect the camera to the computer, it prompts you to run the KODAK Software Downloader on your computer. Make sure the computer is connected to the Internet. When you connect the camera to the computer, the KODAK Software Downloader automatically runs. Follow the prompts to download and install KODAK Software. 1 Turn off the camera.
urg_01119.book Page 7 Wednesday, March 3, 2010 6:29 AM ENGLISH Use the camera Help system button, then highlight a menu choice. 1 Press the Menu 2 Press the Info button. Scroll through a Help topic. Keep learning about your camera! Go to www.kodak.com/go/z981support for: • the Extended user guide • interactive troubleshooting and repairs • interactive tutorials • and more! See the Extended user guide www.kodak.com/go/z981support www.kodak.
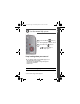
urg_01119.book Page 8 Wednesday, March 3, 2010 6:29 AM ENGLISH Back View EVF/LCD Power light Mode dial Power Vertical Shutter on/off Shutter button Flash, Focus Mode, Drive Jog dial Strap post Zoom Share 5V DC-In, A/V Out, USB Vertical Shutter button OK, EVF (Electronic viewfinder) LCD Delete, Menu, Info, Review Tripod socket SD/SDHC Card slot, battery compartment 8 www.kodak.
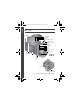
ENGLISH urg_01119.book Page 9 Wednesday, March 3, 2010 6:29 AM Front View AF Assist/ Self-timer/ Video light Flash Microphone Speaker Lens www.kodak.
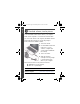
urg_01119.book Page 10 Wednesday, March 3, 2010 6:29 AM 1 Do more with your camera Choose the mode that best suits your subjects and surroundings. Capture mode Smart Capture Excellent image quality and ease of use. Portrait Full-frame portraits of people. Sport Subjects that are in motion. Shutter speed is fast. Panorama “Stitching” 2 or 3 pictures into 1 panoramic scene. SCN Scene P A S M For Point-and-shoot simplicity when taking pictures under special conditions.
urg_01119.book Page 11 Wednesday, March 3, 2010 6:29 AM Do more with your camera Take a video 1 Turn the Mode dial to Video 2 Press the Shutter button completely down, then release it. To stop recording, press and release the Shutter button again. Use Scene (SCN) modes Choose a Scene mode—for great pictures in any situation. 1 Turn the Mode dial to SCN. 2 Press to choose a mode and read its description. 3 Press OK (or let the description turn off) to enter the chosen Scene mode.
urg_01119.book Page 12 Wednesday, March 3, 2010 6:29 AM Do more with your camera Use the flash Press the Flash button repeatedly to scroll through flash modes. The current flash mode appears on the LCD or EVF. Flash modes Flash fires Auto When the lighting conditions require it. Fill (Flash On) Every time you take a picture, regardless of the lighting conditions. Use when the subject is in shadow or is “backlit” (when the light is behind the subject). NOTE: Not available in Smart Capture mode.
urg_01119.book Page 13 Wednesday, March 3, 2010 6:29 AM Do more with your camera Use the optical zoom 1 Use the LCD or EVF to frame your subject. 2 To zoom in, press Telephoto (T). To zoom out, press Wide Angle (W). 3 Take the picture. Delete pictures/videos 1 Press the Review 2 Press button. for previous/next picture/video. 3 Press the Delete button. 4 Follow the screen prompts. See the Extended user guide www.kodak.com/go/z981support www.kodak.
urg_01119.book Page 14 Wednesday, March 3, 2010 6:29 AM Do more with your camera P, A, S, and M modes Use these modes for more control over your camera. Jog dial Mode When to use Press Jog dial to control Program mode offers Exposure compensation (how much the ease of auto light enters the camera), flash shooting with access to compensation, and ISO speed all menu options.
urg_01119.book Page 15 Wednesday, March 3, 2010 6:29 AM Do more with your camera Use the menu button to change settings You can change settings to get the best results from your camera. Some modes offer limited settings. 1 Press the Menu 2 Press button. to choose a tab: ■ Capture/Video for the most common picture- and video-taking settings ■ Setup for other camera settings 3 Press to choose a setting, then press OK. 4 Choose an option, then press OK. To access the camera Help system, see page 7.
urg_01119.book Page 16 Wednesday, March 3, 2010 6:29 AM Do more with your camera Understand the picture-taking icons Focus mode Self timer/Burst Flash mode Capture mode Pictures/time remaining Zoom slider Battery level Date stamp Tag name Understand the review icons Video duration Select picture/video Print, quantity Protected Email Picture/Video number Add text tag View thumbnails Play video Upload Favorite Text tag Battery level See the Extended user guide www.kodak.com/go/z981support 16 www.
urg_01119.book Page 17 Wednesday, March 3, 2010 6:29 AM 2 Share and tag pictures It’s never been easier to share pictures on your favorite social networking sites. IMPORTANT: To use the social networking features, you need to download KODAK Software. (See page 6.) 1 Press the Review button, then to find a picture. 2 Press the Share button. If it’s your first time, a Help screen appears. 3 Press to choose a social networking site, then press OK. A check mark appears.
urg_01119.book Page 18 Wednesday, March 3, 2010 6:29 AM Share and tag pictures Choose networking sites to show You can show/hide social networking sites on your camera so that only your favorite sites appear. 1 In Review, press the Menu button. 2 Press to choose the Setup tab, then Share Button Settings, then press OK. to choose 3 Press to choose a social networking site, then press to choose Show/Hide. Repeat this step for each network. 4 When finished, press to choose Done, then press OK.
urg_01119.book Page 19 Wednesday, March 3, 2010 6:29 AM Share and tag pictures Manage email addresses and KODAK PULSE Digital Frames You can add, edit, or delete email addresses and KODAK PULSE Digital Frames on your camera. 1 In Review, press the Share button. Press to choose Manage Email Addresses (or Manage Frames), then press OK. 2 To add an email address or frame, press to choose New Email or New Frame, then press OK. Use the on-screen keyboard to make the addition. (Example: JohnDoe@domain.
urg_01119.book Page 20 Wednesday, March 3, 2010 6:29 AM Share and tag pictures Use the keyboard The keyboard appears when you need it. 1 Press to choose a letter, then press OK. 2 When finished, press to choose OK, then press OK. 3 If you’ve added a new name, the camera prompts you to update all faces to match assigned names. Choose Yes, then press OK. The name is assigned to all faces that match this one. Tag pictures Tag pictures to make them easy to find, later.
urg_01119.book Page 21 Wednesday, March 3, 2010 6:29 AM Share and tag pictures Tag people When you tag faces, you’re helping your camera to recognize people by name. Then it matches names and faces in pictures you’ve taken—and those you take in the future! 1 Press the Review that contains faces. button, then 2 Press the Menu button. Press People, then press OK. 3 Press to find a picture to choose Tag to choose Apply Tags, then press OK.
urg_01119.book Page 22 Wednesday, March 3, 2010 6:29 AM Share and tag pictures Need to update a name? If you meet a new friend—James—but you already have pictures tagged with an old friend, James, you can: ■ Tag the new James with “James Smith” and/or ■ Update the old James to “James Monroe” 1 Press the Review button. 2 Press the Menu button. Press People, then press OK. to choose Tag 3 Press to choose Modify Names List, then press OK. 4 Press press OK.
urg_01119.book Page 23 Wednesday, March 3, 2010 6:29 AM Share and tag pictures Tag with keywords 1 Press the Review button, then 2 Press the Menu button. Press Tag, then press OK. to find a picture. to choose Keyword 3 Press to choose an existing keyword or New Keyword to add a new one, then press OK. 4 Press to add keywords to other pictures. When finished, press to choose Done, then press OK. To return to picture-taking mode, press the Shutter button halfway down.
urg_01119.book Page 24 Wednesday, March 3, 2010 6:29 AM Share and tag pictures A smarter way to find your pictures Tag pictures—by people or keywords—to make them easy to find, later. For example, the camera can find all pictures that contain “Mary” or “Dad’s 60th Birthday.” (See Tag people, page 21 or Tag with keywords, page 23.) 1 Press the Review button. 2 Press the Wide Angle (W) button to view pictures by thumbnail (or choose View Thumbnails shortcut).
urg_01119.book Page 25 Wednesday, March 3, 2010 6:29 AM 3 Solve camera problems To access the camera Help system, see page 7. Status Solution Camera does not turn on or off ■ Make sure the batteries are charged and installed correctly (see page 1). Camera buttons and controls do not function Flash does not fire ■ Check the flash setting, and change as needed (see page 12). NOTE: The flash does not fire in all modes.
urg_01119.book Page 26 Wednesday, March 3, 2010 6:29 AM 4 Appendix CAUTION: Do not disassemble this product; there are no user-serviceable parts inside. Refer servicing to qualified service personnel. KODAK AC Adapters and Battery Chargers are intended for indoor use only. The use of controls, adjustments, or procedures other than those specified herein may result in exposure to shock and/or electrical or mechanical hazards. If the LCD breaks, do not touch the glass or liquid.
urg_01119.book Page 27 Wednesday, March 3, 2010 6:29 AM Appendix Limited Warranty Kodak warrants its digital cameras and accessories (excluding batteries) to be free from malfunctions and defects in both materials and workmanship for the warranty period specified on your KODAK Product packaging. Retain the original dated sales receipt. Proof of purchase date is required with any request for warranty repair.
urg_01119.book Page 28 Wednesday, March 3, 2010 6:29 AM Appendix Your rights Some states or jurisdictions do not allow exclusion or limitation of incidental or consequential damages, so the above limitation or exclusion may not apply to you. Some states or jurisdictions do not allow limitations on how long an implied warranty lasts, so the above limitation may not apply to you. This warranty gives you specific rights, and you may have other rights which vary from state to state or by jurisdiction.
urg_01119.book Page 29 Wednesday, March 3, 2010 6:29 AM Appendix China RoHS Eastman Kodak Company Rochester, New York 14650 © Kodak, 2009 Kodak, EasyShare, and Pulse are trademarks of Eastman Kodak Company. 4H6893_en www.kodak.