KODAK EASYSHARE W820/W1020 Wireless Digital Frames Extended user guide www.kodak.com For help with your digital frame, www.kodak.
Eastman Kodak Company Rochester, New York 14650 © Eastman Kodak Company, 2008 All screen images are simulated. Kodak and EasyShare are trademarks of Eastman Kodak Company. Eastman Kodak Company is an authorized licensee of the CompactFlash trademark.
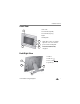
Product features Front View 1 LCD screen 1 2 Touch border (tap/slide) 3 Touch border (tap only) 4 Lights 5 Raised guide 3 4 2 5 NOTE: When screen icons appear, lights turn on at touch-sensitive points near the raised guide. To use the touch border, see page 3. Back/Right View 1 Audio In 2 Audio Out 1 3 DC-In (12V) 4 Speakers (2) 2 4 3 www.kodak.
Back/Side View 4 1 5 2 6 3 7 8 1 Power button 5 Volume button 2 Wall mounting holes 6 Memory card slot - CF, MD 3 Rotating/extending stand (see page 1) 7 USB connector (to camera/USB device) 4 Memory card slot - SD/SDHC, MMC, MS, xD USB connector (to computer) ii 8 www.kodak.
Table of contents 1 1 Getting started ......................................................................................1 Setting up your frame.................................................................................... 1 Turning on/off your frame.............................................................................. 2 Using your frame’s Quick Touch Borders ........................................................ 3 Setting your language ..................................................
Table of contents Playing music .............................................................................................. 37 Playing a video............................................................................................ 38 Printing pictures.......................................................................................... 39 Copying on your frame ................................................................................ 41 Deleting pictures ...................................
Table of contents 9 Appendix .............................................................................................73 Digital frame specifications.......................................................................... 73 Important safety instructions ....................................................................... 75 Additional care and maintenance ................................................................ 76 Limited warranty ..........................................................
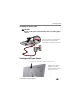
1 Getting started Welcome to your KODAK EASYSHARE W820/W1020 Wireless Digital Frame. Viewing your pictures couldn’t be simpler! Setting up your frame Setting up the stand Your frame displays pictures in landscape orientation, see page 65. orientation. To change to portrait Stand (pull to adjust the frame angle for best viewing) 2 When displayed with the stand extended, the frame rests at a 68-90 ° angle. 1 1 www.kodak.
Getting started Attaching the power cable CAUTION: Do not use this power cable with other devices, including digital cameras. Your power cable may look different from the one pictured. Use the plug that accommodates your type of power outlet. 1 2 Turning on/off your frame Power button - press and hold (for about 2 seconds), then release. With the power cable still plugged in, your frame retains information (like the time) if you turn it off. www.kodak.
Getting started Using your frame’s Quick Touch Borders IMPORTANT: The display screen is not touch-sensitive. Do not touch it. Lights appear on the borders (upper right and bottom) to show you where to touch. CAUTION: Only use your finger to touch the borders. Using sharp or metal objects may damage the border or screen. Tap lights next to icons (No sliding here) Touch tips Tap and slide on the Quick Touch Borders* only. Tap a border to display the icons. Tap Close to dismiss them.
Getting started Setting your language The language screen appears the first time you turn on your frame. Slide (or tap below slider arrows) on the lights at the bottom border to highlight your language, then tap Save. NOTE: Slide left/right on the lights to move up or down the list. ■ Save To change the language at a later time: Slider arrows ■ Tap (Home) → (Settings) → Language. The language screen appears. Slide to highlight your language, then tap Save. To use the Quick Touch Borders, see page 3.
2 Setting up for wireless operation If you have problems with your wireless setup or connection, see Troubleshooting starting on page 67. Or open EASYSHARE Digital Display Software on your computer (see page 9) and click Tools → Wireless Troubleshooter. Follow the automated troubleshooting wizard. Connecting to your wireless network To allow your frame to access the contents of your computer wirelessly, connect your frame to your wireless home network.
Setting up for wireless operation Available wireless networks are listed. NOTE: If the scan finds multiple networks, your home network (with the highest % signal strength) is usually listed first and highlighted. Tap OK. Or, to select another network, slide or tap below the arrows to highlight a network, then tap OK. Slider Slider arrows You can slide to highlight Exit without connecting, then tap OK (or tap Back) to dismiss the screen and go to the Home screen (see page 30).
Setting up for wireless operation If your wireless network is not found: a. Slide to highlight My network not shown, then select OK. b. Check that your router is on and your frame is close to the router, then select Scan again. If your wireless network is still not found, your network does not broadcast SSIDs. You then need to enter your network SSID (sometimes called the network name) manually: a. Select Enter SSID, then tap OK. The on-screen keyboard appears. b.
Setting up for wireless operation Backspace - erases text Done Touch tips Right border - tap only Text box Slider Select On the bottom border, keep sliding (or tapping slider arrows) left/right to go to the previous or next row. Slider arrows If you do not have security enabled, go to step 3. (We recommend that you enable your network security to prevent others from accessing your wireless home network.) NOTE: The screen identifies your security as either WEP or WPA.
Setting up for wireless operation Installing the software: WINDOWS OS only IMPORTANT: For MAC OS users, do not install the software on your computer. See page 15 to open your frame’s Device Settings page in your browser to start setting access to Web content and customizing your frame.
Setting up for wireless operation Verifying computer/device connections Scanning to verify your wireless network connection gives your frame access to content on your devices wirelessly. After installing the software (see page 9), return to your frame then: 1 Tap OK. The network connection setup screen appears. Scan later Scan now If you forgot to install the software, tap Back then install the software (see page 9).
Setting up for wireless operation Help Done Exit Scan again 3 If your computer is listed, your wireless connection is successful. Tap Done to close the window. If your computer is not listed, tap Scan again or tap Help for options. You have completed the frame setup. Your frame can now access your host computer, wirelessly. Your computer appears as a picture source icon on your frame’s Home screen (see page 30). 4 Tap (Home) to start viewing your pictures.
3 Setting up Web content Setting up access to the Gallery and Web media IMPORTANT: For Mac OS users, do not load the EASYSHARE Digital Display Software on your computer. See page 15 to open your frame’s Device Settings page in your browser to start setting access to Web content and customizing your frame from your computer.
Setting up Web content 5 6 6 From the drop-down menu, select your frame. 7 Click the following Web Media pages for setup instructions to easily access content right on your frame: 13 ■ KODAK Gallery—connect to your existing Gallery account or set up a new one to receive pictures from other Gallery friends and family. See page 16. ■ FLICKR—sign in to your existing FLICKR account or set up a new one (see page 17) so you can receive and view FLICKR photos on your frame.
Setting up Web content NOTE: Use the preview, edit, and delete features to manage your feed list quickly and easily (see page 26). IMPORTANT: Make sure you click Save or Save to frame to save your entries. Overview KODAK Gallery FLICKR FRAMECHANNEL Photo RSS Save Create shortcuts Settings Save to frame www.kodak.
Setting up Web content MAC OS users Instead of installing the software on your MACINTOSH Computer, open the Device Settings page right from your browser and start setting up access to Web content and customizing your frame from your computer. 1 Make sure the frame is connected to your wireless network (see page 5) and your computer is connected to the Internet. 2 On the frame, tap Home → Settings → Network, then tap Select. 3 Retrieve the IP address (format: XXX.XXX.X.
Setting up Web content Connecting to your Gallery account Perform this one-time setup on your frame to connect it to your existing KODAK Gallery account. 1 Follow the steps on page 12 to access the Device Settings page. 2 Click the KODAK Gallery tab. The KODAK Gallery Web Media configuration page appears. 3 If you don’t have a Gallery account, click Set one up now. Follow the on-screen instructions, or visit www.kodakgallery.com, then continue with step 4.
Setting up Web content Connecting to your FLICKR account To view your FLICKR photos on your digital frame, you need a FLICKR account. 1 Follow the steps on page 12 to access the Device Settings page. 2 Click the FLICKR tab. The FLICKR Web Media configuration page appears. 3 If you don’t have a FLICKR account, click Set one up. Follow the on-screen instructions to create an account. 4 If you have an account, click Sign in now. The FLICKR authorization window appears if you logged into a valid account.
Setting up Web content Connecting to your FRAMECHANNEL account Creating an account links FRAMECHANNEL to your frame so you can view, create, and manage additional customized feeds such as health, finance, and much more. 1 Follow the steps on page 12 to access the Device Settings page. 2 Click the FRAMECHANNEL tab. The FRAMECHANNEL Web Media configuration page appears. 3 If you don’t have a FRAMECHANNEL account, click the link to create an account. Follow the on-screen instructions.
Setting up Web content Adding Web feeds Set up your frame to view RSS (Really Simple Syndication) photo feeds directly from FLICKR, FRAMECHANNEL, and other favorite sites. IMPORTANT: Your frame can play only feeds that contain photos. An error message appears when you try to play feeds that are text only. Make sure you preview your feeds after they are added to the Web Media configuration page where you can edit or delete them. See page 26.
Setting up Web content 3 4 5 Save 6 7 5 In the Site drop-down menu, keep FLICKR as the default site. 6 Enter a tag (keyword) for the types of photos you want to see. NOTE: FLICKR automatically sends pictures matching the tag (keyword) directly to your frame. 7 Click in the Photo feed name box to automatically assign the tag to the FLICKR feed name. 8 Click Save.
Setting up Web content How to add a FRAMECHANNEL feed 1 Follow the steps on page 12 to access the Device Settings page. 2 Click the FRAMECHANNEL tab. The FRAMECHANNEL Web Media configuration page appears with a list of preloaded FRAMECHANNEL feeds that are on your frame. 3 If you don’t have a FRAMECHANNEL account, click the link and follow the on-screen instructions to create one.
Setting up Web content FRAMECHANNEL logo 2 3 4 Save 5 6 5 From the Category drop-down menu, select the type of content you want to see from FRAMECHANNEL (news, weather, sports, finance, etc.) 6 You can change the photo feed name (category included) that appears automatically. 7 Click Save. 8 Congratulations, you have completed your FRAMECHANNEL photo feed setup! Your feed is added to the list of FRAMECHANNEL feeds on the configuration page and to the Web Media list on your frame’s Home screen.
Setting up Web content How to add feeds from other sites 1 Follow the steps on page 12 to access the Device Settings page. 2 Click the Photo RSS tab. The Photo RSS/FLICKR Device Settings page appears with a list of preloaded feeds that are on your frame. 3 Click Add. The Photo RSS/FLICKR Add/Edit page appears. NOTE: You can edit preloaded feeds here (such as Flickr: Interesting photos) and feeds you add from other sites. (See page 26.) 2 3 4 6 7 4 From the Site drop-down menu, select Other.
Setting up Web content Change the name, if desired, by clicking the feed name and entering a new one. 8 Click Save. Congratulations, you have completed your photo feed setup! The feed name is added to the list of feeds on the Web Media Configuration page (see 7) and also in the Web Media list on your frame’s Home screen. (See page 30.) To create a shortcut of your feed on the Home screen, see page 25. NOTE: Preview your feed to make sure it will play on your frame. (See page 26.) www.kodak.
Setting up Web content Creating shortcuts on your frame Create up to five shortcuts to easily access your favorite Web media (such as KODAK Gallery, FLICKR, and FRAMECHANNEL) right from your frame’s Home screen. 1 Follow the steps on page 12 to access the Device Settings page. 2 Click the Create Shortcuts tab. The Web Media shortcut page appears with a list of photo feeds (including feeds you create as shortcuts) that are on your frame.
Setting up Web content Previewing, editing, and deleting feeds Preview, edit, or delete feeds that are preloaded or that you add to the Web Media configuration list to play on your frame. IMPORTANT: Your frame plays only feeds that contain photos. An error message appears when you try to play feeds that are text only. Make sure you preview your feeds after they are added on the Device Settings Web Media page. To preview a feed, click configuration page.
Setting up Web content Preview Edit Delete 27 www.kodak.
4 Viewing on your frame Enjoying your pictures immediately! ■ To view your pictures or play a slide show, insert a memory card, or connect a camera or other USB device (see page 29).Your pictures play automatically. If your frame has pre-loaded sample pictures, they start playing automatically. To maximize your frame’s internal memory, delete the pre-loaded samples. Access them on My Frame (see page 30), then see page 42 to delete them. If you are at the Home screen, see page 30 to start your slide show.
Viewing on your frame Connecting a digital camera or other USB device USB devices: camera, flash drive, card reader, computer, etc. (sold separately) 29 USB cable included with your USB www.kodak.
Viewing on your frame Viewing the Home screen Start at the Home screen to: ■ access your pictures, videos, music, and preloaded FRAMECHANNEL photo feeds such as news, weather, sports ■ view Web media content from KODAK Gallery, FLICKR, FRAMECHANNEL, and other photo-sharing sites ■ customize your viewing through the Settings screens If the icons are not visible, tap the Quick Touch Borders. Tap the border below one of the icons along the bottom of the screen. Tap Close to dismiss the icons.
Viewing on your frame KODAK Gallery—appears if you set up access (see page 16) and create the Gallery as a shortcut (see page 25). If you did not create a shortcut, find KODAK Gallery listed in Web Media above. Display your Gallery albums and My Friends’ Albums. This icon ( ) indicates someone has shared pictures with you at the Gallery! See page 49. FLICKR—preloaded (including Interesting photos from FLICKR) and new FLICKR feeds you set up (see page 19).
Viewing on your frame Accessing your pictures and videos 1 Tap (Home), then (Pictures and Videos). All connected sources are displayed. 2 Slide or tap below the arrows to highlight a picture source, then: ■ Tap (Play slide show) on the right border to start a slide show of the pictures in the highlighted source. Picture source icon ■ Or, tap OK to view thumbnails, folders, etc. Picture sources: Internal memory—the frame’s 512 MB internal memory.
Viewing on your frame Viewing pictures and videos View pictures and videos from the frame’s internal memory or any connected picture source (see page 32). IMPORTANT: For wireless access, make sure you set up your frame to work with your wireless home network (see page 5). See also Viewing pictures/videos wirelessly, page 45. Viewing thumbnails (multi-up) There are two ways to view your pictures as thumbnails: ■ Tap (Home) → (Pictures and Videos), then select a picture source, (see page 32). Tap OK.
Viewing on your frame Viewing a single picture ■ To view a single, full-screen picture, highlight it in thumbnails view, then tap OK. If a slide show is playing, tap the border (upper right or bottom) when the picture appears, then tap (Close) to hide the icons and lights and view full screen. ■ To magnify a picture up to 8X, tap (Actions), then tap (Zoom). Slide under the zoom bar from left to right towards the plus (+) sign. To view other parts of the magnified picture, tap the arrows .
Viewing on your frame Playing a slide show There are two ways to start a slide show on your frame: ■ Insert a card or connect a USB device—a new slide show starts automatically, replacing a currently running slide show or single view picture. Highlight a picture folder in thumbnails view (see page 33), or highlight a picture source on the Pictures and Videos screen, then tap (Play slide show). NOTE: Music and videos in the same picture source play automatically during a slide show.
Viewing on your frame Arranging pictures to play by date or filename The pictures on your frame are arranged and played by date, starting with the oldest. You can play the arrangement or order by date, newest to oldest, or alphabetically by filename. To change the sort order: 1 While viewing a slide show, tap a border to display the icons, then tap show options). (Slide 2 Highlight Sort, then tap Select.
5 Doing more with your frame Playing music 1 Tap (Home), then (Music). Slide to highlight a music source then tap OK. 2 Slide to the right/left to move up/down the music source list, then tap OK. Play/Pause button 3 Slide right/left to go to the previous/next song, or tap Select all, then tap the Play button on the bottom of the border to start playing music. Tap (Audio Options) at the bottom to turn on/off Shuffle Play and to set Audio Priority. For more details, see page 57.
Doing more with your frame ■ To copy or delete music files (MP3), highlight the songs in the music source, then (Actions) → Copy or Delete → OK. tap -To copy, tap under the destination icon where you want to copy your music. -To delete, tap Yes to confirm the deletion. ■ To copy music files (MP3) from your computer to your frame’s internal memory, drag and drop them from your computer. See Copying wirelessly to/from your computer, page 53.
Doing more with your frame Printing pictures NOTE: The print icon is available on your frame when you connect your printer. Your frame is compatible with PICTBRIDGE Technology, so you can print directly to PICTBRIDGE enabled Printers. 1 Turn off the frame and printer. 2 Make sure your frame is disconnected from the printer. 3 Turn on the frame, then change your connection mode on your frame from Computer to Printer. See page 40. 4 Reconnect your frame to the printer, using the USB cable.
Doing more with your frame Manually changing USB connection mode The connection mode must match the device you connect the frame to: Computer or Printer. The default is Connect to computer. You can change the connection mode manually. 1 Disconnect the printer or computer from the frame. 2 On the frame, tap 3 Tap (Home). (Settings). 4 Slide to highlight Device configuration, then tap Select. 5 Highlight USB connection mode, then tap Select.
Doing more with your frame Copying on your frame Copy pictures from your current viewing location to other connected devices (see page 29). CAUTION: Removing a card or disconnecting a device while copying may damage your card, pictures, or device. 1 Highlight a picture to copy: In thumbnails view, slide or tap below the slider arrows to find a picture; or, display a picture in single view (see page 33). 2 Tap 3 Tap (Actions). (Copy). 4 Tap under the destination icon where you want to copy your picture.
Doing more with your frame Deleting pictures CAUTION: Removing a card or disconnecting a device while deleting may damage your card, pictures, or device. 1 Highlight a picture to delete: In thumbnails view, slide or tap below the slider arrows to find a picture; or, display a picture in single view (see page 34). 2 Tap (Actions). 3 Tap (Delete), then tap Yes to confirm. The picture is deleted. 4 Tap Close to dismiss the screen. To delete multiple pictures, see page 43. www.kodak.
Doing more with your frame Selecting multiple pictures Use the multi-select feature to copy or delete two or more pictures or to play a slide show of selected pictures. 1 In thumbnails view (see page 33), slide or tap below the slider arrows to find a picture, then tap (Select). A check mark appears on the selected picture. 2 Continue selecting pictures. To remove a check mark, tap (Unselect) while the picture is highlighted.
6 Using wireless mode For more information on wireless setup, operation, and networks, see Setting up for wireless operation, page 5 or visit www.kodak.com/go/wifisupport or www.wi-fi.org. What are the wireless features of my frame? Connect to your home wireless network and: ■ Display pictures on your frame directly from your computer hard drive (see page 45). ■ Display Web content you set up (see page 46). ■ Display pictures from your KODAK Gallery account (see page 47).
Using wireless mode Viewing pictures/videos wirelessly Wirelessly view pictures and videos from your computer right on your frame using the KODAK EASYSHARE Digital Display Software. Before you proceed: 1 Make sure you install the software packaged with your frame (see page 9). Connect to your wireless home network (see page 5), then verify your computer connection (see page 10). Your frame can now access the content on your host computer, wirelessly.
Using wireless mode 5 Pictures are displayed as thumbnails. See Chapter 4, Viewing on your frame for all the ways you can enjoy your pictures, videos, and music on your frame. Viewing Gallery/Web media content on your frame ■ Play slide shows of KODAK Gallery albums (see page 47). ■ Play slide shows of photo RSS (Really Simple Syndication) preloaded feeds or ones you set up (see page 48). ■ Receive pictures from your friends and family at the Gallery (see page 49).
Using wireless mode FRAMECHANNEL—appears if you create shortcuts for FRAMECHANNEL feeds from favorite photo-sharing sites (see page 21). News— Preloaded feed from FRAMECHANNEL that you can manage or customize (see page 21). Weather—Preloaded feed from FRAMECHANNEL that you can manage or customize (see page 21). Sports—Preloaded feeds from FRAMECHANNEL that you can manage or customize (see page 21). Viewing KODAK Gallery pictures View Gallery pictures and albums wirelessly right on your frame.
Using wireless mode Viewing Web feeds on your frame Wirelessly view preloaded RSS feeds or feeds you set up (see page 19) of frequently changing Web content such as FLICKR or FRAMECHANNEL public photos, news, weather, sports, finance, etc. 1 From the Home screen, tap a shortcut feed you set up (see page 25) or a preloaded one such as News, Weather, and Sports (see page 30). The slide show begins.
Using wireless mode Automatically receiving My Friends Albums Your wireless frame uses KODAK’s Picture Mail feature to notify you automatically when a friend shares pictures with you at the KODAK Gallery. Play a slide show of the new pictures, right on your frame, even before you see the email on your computer! To see the shared pictures right away: ■ When the notice appears on the frame screen, tap below View now. A slide show of the new pictures plays on your frame.
Using wireless mode Turning off auto-receive and notification You can turn off auto-receive and/or notification from your friends’ albums at the Gallery from the Home screen (see below) or from the Device Settings page (see page 12). 1 Tap Home , Settings , then tap OK. 2 Tap KODAK Gallery, then tap Select. 3 Highlight Picture Mail, then tap Select. 4 Choose from these options: Auto-receive with notification ON—(default) you automatically receive your friends’ albums and the notice appears on the frame.
Using wireless mode Emailing pictures and videos from your frame Select pictures or an album on your frame then share them wirelessly via Email. First, add the person’s email address to your share list and assign an optional nickname. IMPORTANT: Make sure you install the software that came with your frame (see page 9) and connect your frame to your wireless home network (see page 5). Adding a new email address 1 Choose a picture source then tap 2 Tap (Actions). (Share) → Add name.
Using wireless mode Sharing your pictures 1 Highlight a picture to share: In thumbnails view (see page 33), slide or tap below the slider arrows to find a picture; or, display a picture in single view (see page 34). 2 Tap 3 Tap (Actions). (Share). A list of email addresses and nicknames you created appear. The album name and number of pictures to share are also displayed. 4 Slide to highlight an email address. Or, tap Add name to add a new email address to your share list (see page 51). 5 Tap (Share).
Using wireless mode Copying wirelessly to/from your computer The KODAK EASYSHARE Digital Display Software (included on the CD that was packaged with your frame) lets you drag and drop (copy) pictures, videos, and music wirelessly between your frame and computer or other connected devices (see page 29). Before you proceed: 1 Make sure you install the software packaged with your frame (see page 9). Connect to your wireless home network (see page 5), then verify your computer connection (see page 10).
Using wireless mode Click Help for more info Select pictures here (Viewer Pane) Drag and drop here (Drag and Drop Zone) Click here to create a slide show Pictures/videos on your computer Music My Devices: - your wireless frame - connected USB devices 4 Click My Devices to see the folders on your frame and connected devices (see page 29).
Using wireless mode NOTE: The slide show order of play for available sources is: memory card, USB device, internal memory. NOTE: To maintain the slide show order during playback, see page 36 and select Filename, A - Z. Copying pictures from EASYSHARE Software It’s easy to copy pictures/videos from My Collection to your frame. 1 Install the software that came with your frame (see page 9). 2 Set the USB connection mode to Computer (see page 40). 3 Double-click software.
Using wireless mode 7 Select Best For Digital Picture Frame to resize the picture you are copying. Full resolution is unnecessary and quickly fills up the frame’s memory. 8 Click Copy. Pictures are copied to your frame. 9 Go to the copy location to view your copied pictures on your frame and to play a slide show. www.kodak.
7 Changing settings and more Changing frame settings The options in the Settings menu let you customize and configure your frame. 1 Tap (Home), then (Settings). 2 Slide or tap below the slider arrows to highlight a setting, then tap Select. IMPORTANT: You may need to keep sliding to see a complete list of available options. 3 Follow the on-screen instructions. Tap Save to accept your selections. 4 Tap (Back) to exit.
Changing settings and more Setting Options Viewing options Sort—available during a slide show only (see page 36). Background music—available during a slide show only (see page 37). Slide duration—specify how long each picture is displayed in a slide show, from 3 seconds to 1 hour. (The default is 5 seconds.) Transitions—specify the transition style between pictures in a slide show. See screen for options. The default is Random. Shuffle—plays the images in random order.
Changing settings and more Setting Options Clock and timer On/Off schedule—set your frame to turn on and off at a specified time every day (see page 61). Set time—manually set the clock to the current time (see page 60). KODAK Gallery Specify your country, email address, and password. First, install the software (see page 9) and set up access to the KODAK Gallery (see page 12). Network Set up your frame for wireless operation. See page 5.
Changing settings and more Setting Options Automatic resizing Choose to turn on or off automatic resizing of your pictures when copying. Full resolution is unnecessary for viewing and quickly fills up the frame’s memory. Choose full resolution for printing. About Check your frame model, serial number, and firmware version. Setting the clock and timer Manually setting the clock 1 Tap (Home), then (Settings). 2 Highlight Clock and timer, then tap Select. 3 Highlight Set time, then tap Select.
Changing settings and more Setting automatic on/off Set your frame to turn on and off at a specified time every day. NOTE: Set the clock before enabling auto on/off. 1 Tap (Home), then (Settings). 2 Highlight Clock and timer, then tap Select. 3 Highlight On/Off schedule, then tap Select. The current time is displayed and the hour field is highlighted. 4 Set the Turn on time. Slide to adjust the hour. Tap the Next arrow to highlight the next setting (minutes), then slide to adjust it.
Changing settings and more Upgrading your software and firmware Upgrade to the latest versions of the software included on the CD that was packaged with your frame (see page 9). Firmware is the software that runs on your frame. To check for the latest version, visit www.kodak.com/go/digitalframedownloads. Manually upgrade firmware Download the firmware to your computer, then upgrade your frame: 1 On your computer, go to www.kodak.com/go/digitalframedownloads.
Changing settings and more Automatically upgrade firmware from the Internet When the frame is connected to your wireless network, you can automatically upgrade the firmware from the Internet whenever a new version is available. For the latest features and best experience with your frame, upgrade your firmware from the Internet whenever the new firmware upgrade message appears.
Changing settings and more Adding a matte and faceplate Customize your frame with a decorative matte and/or faceplate (packaged with some frames). Additional mattes and faceplates are available for purchase (see page 66). Frame When you are not using the matte, reapply it to the liner and store in a plastic bag to keep the adhesive backing clean. Matte Faceplate Mounting your frame on the wall Use wall-anchoring hardware (not included) to anchor your frame securely to your wall.
Changing settings and more Changing your frame orientation Change the frame orientation setting if you change to portrait orientation. Change the stand position and angle: Rotate the stand 90 °, then pull it out or push it in to adjust the frame angle. NOTE: When displayed with the stand extended, the frame rests at a 68-90 ° angle. ■ Change the frame orientation setting: (Settings). 1 Tap (Home) → 2 Slide to highlight OK.
Changing settings and more Maintaining your frame and mattes IMPORTANT: Always disconnect the power before cleaning. Do not use water, cleaning solutions, or other adhesives on the frame or any of its parts. Gently wipe the frame, LCD, or matte with a clean, dry, lint-free cloth (included). For fingerprints on the frame, apply light pressure. Learning more about your frame www.kodak.com/go/digitalframes Purchase frame accessories, including decorative faceplates and custom mattes www.kodak.
8 Troubleshooting and support For step-by-step product support, visit www.kodak.com/go/digitalframesupport and select Interactive Troubleshooting & Repairs. Frequently asked questions I already have KODAK EASYSHARE Software on my computer. Do I have to install it again? The CD that was packaged with your frame contains a special version of EASYSHARE Software that lets your computer share pictures with your frame. Install it to upgrade to this special software version, see page 9.
Troubleshooting and support I didn’t connect to my network the first time I turned on my frame. Can I do it now? Yes, you can. 1 Tap Home → Settings . Slide to highlight Network, then tap Select. 2 Highlight Scan for wireless networks, then tap OK. 3 Continue with step 1 on page 5. Picture frame problems If... Try one or more of the following Frame cannot connect ■ Make sure you have a wireless router and that it is broadcasting the SSID, or enter the SSID manually.
Troubleshooting and support If... Try one or more of the following Nothing happens when ■ Insert a certified SD/MMC/MS/xD/CF/MD Card with images into the designated card slot, then push to seat it (see page 28). In the a memory card, camera, top card slot, make sure the card is seated flush with the top. or USB device is ■ Make sure the USB cable that was included with your camera or connected. USB device is connected securely (see page 29).
Troubleshooting and support Resetting the clock after losing power If you turn off the power on the frame or otherwise lose power for half a day or more, the clock time returns to the factory setting and the automatic on/off times, if set, are disabled. ■ When you turn the frame back on, the set time screen appears on the frame. ■ Slide to set the hour. Tap the left/right arrows to highlight the previous or next setting (hour and minutes), then slide to adjust the setting. Tap OK.
Troubleshooting and support If... Try one or more of the following Cannot copy pictures from one device to another even though the copy destination is not full. Storage devices that have FAT (File Allocation Table) 16 formatting can only store up to 512 files in its top level folder (root directory). To make sure all your pictures copy properly, format the copy destination to FAT32 before copying to it: Caution: Formatting deletes all pictures and videos, including protected files.
Troubleshooting and support Screen message Try one or more of the following Write failed. Select another location. The frame was unable to copy the picture. ■ Insert a different card or device (see page 28). Unable to create file. Device write The frame was unable to copy the picture. protected or full. ■ Insert a different card or device (see page 28). Disk full. ■ Remove write protection, unlock card. ■ Delete pictures from card. Error attempting to open file or directory.
9 Appendix Digital frame specifications For more specifications, visit www.kodak.com/go/digitalframesupport. KODAK EASYSHARE W820/W1020 Wireless Digital Frames Color display W820 20.3 cm (8 in.) diagonal digital LCD, 800 x 480 pixels, 4:3 or 16:9 aspect ratio, 17.6 x 10 cm (6.9 x 3.9 in.) viewable area W1020 25.4 cm (10 in.) diagonal digital LCD, 800 x 480 pixels, 16:9 aspect ratio, 23.5 x 14.6 cm (9.3 x 5.8 in.
Appendix KODAK EASYSHARE W820/W1020 Wireless Digital Frames Picture formats JPEG, JPG, EXIF 2.2 Video formats MOV, AVI, MPG, MPEG NOTE: HD (High Definition) is not supported on your frame. Video formats created with digital cameras are certified for KODAK Digital Frames. Videos created with or copied from other sources may not play on your frame.
Appendix Important safety instructions CAUTION: Do not disassemble this product; there are no user-serviceable parts inside. Refer servicing to qualified service personnel. Do not expose this product to liquid, moisture, or extreme temperatures. The use of controls, adjustments, or procedures other than those specified herein may result in exposure to shock and/or electrical or mechanical hazards. If the LCD breaks, do not touch the glass or liquid. Contact Kodak customer support.
Appendix Additional care and maintenance ■ Wipe the frame and the LCD gently with a soft, lint-free cloth (included). Do not use cleaning solutions unless designed specifically for LCD screens. Do not allow chemicals, such as suntan lotion, to contact painted surfaces. ■ Service agreements are available in some countries. Contact a dealer of Kodak products for more information. ■ For digital frame disposal or recycling information, contact your local authorities.
Appendix materials are warranted for the remaining warranty term of the original Product, or 90 days after the date of repair or replacement, whichever is longer. Limitations This warranty does not cover circumstances beyond Kodak's control.
Appendix Your rights Some states or jurisdictions do not allow exclusion or limitation of incidental or consequential damages, so the above limitation or exclusion may not apply to you. Some states or jurisdictions do not allow limitations on how long an implied warranty lasts, so the above limitation may not apply to you. This warranty gives you specific rights, and you may have other rights which vary from state to state or by jurisdiction.
Appendix or relocate the receiving antenna; 2) increase the separation between the equipment and the receiver; 3) connect the equipment to an outlet on a circuit different from that to which the receiver is connected; 4) consult the dealer or an experienced radio/TV technician for additional suggestions. Any changes or modifications not expressly approved by the party responsible for compliance could void the user’s authority to operate the equipment.
Appendix Hereby, Eastman Kodak Company declares that this Kodak product is in compliance with the essential requirements and other relevant provisions of Directive 1999/5/EC. This digital picture frame (W820 or W1020) transmits in 10 dBm. In France, the power level is limited to 10dBm in outdoor environments, per regulations. When in France, use the wireless functions of this device indoors only.
Appendix Russian GOST-R Eastman Kodak Company Rochester, New York 14650 China RoHS 81 www.kodak.
Appendix Korean Class B ITE Licensing Supply of this product does not convey a license nor imply any right to distribute content created with this product in revenue-generating broadcast systems (terrestrial, satellite, cable and/or other distribution channels), streaming applications (via Internet, intranets and/or other networks), other content distribution systems (pay-audio or audio-on-demand applications and the like) or on physical media (compact discs, digital versatile discs, semiconductor chips,
1 Index A about, frame, 60 appendix, 73 automatic on/off, 59, 61 E EASYSHARE Software copying pictures from, 55 error messages, 71 B battery safety, 75 button macro/landscape, ii F fast forward video, 38 firmware checking version, 60 upgrading, 57 flash drive, connecting, 29 frame, picture changing orientation, 1 checking model, firmware, serial number, 60 setup, 1 specifications, 73 troubleshooting, 68 C cables USB, connecting, 29 camera, connecting, 29 changing picture locations, 32 clock and timer,
Index L landscape, set orientation, 58 language setting, 59, 60 setting first time, 4 M MAC OS users, 15 macro/landscape button, ii multi-up view, 33 O on/off, setting auto, 59, 61 orientation setting, 1, 58 P PICTBRIDGE enabled Printer, 39 pictures copying connected, 53 copying from EASYSHARE Software, 55 deleting, 42 location, changing, 32 selecting more than one, 43 play/pause, video, 38 portrait, set orientation, 58 power specifications, 73 printer connection mode, 40 printing, PICTBRIDGE Printer, 39 R
Index troubleshooting error messages, 71 frame, 68 U upgrading firmware, 57 USB connection mode, 40 USB device, connecting, 29 V viewing pictures, wireless network, 45 thumbnails, 33 W warranty, 76 wireless features on frame, overview, 44 setup, 44 viewing pictures, 45 85 www.kodak.