KODAK EASYSHARE TOUCH Camera / M577 Extended user guide www.kodak.com Help: www.kodak.com/go/m577support Tutorials: www.kodak.
Eastman Kodak Company Rochester, New York 14650 © Eastman Kodak Company, 2011 All screen images are simulated. Kodak, EasyShare Touch, Ektachrome, Kodachrome, Kodacolor, Max, Perfect Touch, Pulse, T-Max, and Tri-X are trademarks of Eastman Kodak Company.
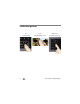
Product features Quick start 1 Load the battery. 2 Charge until the 3 Set language, date/time. 4 Take pictures, videos. light stops blinking. 5 Install software, then share. Keep learning! Take and share your best pictures, videos! www.kodak.
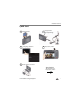
Product features Front, top view IR Receiver for optional remote control Flash AF Assist/ Self-timer/ Video light Lens Power Power/Battery Charging light Shutter button (for pictures) Record Video ii www.kodak.
Side, bottom view Luminance sensor Zoom LCD HDMI Out Micro USB AV Out Strap post Tripod socket Speaker MICROSD/SDHC Card (accessory) Review Share Slot for MICROSD/SDHC Card (accessory) Battery compartment www.kodak.
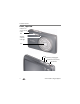
Touchscreen gestures Tap (or tap and hold) iv Swipe (Drag and quickly release) Drag or scroll (Pull down or push up) www.kodak.
Table of contents 1 1 Setting up your camera .........................................................................1 Attaching the strap ....................................................................................... 1 Loading the KLIC-7006 battery...................................................................... 1 Charging the battery ..................................................................................... 2 Turning on the camera ...............................................
Table of contents Understanding the review icons................................................................... 28 Cropping a picture ...................................................................................... 29 Using effects ............................................................................................... 30 Using decorative effects .............................................................................. 30 Trimming a video ..............................................
Table of contents 8 Appendix .............................................................................................57 Specifications.............................................................................................. 57 Care and maintenance ................................................................................ 59 Upgrading your software and firmware........................................................ 59 Storage capacities ......................................................
1 Setting up your camera Attaching the strap Loading the KLIC-7006 battery All batteries lose power over time–even if they’re not being used. For longer life, fully charge the battery prior to use. Charge the battery 1 See page 2 Purchase extra batteries www.kodak.com/go/accessories Watch the battery level See page 13 www.kodak.
Setting up your camera Charging the battery If your package included Then see An in-camera battery charger Using the in-camera battery charger An external battery charger Using the external battery charger Using the in-camera battery charger You can charge the Li-ion battery whenever necessary. Battery Charging light: • Blinking: charging • Steady On: finished charging 1 Turn off the camera. 2 Connect the KODAK Camera USB Cable, Micro B / 5-Pin and charger.
Setting up your camera Using the external battery charger You can charge the Li-ion battery whenever necessary. If you have this charger... Battery Charging light: • Orange: charging • Green: finished charging If you have this charger... Battery Charging light: • Flashing green: charging • Steady On green: finished charging Watch the battery level See page 13 Purchase extra batteries www.kodak.com/go/accessories 3 www.kodak.
Setting up your camera Charge via your computer’s USB port You can charge the Li-ion battery whenever necessary. IMPORTANT: The camera charges when the computer is on and awake. Turn off the computer’s hibernation, sleep, and standby modes. 1 Turn off the camera. 2 Connect the KODAK Camera USB Cable, Micro B / 5-Pin and charger. Use only the cable included with this camera.
Setting up your camera Turning on the camera 5 www.kodak.
Setting up your camera Setting the language, date/time The first time you turn on the camera, you’re prompted to choose your language and set the date/time. Set the language: 1 Drag or swipe up/down to view your language. (For more information on using touchscreen gestures, see page iv.) 2 Tap your language, then tap Done. Set the date and time: 1 Tap the Month, Date, or Year that you want to change, then tap to change it. (Tap MDY to change the date format.) 2 Tap the Hour or Minutes, then tap it.
Setting up your camera Storing pictures on a MICROSD/SDHC Card Your camera has internal memory. We recommend purchasing a MICROSD/SDHC Card to conveniently store more pictures/videos. CAUTION: A card can only be inserted one way; forcing it may cause damage. Inserting or removing a card while the camera is on may damage the pictures, the card, or the camera. 1 Turn off the camera, then open the door. 2 Insert a card until it clicks. To remove a card, press and release it.
2 Taking pictures/videos Taking pictures in Smart Capture mode When you turn on the camera the first time, it’s ready to take pictures in Smart Capture mode . After that, it remembers the last mode you used. To choose a different mode (page 17), tap . You can also take pictures using the Touch Shutter feature (page 9). 1 Use the LCD to compose the picture. 2 Press the Shutter button halfway to focus and set exposure. Framing marks indicate the camera focus area.
Taking pictures/videos Taking pictures using the Touch Shutter feature For convenience, you can take pictures using the Touch Shutter feature. The camera focuses on the area you touch, then takes a picture. NOTE: When the touch shutter is off, the icon shown is . 1 Tap Touch Shutter . The LCD displays the Touch Shutter square. 2 Use the LCD to compose the picture. Touch Shutter square 3 To take a picture, tap the desired area of focus inside the Touch Shutter square.
Taking pictures/videos Reviewing the picture/video just taken After you take a picture/video, the LCD displays a quickview for several seconds. The picture/video is saved unless you tap Delete . (To dismiss the quickview and get back to taking pictures right away, press the Shutter button halfway.) Review a picture Play a video To review pictures/videos anytime, see page 23. www.kodak.
Taking pictures/videos Your camera, the way you want it Sometimes, you want to see everything available. (Other times, you want everything out of your way!) Tap anywhere on the LCD to change between Clean view and Tools view. Clean view Tools Tools view (Tools vary by camera mode.) 11 www.kodak.
Taking pictures/videos Using Tools to choose actions, preferences Tools In Liveview, tap a tool at the top of the LCD to adjust settings. Tap the most recent picture thumbnail to see it in Review. or Most recent picture In Review, tap a tool or to see the previous or next picture/video. NOTE: If you choose , you get a scrollable menu. Tap a setting to view and choose its options. (Some settings let you tap to change a setting.) www.kodak.
Taking pictures/videos Understanding the picture-taking icons Touch Shutter Self-timer/Burst Flash Icons vary by mode. Exposure compensation ISO White balance Sharpness Settings Swipe to see these tools. Color mode Focus/Exposure zone Zoom slider Capture mode Most recent picture/video Battery level Number of pictures/video time remaining Watch the battery level Don’t miss out on great pictures and videos—keep your battery fully charged.
Taking pictures/videos Taking a video The camera is always ready to take a video—just press the Video Record button! 1 Use the LCD to compose the video. 2 To start recording, press and release the Video Record button . To stop recording, press and release the button again. The first frame of the new video and the play button are displayed for a few seconds. ■ To play/pause the video, tap the Play button. ■ www.kodak.com/go/support If you don’t like the video, tap Delete , then follow the prompts.
Taking pictures/videos Using the zoom Use optical zoom to get closer to your subject before taking a picture or video. (If the zoom button is pressed during video recording, then digital zoom is used.) 1 Use the LCD to frame your subject. (For focus distances, see Specifications, page 57.) 2 Press the zoom button toward Telephoto (T) to zoom in. Press toward Wide Angle (W) to zoom out. 3 Take the picture or video. NOTE: To get a focused picture every time, use the framing marks (page 8). 15 www.kodak.
Taking pictures/videos Using the flash Use the flash when you take pictures at night, indoors, or outdoors in heavy shadows. Flash settings are limited in some capture modes. 1 Tap Flash to view flash modes. 2 Tap the desired Flash mode. Flash modes The flash fires Auto When the lighting conditions require it. Fill Every time you take a picture, regardless of the lighting conditions. Use when the subject is in shadow or is “backlit” (when the light is behind the subject).
Taking pictures/videos Using different modes Tap Capture mode Smart Capture Then tap the mode that suits your subject. For General picture taking—it offers excellent image quality and ease of use. ■ Faces are detected. ■ The scene is analyzed for other content and for lighting. You can choose the best picture size and aspect ratio for your needs—tap Settings and choose Picture Size. Film Effects Film-like effects that make your pictures/videos more interesting (see page 18).
Taking pictures/videos Using Film Effects Choose a film effect before taking a picture/video. 1 Tap , then tap Film Effects. 2 Tap an effect to read its description and see an example. 3 Tap Apply to choose that effect. Film Effect For KODACOLOR Nostalgic color EKTACHROME Vivid Vibrant saturated color KODACHROME 25 1970’s Bright natural color T-MAX Art Lustrous tone and fine grain TRI-X Photojournalism Dramatic contrast and grain Sepia Vintage reddish-brown tint www.kodak.
Taking pictures/videos Using Scene modes Choose a Scene mode before taking a picture. 1 Tap , then tap Scene. 2 Tap a Scene mode to read its description. 3 Tap Apply to choose that Scene mode. Scene mode For Program More creative control than Smart Capture. Portrait Full-frame portraits of people. Sport Subjects that are in motion. Shutter speed is fast. Landscape Distant scenes. Close-up Close range. Use available light instead of flash, if possible. Sunset Subjects at dusk.
Taking pictures/videos Using Program mode The Program Scene mode gives access to the greatest number of settings. 1 Tap , then tap Scene. 2 Tap Program, then tap Apply. Touch Shutter Self-timer/Burst Flash Exposure compensation ISO White balance Sharpness Settings Capture mode Swipe to see these tools. Color mode Focus/Exposure zone NOTE: Settings that you change in Program mode apply only to pictures taken in Program mode.
Taking pictures/videos Taking self-timer pictures/videos Use the self-timer when you want to be included in a picture, or to ensure a steady Shutter button press. Place the camera on a tripod or flat surface. NOTE: When the self-timer is off, the icon shown is 1 Tap Self-timer/Burst . , then tap a self-timer setting: 10 seconds— 10 A picture is taken after a 10-second delay (so you have time to get into the scene). 2 seconds— 2 release).
Taking pictures/videos Taking panoramic pictures Use panorama to “stitch” up to 3 pictures into a panoramic scene. NOTE: Individual pictures are not saved, even if panorama capture is cancelled before stitching occurs. (Exposure Compensation, White Balance, Focus/Exposure Zone, AF Control, Color Mode, and Sharpness are set with the first picture. The flash is set to Off.) You can use the self-timer (2- and 10-second delays) while taking panoramic pictures (see page 21).
3 Reviewing and editing Reviewing pictures/videos 1 Press the Review button to enter Review. 2 Tap All, People, Date, Keywords, or Videos. Swipe to access Keywords and Videos or tap the paging bar. Paging bar 3 Review If you chose People, Date, or Keywords, tap a name, date, or keyword.
Reviewing and editing Other things you can do in Review • Swipe a picture to see the previous or next. (Touch and hold the left/right side of the LCD to fast-forward or fast-reverse.) • Tap Play to play videos. • Tap to delete pictures/videos. Delete Multi-up Home Back Tag Edit Print Info Settings Swipe to see these tools. Picture has been marked for Share Battery level Picture/video number IMPORTANT: Remember that you can take a video anytime! Just press the Video Record button. www.kodak.
Reviewing and editing Playing a video 1 Press the Review button . 2 Swipe the LCD right or left to find a video. 3 Tap Play to play the video. ■ To pause/resume, tap Play or Pause. (While paused, tap the left/right side of the LCD for previous/next frame.) ■ To adjust the volume, tap Volume, then drag the slider. (If tools are hidden, tap anywhere on the LCD to show them.) ■ You can drag the timeline slider or tap the timeline bar. Deleting pictures/videos 1 Press the Review button .
Reviewing and editing Viewing pictures/videos in different ways Magnifying a picture You can magnify a picture while in review. 1 Press the Review button , then locate a picture. 2 Press the zoom button toward Telephoto (T) to magnify 2X–8X. Press toward Wide Angle (W) to zoom out. 3 Drag the picture the picture. to view other parts of Viewing as thumbnails 1 Press the Review button . 2 Tap All to view all pictures/videos, or tap Date, People, Keywords or Videos.
Reviewing and editing A smarter way to find and enjoy your pictures Tag pictures—by people or keywords—to make them easy to find, later. For example, the camera can find all pictures that contain “Mary” or “Nature.” (See Tagging people, page 42 or Tagging with keywords, page 44.) 1 Press the Review button . 2 Tap All to view all pictures/videos, or tap Date, People, Keywords or Videos. If you chose All, a single-up picture is shown.
Reviewing and editing Understanding the review icons Pictures Delete Multi-up Home Tags Edit Print Info Settings Back Swipe to see these tools. Picture has been marked for Share Battery level Picture/video number Videos Volume Stop Trim Make picture from a video Action Print Play Video progress www.kodak.
Reviewing and editing Cropping a picture You can crop a picture so that only the desired portion of the picture remains. 1 Press the Review button . 2 Swipe the LCD right or left to find a picture. 3 Tap Edit , then tap Crop . 4 Drag the crop box to the desired portion of the picture. Drag a corner of the box to resize it. Drag the box to position it. Drag a corner to change its size. 5 Double-tap the crop box, then follow the screen prompts. The picture is cropped and the original picture is saved.
Reviewing and editing Using effects You can apply effects to pictures. 1 Press the Review button . 2 Swipe the LCD right or left to find a picture. 3 Tap Edit , then tap Effects . 4 Tap Photo Effects, then tap an effect: Photo Effect Steps and Result Spot Color Your picture begins as black and white. Tap a brush, then use your finger to “paint” (restore) color to an area of the picture. If necessary, use the Zoom button to magnify the picture. Use the hand tool to drag the picture.
Reviewing and editing Trimming a video You can remove the start or end from a video, saving only the desired portion. NOTE: This feature is also available during video playback. 1 Press the Review button . 2 Tap Videos, then find the video you want to trim. 3 Tap Edit , then tap Trim 4 Drag the Start trim mark Drag the End trim mark Start . to choose the new start of the video. to choose the new end of the video.
Reviewing and editing Adding a date stamp You can add a stamp—showing the date taken—to a picture. NOTE: Once a date stamp is applied, it cannot be removed on the camera. A date stamp can also be applied in multi-select mode (page 35). 1 Press the Review button . 2 Tap All to view all pictures/videos, or tap Date, People, Keywords or Videos. If you chose All, a single-up picture is shown. (If you choose People, Date, Keywords, tap the desired person, date, or keyword.
Reviewing and editing Making a picture from a video You can choose a single frame from a video, then make it into a picture. (Quality depends on video resolution.) NOTE: This feature is also available during video playback. 1 Press the Review button . 2 Tap Videos, then find the video you want to trim. 3 Tap Edit . 4 Tap Make Picture . 5 Tap Play to play the video. When you reach the desired frame, tap Pause. 6 Tap Make Picture. The picture is created. (The original video is saved.
Reviewing and editing Making an action print from a video From a video, you can make a 9-up picture. (Quality depends on video resolution.) NOTE: This feature is also available during video playback. 1 Press the Review button . 2 Tap Videos, then find the video from which you want to make an action print. 3 Tap Edit . 4 Tap Action Print . A 9-up picture is created. To return to picture-taking mode, press the Shutter button halfway down. www.kodak.
Reviewing and editing Selecting multiple pictures/videos Use the multi-select feature when you have two or more pictures to print, share, delete, protect/unprotect, tag with keyword, etc. Multi-select is only available in thumbnail view (see page 26). 1 Press the Review button . 2 Tap All to view all pictures/videos, or tap Date, People, Keywords or Videos. If you choose All, a single-up picture is shown. Tap Multi-up to view by thumbnails. 3 Tap Select Images, then tap the desired pictures/videos.
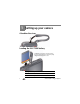
Reviewing and editing Displaying pictures/videos on a television You can display pictures/videos on a television, computer monitor, or any device equipped with a composite video input. If you have an HD television, use an HDMI cable—and get the richest playback experience. HDMI Cable HDMI port AV Cable AV Out port Use the camera controls to navigate through pictures/videos on the television. Purchase cables www.kodak.com/go/support www.kodak.
Reviewing and editing Running a slide show Use Slide Show to display your pictures/videos on the LCD. You can play all pictures/videos, or select pictures to include in the slide show. 1 Press the Review button . 2 To play all pictures/videos, choose All. Then tap Slide Show. To play pictures or videos that you select: a Tap People, Date, Keywords, or Videos. b Tap Select Images, then tap the containers that hold the desired pictures/videos. 3 Tap Slide Show . Each picture/video is displayed once.
Reviewing and editing Using the optional remote control Use the optional remote control to start/stop recording and to review videos and pictures. Go to www.kodak.com/go/accessories. Remove the pull tab. Stop Delete Previous/Next Reverse/Forward OK/Play Liveview (Video/Still) Review Volume/Zoom www.kodak.
4 Sharing pictures/videos Sharing through email and social networks It’s never been easier to share pictures on your favorite social networking sites. IMPORTANT: To use the sharing and social networking features, you must install the KODAK Share Button App (page 49). As new sites become available, they’ll be offered when you connect the camera to a networked computer. Press the Share button anytime In Liveview In Quickview In Review Most recent picture/video 39 www.kodak.
Sharing pictures/videos Using the Simple Share feature Use the Simple Share feature for basic sharing. 1 In Liveview: Press the Share button. Tap Select Images, then tap the pictures/videos you want to share. (To share only the most recent picture/video, tap the thumbnail in the bottom left corner of the LCD.) In Quickview: During a Quickview, press the Share button. Then go to Step 3. In Review: Find a picture/video. (To share more than one, tap Multi-up to view thumbnails.
Sharing pictures/videos Choose which social networking sites to display on your camera You can show/hide networking sites on your camera so that only your favorite sites appear. 1 Tap Settings . 2 Tap Share Button Settings. 3 Tap to check/uncheck each social networking site, then tap Done. When you are in Review and press the Share button, your chosen sites appear. To return to picture-taking mode, press the Shutter button halfway down.
Sharing pictures/videos Tagging pictures Tag pictures to make them easy to find, later. You can tag pictures in 2 ways: ■ People, and then find all pictures of “Mary.” ■ Keywords, and then find all pictures from “Nature.” Tagging people When you tag faces, you’re helping your camera to recognize people by name. Then it matches names and faces in pictures you’ve taken—and those you take in the future! 1 Press the Review button . 2 Tap All to view all pictures, or tap Date, People, Keywords.
Sharing pictures/videos Manually add a face tag If a face is not detected, you can identify and name it. 1 Press the Review button . 2 Swipe the LCD right or left to find the desired picture. 3 Tap Tags. 4 Tap Tag People. If no faces were detected, the Manual Tag menu appears. (If faces were detected, tap Manual Tag.) 5 Follow the prompts to enter a new name, or choose one from the list. (The keyboard appears when you need to type. See page 44.) 6 When finished typing, tap Done.
Sharing pictures/videos Tagging with keywords Tag pictures to make them easy to find, later. 1 Press the Review button . 2 Tap All to view all pictures, or tap Date, People, Keywords. If you chose All, a single-up picture is shown. (If you chose People, Date, Keywords, tap the desired person, date, or keyword. If you chose Videos, thumbnails are displayed.) 3 Tap the LCD to display tools. 4 Tap Tags . 5 Tap Keyword Tag. 6 Tap a tag (or tap “+” to add a new keyword). 7 Tap Done.
Sharing pictures/videos Marking pictures/videos as favorites Mark pictures as favorites to make them easy to find, later. 1 Press the Review button . 2 Tap All to view all pictures, or tap Date, People, Keywords. If you chose All, a single-up picture is shown. (If you chose People, Date, Keywords, tap the desired person, date, or keyword. If you chose Videos, thumbnails are displayed.) 3 Tap the LCD to display tools. 4 Tap Tags . 5 Tap Keyword Tag. 6 Tap Favorite. 7 Tap Done. 45 www.kodak.
5 Using the Settings menu Changing settings You can change settings to get the best results from your camera. NOTE: Some modes offer limited settings. Some settings remain until you change them; others, until you change modes or turn off the camera. 1 In Liveview or Review mode, tap the LCD to display tools. 2 Tap Settings . The Settings list appears. Drag to scroll through the list. 3 Tap a setting, then choose an option within that setting. NOTE: Some settings let you press to change a setting.
Using the Settings menu Setting Options Slide Show Settings Set your slide show preferences. Transitions—Choose how one slide transitions to the next. Loop—Repeat a slide show until you stop it. Intervals—Choose the duration of each slide. AF Control (Still) Continuous AF—Because the camera is always focusing, Choose an auto-focus setting. there is no need to press the Shutter button halfway down to focus. Single AF—Focuses when the Shutter button is pressed halfway down.
Using the Settings menu Setting Options Video Out NTSC—Used in North America and Japan; most common format. Choose the regional setting that lets you connect the PAL—Used in Europe and China. camera to a television or other external device. Format Memory Card—Deletes everything on the card; formats the card. CAUTION: Cancel—Exits without making a change.
6 Install software Install software, transfer pictures, and share IMPORTANT: To use the sharing and social networking features, you must install the KODAK Share Button app. Make sure the computer is connected to the Internet. When you connect the camera to the computer, the KODAK Camera Setup App automatically runs. Follow the prompts to install the KODAK Share Button App. 1 Turn off the camera. 2 Use the KODAK Camera USB Cable, Micro B / 5-Pin to connect the camera to the computer.
Install software Printing pictures Direct printing with a KODAK All-in-One Printer IMPORTANT: To print using PICTBRIDGE Technology, you must change the Computer Connection setting (in the Settings menu) to Other Application (see page 47). You need a camera, a PICTBRIDGE enabled Printer, and a USB cable. Connecting the camera to a KODAK All-in-One Printer 1 Turn off the camera and printer. 2 Use the KODAK Camera USB Cable, Micro B / 5-Pin (included with the camera) to connect the camera to the printer.
Install software Ordering prints online KODAK Gallery (www.kodakgallery.com) makes it easy to: ■ Upload your pictures. ■ Edit, enhance, and add borders to your pictures. ■ Store pictures, and share them with family and friends. ■ Have prints, photo greeting cards, frames, and albums delivered to your door. Printing from an optional MICROSD/SDHC Card ■ Automatically print tagged pictures when you insert your card into a printer. See your printer user’s guide for details.
7 Troubleshooting Camera problems Status Solution Camera does not ■ Remove then reinsert or replace the battery (see page 1). turn on, off; buttons do ■ Charge the rechargeable battery (see page 2). not function Camera freezes up ■ Turn the camera off, then back on. Make sure the camera is turned off before inserting or removing a card. when a card is inserted or removed. LCD is too dark. ■ Adjust the LCD Brightness setting (see page 47).
Troubleshooting Status Solution Flash does not fire ■ Check the flash setting, and change as needed (see page 16). NOTE: The flash does not fire in all modes. Memory card is almost ■ Transfer the pictures to the computer (see page 49). or entirely full ■ Delete pictures from the card (see page 25) or insert a new card. The Reset Camera feature did not take effect.
Troubleshooting Computer/connectivity problems Status Solution The software installer ■ Choose and install the right version for your computer at www.kodak.com/go/camerasw. does not start Slide Show does not run on an external video device ■ Adjust the camera Video Out setting to NTSC or PAL (see Computer does not communicate with the camera ■ Turn off the camera, then turn it back on. page 48). ■ Make sure the external device settings are correct. (See the device’s user guide.
Troubleshooting Status Solution Picture is too dark ■ Reposition the camera for more available light. ■ Use Fill flash (see page 16) or change your position so light is not behind the subject. ■ Move so that the distance between you and the subject is within the effective flash range. (See Specifications, starting on page 57.) ■ To automatically set exposure and focus, press the Shutter button halfway. When the framing marks turn green, press the Shutter button completely down to take the picture.
Troubleshooting Status Solution Cannot print pictures ■ Make sure there is a connection between the camera and the printer (see page 50). ■ Make sure the printer and the camera have power. Camera or printer displays an error message ■ Follow the prompts to resolve the issue. Getting help on the Web Get support for your product (FAQs, troubleshooting www.kodak.com/go/m577support information, etc.) Purchase camera accessories www.kodak.com/go/accessories Download the latest camera firmware www.kodak.
8 Appendix Specifications CCD—1/2.3-type Effective pixels—14 MP (4320 x 3240) LCD—3.0 in. (7.6 cm) LCD; 460K dots; 30 fps; 4:3 aspect ratio Image storage—Optional MICROSD/SDHC Card (The SD logo is a trademark of the SD Card Association.) Maximum supported card size: 32 GB Internal storage capacity—64 MB internal memory (10.9 MB available for image storage. 1 MB equals one million bytes.) Taking lens—5X optical zoom; f/3.9–f/5.
Appendix Exposure compensation—+/-2.0 EV with 1/3 EV step White Balance—Auto, Daylight, Tungsten, Fluorescent, Open Shade Electronic Flash—Auto flash; Auto, Fill, Red Eye, Off; Guide No. 6.4 (m) @ ISO 100; working range in Smart Capture mode: 0.5–3.2 m (1.6–10.5 ft) @ wide; 1.0–2.2 m (3.3–7.2 ft) @ telephoto Self-timer mode—2 seconds, 10 seconds, 2 picture timer Burst modes—See page 21 Capture modes—Smart Capture, Scene modes, Film Effects, Photo Booth, Video (see page 17) Image file format— Still: EXIF 2.
Appendix Microphone—Mono Speaker—Mono PICTBRIDGE support—Yes Power—KODAK Li-ion Rechargeable Digital Camera Battery KLIC-7006; 5V AC-to-USB battery charging; USB charging via computer Tripod mount—1/4 inch Size— 99.8 x 57.4 x 20.1 mm (3.9 x 2.3 x 0.8 in.) @ power off Weight—150 g (5.3 oz) with battery and card Operating temperature—0–40° C (32–104° F) Care and maintenance ■ If you suspect water has gotten inside the camera, remove the battery and card.
Appendix Storage capacities The LCD displays the approximate number of pictures (or minutes/seconds of video) remaining. Actual storage capacity varies depending on subject composition, card size, and other factors. You may be able to store more or fewer pictures and videos. Important safety instructions CAUTION: Do not disassemble this product; there are no user-serviceable parts inside. Refer servicing to qualified service personnel.
Appendix ■ Remove the battery when the product is stored for an extended period of time. In the unlikely event that battery fluid leaks inside the product, contact Kodak customer support. ■ In the unlikely event that battery fluid leaks onto your skin, wash immediately with water and contact your local health provider. For additional health-related information, contact your local Kodak customer support. ■ Go to www.kodak.
Appendix Limited warranty Kodak warrants its digital cameras and accessories (excluding batteries) to be free from malfunctions and defects in both materials and workmanship for the warranty period specified on your KODAK Product packaging. Retain the original dated sales receipt. Proof of purchase date is required with any request for warranty repair. Limited warranty coverage Warranty service is only available from within the country where the Products were originally purchased.
Appendix specified on your Kodak product packaging. The option of repair, replacement, or refund is Kodak's only obligation. Kodak will not be responsible for any special, consequential or incidental damages resulting from the sale, purchase, or use of this product regardless of the cause.
Appendix interference to radio communications. However, there is no guarantee that interference will not occur in a particular installation.
Appendix CE Hereby, Eastman Kodak Company declares that this KODAK Product is in compliance with the essential requirements and other relevant provisions of Directive 1999/5/EC. Australian C-Tick N137 VCCI Class B ITE Russian GOST-R Eastman Kodak Company Rochester, NY 14650 65 www.kodak.
Appendix Korean Class B ITE Korean Li-ion Regulatory www.kodak.
Appendix China RoHS 67 www.kodak.
1 Index A A/V out, 36 about this camera, 48 accessories batteries, 61 buying, 56 MICROSD/SDHC Card, 7 action print, 34 add keywords, names, 44 AF control, 47 auto flash, 16 focus control, 47 focus framing marks, 8 B background blur, 30 backlight, 18, 19 battery charging, 2 expected life, 61 icons, 13 loading, 1 types, 61 blur background, 30 bright, 19 burst, use, 21 button Burst, 21 Delete, 25 Flash, 16 Review, 46 www.kodak.
Index delete pictures from internal memory, 25 from MICROSD/SDHC Card, 25 deleting during quickview, 10 display a slide show, 37 disposal, recycling, 59 download KODAK Software, 49 download pictures, 49 E edit videos, 31 effects, 18, 30 EKTACHROME Vivid, 18 email, 39 email pictures, videos, 45 erase, 48 expected battery life, 61 exposure compensation, 20 long time, 46 external video device viewing pictures, videos, 36 F faces, tagging, recognition, 42 FCC compliance, 63 film effects, 18 find pictures, 27 f
Index L language, 47 LCD brightness, 47 reviewing pictures, 23 reviewing videos, 23 lens, i lens, clean, 59 load MICROSD/SDHC Card, 7 loading battery, 1 locate pictures, 27 long time exposure, 46 M magnify a picture, 26 maintenance, camera, 59 make picture from video, 33 mark for email, 45 memory insert card, 7 menu settings, 46 microphone, i MICROSD/SDHC Card insert, 7 printing from, 51 mode safe, 47 mode dial, 17 modes backlight, 18, 19 bright, 19 www.kodak.
Index review icons, 28 reviewing, 23 taking, modes, 17 transfer to computer, 49 pictures/video deleting, 25 picture-taking icons, 13 Portrait mode, 17 power icon, 13 power, camera, 5 print from a video, 34 printing from a card, 51 optimizing printer, 52 order online, 51 PICTBRIDGE, 50 tagged pictures, 51 Program mode, 20 Q quickview using, 10 R record button, 14 recording light, i recycling, disposal, 59 red-eye, flash, 16 regulatory information, 63 remote control, 38 reset camera, 47 Review button, 46 rev
Index settings picture, video size, 46 settings menu, 46 Share button, 39, 46 shutter problems, 53 shutter button, 8 single frame, 34 slide show running, 37 slide show settings, 47 smart capture, 17 Smart Capture mode, 17 smart find, 27 social networks, 39 software upgrading, 59 software downloader, 49 sounds, 47 specifications, camera, 57 Sport mode, 17 spot color, 30 strap, 1 T tag people setting, 46 tagging keywords, 44 people, faces, 42 taking a picture, 8 taking a video, 14 taking pictures, videos, 8
video record button, 14 video size, 46 viewing by multi-up, thumbnails, 26 picture, after taking, 23 viewing picture/video after taking, 10 W warranty, 62 Z zoom optical, 15 73 www.kodak.