Kodak EasyShare CX7330 zoom digital camera User’s guide www.kodak.com For interactive tutorials, www.kodak.com/go/howto For help with your camera, www.kodak.
Eastman Kodak Company 343 State Street Rochester, New York 14650 © Eastman Kodak Company, 2004 All screen images are simulated. Kodak, EasyShare, and Max are trademarks of Eastman Kodak Company.
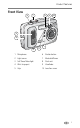
Product features Front View 6 7 8 9 10 5 4 3 1 2 1 Microphone 6 Shutter button 2 Light sensor 7 Mode dial/Power 3 Self Timer/Video light 8 Flash unit 4 Wrist strap post 9 Viewfinder 5 Grip 10 Lens/Lens cover i
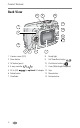
Product features Back View 8 9 10 11 7 12 6 13 14 5 4 3 2 1 1 Camera screen (LCD) 8 Ready light 2 Share button 9 Self Timer/Burst button 3 OK button (press) 10 Flash/status button 4 4-way controller 5 DC-In (3V) 11 Zoom (Wide Angle/Telephoto) ,for optional AC adapter 12 Grip 6 Delete button 13 Menu button 7 Viewfinder 14 Review button ii
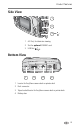
Product features Side View 1 2 3 1 A/V Out, for television viewing 2 Slot for optional SD/MMC card 3 USB Port Bottom View 1 2 3 4 1 Locator for EasyShare camera dock or printer dock 2 Dock connector 3 Tripod socket/locator for EasyShare camera dock or printer dock 4 Battery door iii
Table of contents 1 1 Getting started ........................................................................... 1 Package contents.............................................................................. 1 Installing the software first ................................................................ 1 Inserting the batteries ....................................................................... 2 Important battery information ...........................................................
4 Installing the software ............................................................. 30 Minimum system requirements ........................................................ 30 Install the software ......................................................................... 31 5 Sharing pictures and videos ..................................................... 32 When can I tag my pictures and videos? .......................................... 32 Tagging pictures for printing.................................
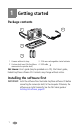
1 Getting started Package contents 4 1 2 3 1 Camera with wrist strap 3 2 AA non-rechargeable starter batteries 2 Custom dock insert (for EasyShare 4 USB cable camera dock or printer dock) Not shown: User’s guide (may be provided on a CD), Start Here! guide, Kodak EasyShare software CD. Contents may change without notice. Installing the software first IMPORTANT: Install the software from the Kodak EasyShare software CD before connecting the camera (or dock) to the computer.
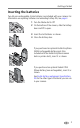
Getting started Inserting the batteries Two AA non-rechargeable starter batteries are included with your camera. For information on replacing batteries and extending battery life, see page 3. 1 Turn the Mode dial to Off. 2 On the bottom of the camera, slide the battery door and lift to open. 3 Insert the AA batteries as shown. 4 Close the battery door.
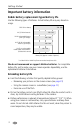
Getting started Important battery information Kodak battery replacement types/battery life Use the following types of batteries. Actual battery life may vary based on usage. CRV3 lithium battery 350 - 500 AA (2) lithium batteries 250 - 350 Ni-MH rechargeable battery pack* (per charge) 200 - 300 AA (2) Ni-MH rechargeable batteries (per charge) 200 - 300 AA (2) non-rechargeable Kodak digital starter batteries (included with camera) 150 - 250 0 500 Battery Life (Approx.
Getting started Visit www.kodak.com/go/cx7330accessories for: Kodak EasyShare camera dock—powers your camera, transfers pictures to your computer, and charges the included Kodak EasyShare Ni-MH rechargeable battery pack. Kodak EasyShare printer dock—powers your camera, makes 4 x 6 in. (10 x 15 cm) prints with or without a computer, transfers pictures, and charges the included Kodak EasyShare Ni-MH rechargeable battery pack. Kodak 3-volt AC adapter—powers your camera.
Getting started Changing the display If you want to Then do this Turn the camera screen on or off. Press the OK button. Change the camera screen setting so that it is on whenever the camera is on. See Liveview, page 20. Show/Hide the status icons when the Press camera screen is off. . Setting the date and time Setting the date & time, first time The Date and Time have been reset message appears the first time you turn on the camera or if the batteries are removed for an extended time.
Getting started Checking camera and picture status The icons that appear on the camera screen indicate the active camera and picture settings. If is displayed in the status area, press the Flash/Status button to display additional settings.
Getting started Flash/Status screen Press the Flash/Status button. The current camera status icons are displayed in the bottom half of the Flash screen. Other settings Storing pictures on an SD/MMC card Your camera has 16 MB of internal memory. You can purchase optional SD/MMC cards for removable, reusable storage for your pictures and videos. CAUTION: The card can only be inserted one way; forcing it may damage the camera or card.
2 Taking pictures and videos Taking a picture 1 Turn the Mode dial to the mode you want to use. See page 9 for mode descriptions. The camera screen displays the mode name and description. To interrupt the description, press any button. 2 Use the viewfinder or camera screen to frame your subject. (Press the OK button to turn on the camera screen. See page 10.) 3 Press the Shutter button halfway and hold to set the exposure and focus.
Taking pictures and videos Camera modes Use this mode 9 For Auto General picture-taking. Automatically sets exposure, focus, and flash. Sport Subjects that are in motion. Shutter speed is fast. Night Night scenes or low-light conditions. Place the camera on a flat, steady surface or use a tripod. Due to slow shutter speeds, advise people to stay still for a few seconds after flash fires. Landscape Distant subjects. Flash does not fire unless you turn it on.
Taking pictures and videos Using the camera screen as a viewfinder IMPORTANT: The Liveview feature quickly depletes battery power; use it sparingly. 1 Turn the Mode dial to any Still position. 2 Press the OK button to turn on the camera screen. 3 Frame your subject in the camera screen. For more about auto-focus framing marks, see page 11. OK Framing marks 4 Press the Shutter button halfway and hold to set the exposure and focus.
Taking pictures and videos Using the auto-focus framing marks When using the camera screen as a viewfinder, framing marks indicate where the camera is focusing. For the best possible pictures, the camera attempts to focus on foreground subjects, even if the subjects are not centered in the scene. NOTE: This procedure does not apply to videos. 1 Press the OK button to turn on the camera screen. 2 Press the Shutter button halfway and hold. When the framing marks turn red, focus is accomplished.
Taking pictures and videos Reviewing the picture or video just taken After you take a picture or video, the camera screen displays a Quickview for approximately 5 seconds. While the picture or video is displayed, you can: Delete OK Share ■ Review: If you take no action, the picture/video is saved. ■ Play (video): Press the OK button to play the video. (If the camera is connected to a television, press to adjust the volume. See page 28.
Taking pictures and videos Using optical zoom Use optical zoom to get up to 3X closer to your subject. Optical zoom is effective when the lens is no closer than 23.6 in. (60 cm) to the subject or 5.1 in. (13 cm) in Close-up mode. You can change optical zoom before (but not during) video recording. 1 Use the viewfinder or camera screen to frame your subject. 2 Press Telephoto (T) to zoom in. Press Wide Angle (W) to zoom out.
Taking pictures and videos Using the flash Use the flash when you take pictures at night, indoors, or outdoors in heavy shadows. You can change the flash setting in any Still mode; the default flash setting is restored when you exit the mode or turn off the camera. Flash Range Wide Angle 2-11.8 ft (0.6-3.6 m) Telephoto 2-6.9 ft (0.6-2.1 m) Turning on the flash Press the button to scroll through the flash options. The active flash icon is displayed in the camera screen status area.
Taking pictures and videos Flash settings in each mode For the best possible pictures, flash settings are preset for each capture mode. Icon Capture mode Default flash setting Available flash To return to the settings default flash setting: (press the Flash button to change) Auto Auto* Auto, Flash Off, Fill Flash, Red-eye Exit the mode or turn off the camera. Sport Auto Night Auto* None Flash cannot be turned on.
Taking pictures and videos Putting yourself in the picture The Self Timer creates a 10-second delay between the time you press the Shutter button and the time the picture is taken. 1 Place the camera on a flat surface or tripod. 2 In any Still mode, press the Self Timer button . The Self Timer icon appears in the status area. 3 Compose the scene. Then press the Shutter button halfway and hold to set the exposure and focus, then press the rest of the way down. Move so that you are in the scene.
Taking pictures and videos Taking a burst series of pictures Burst lets you to take up to 3 pictures in quick succession (approximately 3 frames per second). Burst is ideal for capturing sporting events or objects in motion. Flash and Self Timer are disabled when you use Burst. Turn on burst Burst Icon Burst button In any Still mode, press the Self Timer/Burst button twice. The Burst icon appears in the status area. NOTE: The setting remains until you change it or turn off the camera.
Taking pictures and videos Changing picture-taking settings You can change settings to get the best results from your camera: 1 Press the Menu button. (Some settings are unavailable in some modes.) 2 Press button. to highlight the setting you wish to change, then press the OK 3 Choose an option, then press the OK button. 4 Press the Menu button to exit. Setting Icon Options Image Storage Choose a storage location for pictures and videos. This setting remains until you change it.
Taking pictures and videos Setting Color Mode Choose color tones. This setting remains until you turn the Mode dial or turn off the camera. Icon Options Color (default)—for color pictures. Black & White—for black-and-white pictures. Sepia—for pictures with a reddish-brown, antique look. NOTE: EasyShare software also lets you change a color picture to black-and-white or sepia. Unavailable in Video mode. Set Album Choose Album names. On or Off. Pre-select album names before you take pictures or videos.
Taking pictures and videos Customizing your camera Use Setup to customize your camera settings. 1 In any mode, press the Menu button. 2 Press to highlight Setup Menu , then press the OK button. 3 Press button. to highlight the setting you wish to change, then press the OK 4 Choose an option, then press the OK button. 5 Press the Menu button to exit. Setting Icon Options Return to previous menu. Default Print Quantity Choose the default quantity.
Taking pictures and videos Setting Icon Options Video Out Choose the regional setting that lets you connect the camera to a television or other external device. NTSC (default)—used in North America and Japan; most common format. PAL—used in Europe and China. Language Choose a language. Format Memory Card—deletes everything on the card; formats the card. Cancel (default)—exits without making a change.
Taking pictures and videos Pre-tagging for album names Use the Set Album (Still or Video) feature to pre-select album names before you take pictures or videos. Then, all the pictures or videos you take are tagged with those album names. First—on your computer Use Kodak EasyShare software (V 3.0 or higher, see page 30) to create album names on your computer. Then copy up to 32 album names to the album name list the next time you connect the camera to the computer.
3 Reviewing pictures and videos Press the Review button to view and work with your pictures and videos. To save battery power, use the optional Kodak EasyShare camera or printer dock, or Kodak 3-volt AC adapter. (See www.kodak.com/go/cx7330accessories.) Viewing single pictures and videos 1 Press the Review button. 2 Press to scroll backward or forward through pictures and videos. (For fast scrolling, press and hold .) 3 Press the Review button to exit Review.
Reviewing pictures and videos Playing a video 1 Press the Review button. 2 Press to locate a video. (In Multi-up view, highlight a video, then press the OK button. When a video is highlighted in Multi-up view, the video duration is displayed at the top of the camera screen.) 3 To play or pause a video, press the OK button. (If the camera is connected to a television, press to adjust the volume. See page 28.) To adjust the volume, press To rewind the video, press . during playback.
Reviewing pictures and videos Changing optional review settings In Review mode, press the Menu button to access optional review settings. Magnify picture (page 25) Slide Show (page 27) Play video (page 24) Copy (page 29) Share (page 32) Video Date Display (Display Date/Time at the start of video playback.
Reviewing pictures and videos Protecting pictures and videos from deletion 1 Press the Review button, then locate the picture or video. 2 Press the Menu button. 3 Press to highlight Protect , then press the OK button. The picture or video is protected and cannot be deleted. The Protect icon appears with the protected picture or video. 4 To remove protection, press the OK button again. 5 Press the Menu button to exit the menu.
Reviewing pictures and videos Second—on your camera 1 Press the Review button, then locate the picture or video. 2 Press the Menu button. 3 Press to highlight Album , then press the OK button. 4 Press to highlight an album folder, then press the OK button. To add other pictures to the same album, press to scroll through the pictures. When the picture you want is displayed, press the OK button. To add the pictures to more than one album, repeat step 4 for each album.
Reviewing pictures and videos Changing the slide show display interval The default interval setting displays each picture for 5 seconds. You can increase the display interval up to 60 seconds. 1 On the Slide Show menu, press OK button. to highlight Interval, then press the 2 Select a display interval. To scroll through the seconds quickly, press and hold . 3 Press the OK button. The interval setting remains until you change it.
Reviewing pictures and videos Copying pictures and videos You can copy pictures and videos from a card to internal memory or from internal memory to a card. Before you copy, make sure that: ■ A card is inserted in the camera. ■ The camera’s picture storage location is set to the location from which you are copying. See Image Storage, page 18. Copy pictures or videos: 1 Press the Review button, then locate the picture or video. 2 Press the Menu button.
4 Installing the software Minimum system requirements Windows OS-based computers Macintosh computers ■ Windows 98, 98SE, ME, 2000 SP1, or ■ Power Mac G3, G4, G5, G4 Cube, XP OS ■ Internet Explorer 5.
Installing the software Install the software CAUTION: Install Kodak EasyShare software before connecting the camera or optional dock to the computer. Failure to do so may cause the software to install incorrectly. 1 Close all software applications that are open on your computer (including anti-virus software). 2 Place the Kodak EasyShare software CD into the CD-ROM drive.
5 Sharing pictures and videos Press the Share button to “tag” your pictures and videos. When they are transferred to your computer, you can share them by: Pictures Videos Print (page 33) ✔ Email (page 34) ✔ ✔ Favorites (page 35) ✔ ✔ NOTE: Tags remain until removed. If a tagged picture/video is copied, the tag is not copied. In a burst series, only the last picture is tagged during Quickview.
Sharing pictures and videos Tagging pictures for printing 1 Press the Share button. Press 2 Press to highlight Print to locate a picture. , then press the OK button.* 3 Press to select the number of copies (0-99). Zero removes the tag for that picture. The Print icon appears in the status area. 4 Optional: You can apply a print quantity to other pictures. Press to locate a picture. Keep the print quantity as is, or press to change it.
Sharing pictures and videos Tagging pictures and videos for emailing First—on your computer Use Kodak EasyShare software to create an email address book on your computer. Then, copy up to 32 email addresses to the camera’s internal memory. See Kodak EasyShare software Help for details. Second—tag pictures/videos on your camera 1 Press the Share button. Press to locate a picture/video. 2 Press to highlight Email , then press the OK button. The Email icon appears in the status area.
Sharing pictures and videos Tagging pictures and videos as favorites 1 Press the Share button. Press picture/video. to locate a 2 Press to highlight Favorite , then press the OK button. The Favorite icon appears in the status area. 3 To remove the tag, press the OK button again. 4 Press the Share button to exit the menu.
6 Transferring and printing pictures CAUTION: Install Kodak EasyShare software before connecting the camera or optional dock to the computer. Failure to do so may cause the software to install incorrectly. Transferring pictures with the USB cable 1 Turn off the camera. 2 Plug the labeled end of the USB cable into the labeled USB port on your computer. See your computer user’s guide for details. 3 Plug the other end of the USB cable into the labeled USB port on the camera. 4 Turn on the camera.
Transferring and printing pictures Printing pictures from your computer For details on printing pictures from your computer, click the Help button in the Kodak EasyShare software. Ordering prints online Kodak EasyShare print service (provided by Ofoto www.ofoto.com) is one of the many online print services offered in the Kodak EasyShare software. You can easily: ■ Upload your pictures. ■ Edit, enhance, and add borders to your pictures. ■ Store pictures, and share them with family and friends.
7 Troubleshooting When you have questions about your camera, start here. Additional technical information is available in the ReadMe file located on the Kodak EasyShare software CD. For updates to Troubleshooting information, see www.kodak.com/go/cx7330support. Camera problems If... Try one or more of the following The camera does not ■ Remove, then reinsert the batteries. turn on ■ Insert new or charged batteries.
Troubleshooting If... Try one or more of the following You cannot take a picture ■ Turn the camera off, then on again. ■ Depress shutter button all the way (page 8). ■ Insert new or charged batteries (page 2). ■ Wait until the ready light is green before attempting to take another picture. ■ Transfer pictures to the computer (page 36), delete pictures from the camera (page 24), switch image storage locations (page 18), or insert a card with available memory (page 7).
Troubleshooting Picture quality problems If... Try one or more of the following The picture is too dark or underexposed ■ Use Fill flash (page 14) or change your position so light is not behind the subject. ■ Move so that the distance between you and the subject is within the effective flash range (see page 14). ■ To automatically set exposure and focus, press the Shutter button halfway and hold. When the ready light glows green, press the Shutter button the rest of the way down to take the picture.
Troubleshooting Camera ready light status Status Cause Ready light glows steady green. Camera is ready to take a picture or video. Shutter button is pressed halfway down. Focus and exposure are set. Ready light blinks green. Picture is being processed and saved to the camera. Ready light blinks orange. Flash is not charged. Wait. Resume picture taking when the light stops blinking and turns green. Ready light glows steady red. Camera’s internal memory or card is full.
8 Getting help Helpful links Help with your camera www.kodak.com/go/cx7330support Help with Windows operating system and working with digital pictures www.kodak.com/go/pcbasics Download the latest camera software and firmware www.kodak.com/go/cx7330downloads Optimize your printer for truer, more vibrant colors www.kodak.com/go/onetouch Get support for cameras, software, accessories, more www.kodak.com/go/support Purchase camera accessories www.kodak.
Getting help Australia 1800 147 701 Netherlands 020 346 9372 Austria 0179 567 357 New Zealand 0800 440 786 Belgium 02 713 14 45 Norway 23 16 21 33 Brazil 0800 150000 Philippines 1 800 1 888 9600 Canada 1 800 465 6325 Portugal 021 415 4125 China 800 820 6027 Singapore 800 6363 036 Denmark 3 848 71 30 Spain 91 749 76 53 Ireland 01 407 3054 Sweden 08 587 704 21 Finland 0800 1 17056 Switzerland 01 838 53 51 France 01 55 1740 77 Taiwan 0800 096 868 Germany 069 5007 0035
9 Appendix Camera specifications For more specifications, visit www.kodak.com/go/cx7330support. Kodak EasyShare CX7330 zoom digital camera CCD 1/2.7 in. CCD; 4:3 aspect ratio; RGB Bayer CFA; 3.3 M pixels (effective) Output image size (image quality mode) Best: 2032 x 1524 (3.1 M) pixels Best (3:2): 2032 x 1354 (2.8 M) pixels Better: 1656 x 1242 (2.1 M) pixels Good: 1200 x 900 (1.1 M) pixels Display Color display 1.6 in.
Appendix Kodak EasyShare CX7330 zoom digital camera Exposure mode Programmed AE mode: Auto, Sports, Night Shot, Landscape, Macro Exposure Compensation: +2.0EV with 0.5EV step Shutter speed 2-aperture shutter, 1/2 - 1/1400 sec. ISO speed Auto, 100-200 Flash Electronic flash Working range @ ISO 140: 2 - 11.8 ft (0.6 - 3.6 m) @ Wide 2 - 6.9 ft (0.6 - 2.
Appendix Kodak EasyShare CX7330 zoom digital camera Other features Self timer 10 seconds White balance Auto Auto sleep mode 8 minutes Color modes Color, black & white, sepia Date stamp None, YYYYMMDD, MMDDYYYY, DDMMYYYY Tripod mount 1/4 in. (6.35 mm) Size 4 in. (103 mm) x 1.5 in. (38 mm) x 2.6 in. (65 mm) @ power off Weight 6.
Appendix Storage capacities File sizes vary. You may be able to store more or fewer pictures and videos. Picture storage capacity Number of pictures Best Best (3:2) Better Good 16 MB internal memory 13 15 20 45 16 MB SD/MMC 16 18 24 43 32 MB SD/MMC 32 36 48 87 64 MB SD/MMC 65 73 97 175 128 MB SD/MMC 131 147 194 350 256 MB SD/MMC 262 294 388 700 Video storage capacity Minutes/seconds of video 16 MB internal memory 53 sec. 16 MB SD/MMC 1 min. 32 MB SD/MMC 2 min. 15 sec.
Appendix Regulatory compliance FCC compliance and advisory Kodak EasyShare CX7330 zoom digital camera This equipment has been tested and found to comply with the limits for a Class B digital device, pursuant to Part 15 of the FCC Rules. These limits are designed to provide reasonable protection against harmful interference in a residential installation.
Appendix Upgrading your software and firmware Download the latest versions of the software included on the Kodak EasyShare software CD and the camera firmware (the software that runs on the camera). See www.kodak.com/go/cx7330downloads.
Index Numerics 4-way controller, ii A A/V out, iii, 28 AA battery, inserting, 2 about picture, video, 29 about this camera, 21 AC adapter, 4 accessories, 36 AC adapter, 4 battery, 3 buying, 42 camera dock, 4 printer dock, 4, 37 SD/MMC card, 7 album, 19 albums, tagging pictures for, 22, 26 alkaline batteries, warning, 2 auto, 9 flash, 14 focus framing marks, 11 power-down, 47 B batteries expected life, 3 extending life, 3 inserting, 2 safety and handling, 4 types, 3 battery door location, iii burst, ii, 17
Index from internal memory, 24 from SD/MMC card, 24 protecting pictures, videos, 26 digital zoom, using, 13 displaying slide show, 27 disposal, recycling, 46 dock camera, 4 printer, 4, 37 downloading pictures, 36 information about pictures, videos, 29 inserting batteries, 2 SD/MMC card, 7 installing SD/MMC card, 7 software, 31 internal memory storage capacity, 47 E EasyShare software, 30 emailing pictures, videos, 34 exposure compensation, 18 external video device viewing pictures, videos, 28 K Kodak di
Index memory inserting card, 7 storage capacities, 47 menu button, ii menu button, ii microphone, i mode dial, ii, 9 modes auto, 9 close-up, 9 landscape, 9 night, 9 N night, 9 Ni-MH rechargeable battery expected life, 3 O OK button, 5 online prints, ordering, 37 optical zoom, 13 orientation sensor, 19 overview camera, ii camera modes, 9 P package contents, camera, 1 picture quality, 18 pictures checking settings, 6, 7 copying, 29 deleting, 24 emailing tagged, 34 magnifying, 25 printing, 37 printing tagged,
Index running slide show, 27 S safety, 46 SD/MMC card inserting, 7 printing from, 37 slot location, iii storage capacities, 47 SD/MMC card, inserting, 7 self timer button, ii light, i with pictures, 16 with videos, 16 sensor, light, i service and support telephone numbers, 42 setting album, 19 color mode, 19 date & time, 20 date and time, 5 date stamp, 19, 20 exposure compensation, 18 flash, 14 image storage, 18 language, 21 liveview, 20 orientation sensor, 19 picture quality, 18 picture taking mode, 9 sel
Index U upgrading software, firmware, 49 URLs, Kodak web sites, 42 USB (universal serial bus) connection location, iii transferring pictures, 36 V video out, 21 videos checking settings, 6, 7 copying, 29 deleting, 24 emailing tagged, 34 protecting, 26 reviewing, 23 storage capacities, 47 transfer to computer, 36 viewing, 23 viewfinder, i, ii using camera screen, 10 viewing picture after taking, 12, 23 magnified, 25 viewing picture, video information, 29 W wide angle button, ii Windows computers installing