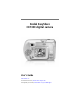
Kodak EasyShare CX7300 digital camera User’s Guide www.kodak.com For interactive tutorials, www.kodak.com/go/howto For help with your camera, www.kodak.
Eastman Kodak Company 343 State Street Rochester, New York 14650 © Eastman Kodak Company, 2004 All screen images are simulated. Kodak and EasyShare are trademarks of Eastman Kodak Company.
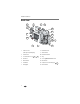
Product features Front view 4 5 6 7 3 8 2 1 1 Grip 5 Mode dial/Power 2 Wrist strap post 6 Flash unit 3 Self Timer/Video light 7 Viewfinder lens 4 Shutter button 8 Lens i
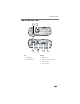
Product features Back view 6 7 8 9 5 10 11 4 12 3 13 14 2 1 Camera screen (LCD: liquid crystal display) 1 15 8 Mode dial/Power 9 Shutter button 2 Share button 10 Flash/Status button 3 Controller buttons (4) 11 Grip 4 OK button 12 Slot for optional SD/MMC card 5 Delete button 13 Menu button 6 Viewfinder 14 USB (Universal Serial Bus) port 7 Ready light 15 Review button ii
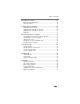
Product features Top and bottom views 1 3 2 4 5 6 Top Bottom 1 Shutter button 3 Battery door 2 Mode dial/Power 4 Tripod socket/locator for dock 5 Dock connector 6 Locator for dock iii
Table of contents 1 1 Getting started ........................................................................... 1 Package contents.............................................................................. 1 Installing the software first ................................................................ 1 Loading the batteries ........................................................................ 2 Important battery information ...........................................................
Table of contents 4 Installing the software ............................................................. 22 Minimum system requirements ........................................................ 22 Install the software ......................................................................... 22 5 Sharing pictures and videos ..................................................... 24 Tagging pictures for printing............................................................
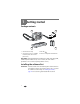
1 Getting started Package contents 1 3 2 4 1 Camera and wrist strap 3 USB cable 2 Custom dock insert (for compatible 4 2-AA non-rechargeable starter batteries Kodak EasyShare camera dock or printer dock) Not shown: Getting Started kit that includes User’s Guide, Start Here! guide, Kodak EasyShare software CD. (In some countries, the User’s Guide is provided on a CD. Contents may change without notice.
Getting started Loading the batteries Two AA non-rechargeable starter batteries are included with your camera. For information on approved battery types and extending battery life, see page 3. 1 Make sure the Mode dial is set to Off (see page 4). 2 On the bottom of the camera, slide the battery door and lift to open. AA 3 Insert the batteries, as shown. 4 Close the battery door.
Getting started Important battery information Battery safety and handling ■ Do not allow batteries to touch metal objects, including coins. Otherwise, a battery may short circuit, discharge energy, become hot, or leak. ■ For rechargeable battery disposal information, visit the Rechargeable Battery Recycling Corporation Web site at www.rbrc.com. Kodak battery replacement types/battery life Your camera can use the following types of batteries. Actual battery life may vary based on usage.
Getting started ■ Visit www.kodak.com/go/cx7300accessories for: Kodak EasyShare camera dock—powers your camera, transfers pictures to your computer, and charges the included Kodak EasyShare Ni-MH rechargeable battery pack. Kodak EasyShare printer dock—powers your camera, makes 4 x 6 prints with or without a computer, transfers pictures, and charges the included Kodak EasyShare Ni-MH rechargeable battery pack. ■ Dirt on the battery contacts can affect battery life.
Getting started Selecting a language Selecting a language, first time The Language screen is displayed the first time you turn on the camera. ■ Press to highlight a language, then press the OK button. The Set Date & Time screen is displayed in the current language (see Setting the date & time, first time). Selecting a language, anytime 1 In any mode, press the Menu button. 2 Press to highlight Setup Menu 3 Highlight Language , then press the OK button. , then press the OK button.
Getting started 5 When finished, press the OK button. 6 Press the Menu button to exit. NOTE: Depending on your computer operating system, Kodak EasyShare software may update the camera clock when you connect the camera. See the Kodak EasyShare software Help for details. Checking camera and picture status The icons that appear on the camera screen indicate the active camera and picture settings. If is displayed in the status area, press the Flash/Status button to display additional settings.
Getting started Storing pictures and videos on an SD/MMC card Your camera has 16 MB of internal memory. You can purchase optional SD/MMC cards for removable, reusable image storage for pictures and videos. Purchase this and other accessories at a dealer of Kodak products. Visit www.kodak.com/go/cx7300accessories. CAUTION: Cards should only be inserted as explained below. If inserted incorrectly, the door won’t close, and forcing it may damage the camera or card.
2 Taking pictures and videos The camera is ready to take pictures or videos when you turn it on—even if you are in Review, Share, or Setup. Taking a picture Shutter button Mode dial 1 Turn the Mode dial to the Still mode you want to use: Ready light Auto—for general picture-taking. Automatically sets exposure and flash. Night—for night scenes or low-light conditions. Place the camera on a flat, steady surface or use a tripod.
Taking pictures and videos Using the camera screen as a viewfinder IMPORTANT: The Liveview feature significantly depletes battery power; use it sparingly. 1 Turn the Mode dial to any Still mode. 2 Press the OK button to turn on the camera screen. 3 Frame your subject in the camera screen. 4 Press the Shutter button to take the picture. OK button 5 To turn off the camera screen, press the OK button. To make the camera screen turn on whenever the camera is on, see Liveview, page 14.
Taking pictures and videos 2 Press to zoom in or out, in 0.1X increments. 3 Press the Shutter button to take the picture. To turn off digital zoom, from the lowest setting, press NOTE: You cannot use digital zoom for video recording. . Using the flash Use the flash when you take pictures at night, indoors, or outdoors in heavy shadows. Flash is effective between 2.6 - 7.9 ft (0.8 - 2.4 m). You can only change the flash setting in Still modes.
Taking pictures and videos Changing picture-taking settings You can change settings to get the best results from your camera: 1 In any mode, press the Menu button. 2 Press button. to highlight the setting you wish to change, then press the OK 3 Choose an option, then press the OK button. 4 Press the Menu button to exit. Setting Icon Options Self Timer Put yourself in the picture or video. See page 12. Exposure Compensation (Still modes) Choose how much light enters the camera.
Taking pictures and videos Setting Icon Options Color Mode (Still modes) Choose color tones. This setting remains until you change the Mode dial or turn off the camera. Color (default)—for color pictures. Black & White—for black and white pictures. Sepia—for pictures with a reddish-brown, antique look. Set Album Choose Album names. See page 13. Video Length (Video mode) Choose the amount of recording time for videos. This setting remains until you change it.
Taking pictures and videos 5 Place the camera on a flat surface or use a tripod. 6 Compose the scene. Press the Shutter button, then move so that you are in the scene. The Self Timer light blinks slowly for 8 seconds (then quickly for 2 seconds) before the picture is taken. The Self Timer turns off after you take the picture or turn off the camera. Pre-tagging for album names Use the Set Album (Still or Video) feature to pre-select album names before you take pictures.
Taking pictures and videos Third—transfer to your computer When you transfer the tagged pictures and videos to your computer, the Kodak EasyShare software opens and categorizes your pictures and videos in the appropriate album folder. See the Kodak EasyShare software Help for details. Customizing your camera Use the Setup Menu to customize your camera settings. 1 In any mode, press the Menu button. 2 Press to highlight Setup Menu , then press the OK button.
Taking pictures and videos Setting Icon Options Date Stamp (Still modes) Imprint the date on pictures. This setting remains until you change it. Turn the Date Stamp on or off, or change the date stamp format. Video Date Display (Video mode) Display capture date and time before the video starts. This setting remains until you change it. Choose None, or choose a date and time format. Language Display the camera screen text in different languages. This setting remains until you change it. See page 5.
3 Reviewing pictures and videos Press the Review button to view and work with your pictures and videos. To save battery power, place your camera in a compatible Kodak EasyShare camera dock or Kodak EasyShare printer dock (sold separately) to review pictures and videos. Remember, press the Shutter button to take a picture anytime—even in Review. Viewing single pictures and videos 1 Press the Review button. 2 Press to scroll backward or forward through pictures and videos.
Reviewing pictures and videos 3 To play or pause a video, press the OK button. NOTE: You can also press the Menu button, highlight Play Video To rewind a video, press OK button. , then press the OK button. during playback. To replay the video, press the To go to the previous or next picture or video, press . 4 Press the Review button to exit. NOTE: The camera does not record audio; there is no sound during playback. Deleting pictures and videos 1 Press the Review button.
Reviewing pictures and videos Magnifying pictures 1 Press the Review button, then locate a picture. 2 To magnify at 2X, press the OK button. To magnify at 4X, press the OK button again. NOTE: You can also press the Menu button, highlight Magnify , then press the OK button. The picture is magnified. The magnification value is displayed. ■ Press to see different parts of the picture. ■ Press the OK button to redisplay the picture at the 1X (original) size. ■ Press to locate a different picture.
Reviewing pictures and videos 6 Highlight Exit, then press the OK button. Your selections are saved. 7 Press the Menu button to return to Review mode. Third—transfer to your computer When you transfer the tagged pictures and videos to your computer, the Kodak EasyShare software opens and categorizes your pictures and videos in the appropriate album folder. See the Kodak EasyShare software Help for details.
Reviewing pictures and videos 3 Highlight Begin Show, then press the OK button. Each picture and video is displayed once, in the order in which you took them. 4 To cancel the Slide Show, press the OK button. Changing the slide show display interval The default interval setting displays each picture for 5 seconds. You can increase the display interval to up to 60 seconds. 1 On the Slide Show menu, press OK button. to highlight Interval, then press the 2 Select a display interval.
Reviewing pictures and videos Copying pictures and videos You can copy pictures and videos from a card to internal memory or from internal memory to a card. Before you copy, make sure that: ■ A card is inserted in the camera. ■ The camera’s image storage location is set to the location from which you are copying. See page 12. Copy pictures or videos: 1 Press the Review button, then press the Menu button. 2 Press to highlight Copy , then press the OK button.
4 Installing the software Minimum system requirements Windows OS-based computers Macintosh computers ■ Windows 98, 98SE, ME, 2000 SP1, or XP OS ■ Power Mac G3, G4, G4 Cube, iMac; PowerBook G3, G4; or iBook computers ■ Internet Explorer 5.01 or higher ■ 233 MHz processor or greater ■ Mac OS X 10.2.
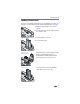
Installing the software 3 Load the software: Windows OS-based computer—if the install window does not appear, choose Run from the Start menu and type d:\setup.exe where d is the drive letter that contains the CD. Mac OS X—double-click the CD icon on the desktop, then click the Install icon. Mac OS 8.6 or 9.x—on the install window, click Continue. 4 Follow the on-screen instructions to install the software.
5 Sharing pictures and videos Press the Share button to "tag" your pictures and videos. When they are transferred to your computer, you can share using: Pictures Videos Print (page 24) ✔ Email (page 25) ✔ ✔ Favorites (page 26), for easy organization on your computer and for sharing on your camera ✔ ✔ NOTE: Tags remain until removed. If a tagged picture or video is copied, the tag is not copied. Tagging pictures for printing 1 Press the Share button. 2 Press to locate a picture.
Sharing pictures and videos 5 Press the OK button. 6 Press the Share button to exit. * To tag all pictures in the image storage location, highlight Print All , press the OK button, then select the number of copies as described above. Print All is not available in Quickview. **To remove the print tagging for all pictures in the image storage location, highlight Cancel Prts , then press the OK button. You cannot cancel prints in Quickview.
Sharing pictures and videos 4 To remove a selection, highlight a checked address, then press the OK button. To remove all email selections, highlight Clear All. 5 Highlight Exit, then press the OK button. Your selections are saved. The email icon 6 Press the Share button to exit. appears in the status area.
6 Connecting camera to computer CAUTION: Install Kodak EasyShare software before connecting the camera or optional camera dock or printer dock to the computer. Failure to do so may cause the software to load incorrectly. Transferring pictures and videos with the USB cable 1 Turn off the camera. 2 Plug the labeled end of the USB cable into the labeled USB port on your computer. See your computer user’s guide for details. 3 Plug the other end of the USB cable into the labeled USB port on the camera.
Connecting camera to computer Ordering prints online Kodak EasyShare print service (provided by Ofoto at www.ofoto.com) is one of the many online print services offered in the Kodak EasyShare software. You can easily: ■ Upload your pictures. ■ Edit, enhance, and add borders to your pictures. ■ Store pictures, and share them with family and friends. ■ Order high-quality prints, photo greeting cards, frames, and albums—and have them delivered to your door.
7 Troubleshooting When you have questions about your camera, start here. Additional technical information is available in the ReadMe file located on the Kodak EasyShare software CD. For updates to Troubleshooting information, visit www.kodak.com/go/cx7300support. Camera problems Problem Cause Solution Camera does not turn on. Batteries are not installed correctly. Install new batteries (page 2) or charge rechargeable batteries. Camera does not turn off. Camera has locked up.
Troubleshooting Problem Cause Solution In Review mode, a File format is blue or black screen unrecognized. is displayed instead of a picture. Transfer the picture to the computer (page 27). Shutter button does Camera is not turned on. not work. Camera is processing a picture; the ready light (near the viewfinder) is blinking red. Turn on the camera (page 4). Wait until the ready light stops blinking red before attempting to take another picture.
Troubleshooting Problem Cause Picture is too dark or Flash is not on. underexposed. Subject is too far away for the flash to be effective. Solution Turn on the flash (page 10). Move so there is no more than 7.9 ft (2.4 m) between the camera and the subject. Subject is in front of a bright light (backlit). Use Fill flash (page 10) or change your position so light is not behind the subject. Not enough light. Increase Exposure Compensation (page 11).
Troubleshooting Camera/computer communications Problem Cause The computer There is a problem with cannot the configuration of the communicate USB port on the computer. with the camera. Camera power is off. Solution See this file on the EasyShare software CD: USB.html Or, visit www.kodak.com/go/ camerasupport Turn on the camera (page 4). Batteries are exhausted or Install new batteries (page 2) or are not charged. charge rechargeable batteries.
Troubleshooting Camera screen messages Message Cause Solution No images to display There are no pictures in Change image storage location the current image storage setting (page 12). location. Memory card requires Card is corrupted or formatting formatted for another Memory card cannot digital camera. be read (Please format memory card or insert another card) Insert a new card (page 7) or format the card (page 15). Caution: Formatting a card deletes all pictures and videos, including protected files.
Troubleshooting Message Cause Solution Memory card is Card is slow, corrupted, or Insert a new card (page 7) or unusable (Insert new unreadable. format the card (page 15). memory card) Caution: Formatting a card deletes all pictures and videos, including protected files. Date and time have been reset This is the first time you Reset the clock (page 5). turned on the camera; or the batteries have been removed for an extended period of time; or the batteries are exhausted.
Troubleshooting Message Cause Camera error #XXXX. An error is detected. See user’s guide. Solution Turn the Mode dial off, then back on. If the message reappears, contact Customer Support (page 36). Camera ready light status Status Cause Solution Ready light does not turn on and the camera does not work. Camera is not turned on. Turn on the camera (page 4). Batteries are exhausted Install new batteries (page 2) or or are not charged. charge rechargeable batteries.
8 Getting help Helpful Web links Help with your camera www.kodak.com/go/cx7300support Help with Windows operating system and working with digital pictures www.kodak.com/go/pcbasics Download the latest camera software and firmware www.kodak.com/go/cx7300downloads Optimize your printer for truer, more vibrant www.kodak.com/go/onetouch colors Get support for cameras, software, accessories, more www.kodak.com/go/support Purchase camera accessories www.kodak.
Getting help Australia 1800 147 701 Netherlands 020 346 9372 Austria 0179 567 357 New Zealand 0800 440 786 Belgium 02 713 14 45 Norway/Norge 23 16 21 33 Brazil 0800 150000 Philippines 1 800 1 888 9600 Canada 1 800 465 6325 Portugal 021 415 4125 China 800 820 6027 Singapore 800 6363 036 Denmark 3 848 71 30 Spain 91 749 76 53 Ireland 01 407 3054 Sweden 08 587 704 21 Finland 0800 1 17056 Switzerland 01 838 53 51 France 01 55 1740 77 Taiwan 0800 096 868 Germany 069 5007
9 Appendix Camera specifications Kodak EasyShare CX7300 digital camera Color 24-bit, millions of colors Color modes Color, black & white, sepia Communication with computer USB, via: USB cable; compatible EasyShare camera dock or printer dock Dimensions Width Depth Height 4.1 in. (103.5 mm) 1.6 in. (40.2 mm) 2.6 in. (65 mm) Weight 5.2 oz (147 g) excluding batteries or card File format Still JPEG/EXIF v2.2 Video QuickTime (CODEC: motion JPEG) Flash Modes Auto, Fill, Red-eye, Off Range 2.
Appendix Kodak EasyShare CX7300 digital camera Pixel resolution (by Quality setting) Power Best - 3.2 MP, low 2080 x 1544, 1/8 JPEG compressed compression Best (3:2) - 2.8 MP, 2080 x 1368, 1/8 JPEG compressed print optimized Better - 3.2 MP, high compression 2080 x 1544, 1/10 JPEG compressed Good - 0.
Appendix ■ Clean the lens and camera screen: 1 Blow gently on the lens or camera screen to remove dust and dirt. 2 Wipe the lens or camera screen gently with a soft, lint-free cloth or an untreated lens-cleaning tissue. Do not use cleaning solutions unless they are designed specifically for camera lenses. Do not wipe the camera lens or camera screen with chemically treated eyeglass lens tissue. It may scratch the lens. ■ Wipe the outside of the camera with a clean, dry cloth.
Appendix Video storage capacity Minutes/seconds of video 16 MB internal memory 46 sec. 16 MB SD/MMC 53 sec. 32 MB SD/MMC 1 min., 50 sec. 64 MB SD/MMC 3 min., 44 sec. 128 MB SD/MMC 7 min., 31 sec. Power-saving features If no The camera activity for To turn it back on 1 minute screen turns off. Press the OK button. 8 minutes enters auto power off. Press any button (or insert or remove a card). 3 hours turns off. Turn Mode dial Off, then back on.
Appendix If this equipment does cause harmful interference to radio or television reception, which can be determined by turning the equipment off and on, the user is encouraged to try to correct the interference by one or more of the following measures: 1) reorient or relocate the receiving antenna; 2) increase the separation between the equipment and the receiver; 3) connect the equipment to an outlet on a circuit different from that to which the receiver is connected; 4) consult the dealer or an experien
1 Index A AA batteries expected life, 3 installing, 2 About, 15 accessories batteries, 2, 3 buying, 36 SD/MMC card, 7 Album, 18 pre-tagging pictures/videos for, 13 alkaline batteries, warning, 3 auto flash, 10 power-down, 41 Auto mode, 8 B batteries alkaline warning, 3 door, iii expected life, 3 extending life, 3 installing, 2 safety and handling, 3 types, 3 button controller, ii Delete, ii, 9 Flash/Status, ii, 6, 10 Menu, ii, 11 OK, ii, 4 Review, ii, 9, 16 Share, ii, 9, 24 shutter, i, 8 C cable USB, 1, 27
Index deleting during Quickview, 9 formatting precaution, 15 from internal memory, 17 from SD/MMC Card, 17 protected pictures/videos, 19 digital zoom, 9 disposal and recycling of batteries, 3 of camera, 40 dock connector on camera, iii locator holes for, iii printer, 28 downloading pictures, 27 E EasyShare software See also Kodak EasyShare software, 22 emailing pictures/videos, 25 error messages, 33 Exposure Compensation, 11 external video device setting video out, 14 viewing pictures, videos, 20 F favorit
Index L Language, 15 setting, 5 LCD (liquid crystal display).
Index tagging, 13, 18 taking, 8 transferring to computer, 27 viewing multi-up, 16 viewing on television, 20 Play Video, 16 power auto off, 41 camera, 4 switch, i printer dock, 28 printing from a card, 28 from computer, 27 optimizing printer, 36 order online, 28 tagged pictures, 24, 28 without computer, 28 protecting pictures/videos, 19 Q Quickview, 9 R ReadMe file, 29 ready light, ii, 35 recycling and disposal of batteries, 3 of camera, 40 red-eye flash, 10 regulatory information, 41 requirements, system,
Index shutter, problems, 30 sleep mode, 41 Slide Show, 19 changing display time, 20 continuous loop, 20 problems, 30 viewing on camera, 19 viewing on television, 20 software getting help, 36 installing, 22 upgrading, 41 specifications, camera, 38 status camera ready light, 35 checking on screen, 6 screen icons, 6 storage capacities battery, 3 internal memory/card, 40 support, technical, 36 system requirements, computer, 22 T tagging favorites, 26 for albums, 13, 18 for email, 25 for print, 24 when to tag,
Index viewing camera information, 15 magnified picture, 18 picture/video information, 21 picture/video just taken, 9 pictures/videos, 16 pictures/videos on television, 20 slide show, 19 W Windows OS installing software on, 22 system requirements, 22 wrist strap post, i Z zoom, digital, 9 48