KODAK EASYSHARE CX4210 Digital Camera User’s Guide Visit Kodak on the World Wide Web at www.kodak.
Eastman Kodak Company 343 State Street Rochester, New York 14650 © Eastman Kodak Company, 2002 Kodak and EasyShare are trademarks of Eastman Kodak Company.
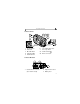
Product Overview Camera Front 4 1 2 5 6 7 3 8a 1 2 3 4 5 Shutter button Flash unit On / Off switch Self Timer light Viewfinder lens 6 7 8a 8b 8b Lens with built-in cover Close-up switch USB connector DC in connector Camera Bottom 1 2 3 1 Camera Dock connector (door shown closed) 2 Tripod mount socket 3 Battery door iii
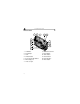
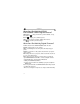
Product Overview Camera Back 1 2 3 4 5 9 10 6 11 7 12 8 13 1 2 3 4 5 6 7 iv Viewfinder Ready light LCD Shutter button 4 way arrow / OK buttons Wrist strap post Video out port 8 9 10 11 12 13 MMC/SD card door Flash button Share button Delete button Review button Menu button
Table of Contents 1 Getting Started ...................................................................1 Install the Software First ........................................................1 Need This Guide in Large Print? .............................................1 What Can I Do With My KODAK EASYSHARE CX4210 Digital Camera? ..........................................................................2 What Can I Do With My Digital Pictures? ...........................2 Camera Package Contents .............
Using Digital Zoom....................................................................17 Taking Close-up Pictures .......................................................18 Changing Picture-Taking Options........................................ 19 3 Reviewing Pictures—Review Mode ............................ 25 To Enter Review Mode............................................................ 25 To Access the Review Menus ..............................................26 Viewing Single Pictures................
Returning to the Previous Menu ........................................38 Changing the Print Quantity Default ...............................38 Turning Off Quickview .............................................................39 Turning On Liveview................................................................. 39 Setting Video Out................................................................... 40 Formatting Memory or MMC/SD Card ..............................41 Viewing Camera Information .............
Caution When Using a Tripod...............................................55 Earlier Camera Dock Model..................................................56 9 Troubleshooting ...............................................................57 Troubleshooting—Camera ................................................... 57 Troubleshooting—Camera Dock II ..................................... 70 10 Getting Help ....................................................................73 Helpful Web Links.................
1 Getting Started Install the Software First It is important to install the KODAK EASYSHARE Software on your computer before you connect the camera to the computer or attempt to transfer pictures. See Chapter 6, Installing the Software, or the Quick Start Guide for directions. Need This Guide in Large Print? For a large print version of this User’s Guide: 1 Go to http://www.kodak.com/go/cx4210support. 2 Under Explore EasyShare, click Service and Support.
Chapter 1 What Can I Do With My KODAK EASYSHARE CX4210 Digital Camera? Take Pictures —Enjoy point-and-shoot operation with flash, close-up, and self timer features. Review —Display, protect, and delete pictures. Share—Tag your pictures for printing, emailing, and as Favorites. Set Up —Customize your camera settings. What Can I Do With My Digital Pictures? Install the software from the KODAK EASYSHARE Software CD*, then: Transfer—transfer pictures to your computer.
Chapter 1 Camera Package Contents 1 3 2 4 5 1 Camera 4 USB cable 2 Wrist Strap 5 Video Cable (for viewing pictures on television) 3 Custom Camera Insert* Also included but not shown: 2 KODAK Digital Camera Batteries, AA or a KODAK CRV3 Lithium battery; and the User’s Guide or CD; Software CD; and Quick Start Guide. NOTE: Contents subject to change. Check retail box for contents listing. *The custom camera insert perfectly fits your camera to the optional KODAK EASYSHARE Camera Dock II. DO NOT DISCARD.
Chapter 1 Attaching the Wrist Strap 1 Thread the short loop of the strap through the wrist strap post. 2 Thread the long end of the strap through the short loop. Pull until secure. Loading the Batteries Two KODAK Digital Camera Batteries or one KODAK CRV3 Lithium Battery is included with your camera.* 1 Turn off the camera. 2 On the bottom of the camera, slide the battery door and lift to open. 3 Insert two KODAK Digital Camera Batteries, AA, or KODAK CRV3 battery, as shown.
Chapter 1 Turning the Camera On and Off 1 Slide the On/Off switch to the On position. The ready light blinks green while the camera performs a self-check, then glows steady green when the camera is ready to take pictures. 2 To turn off the camera, slide the On/Off switch to the Off position. The camera completes operations that are in process. Built-in Lens Cover The lens has a built-in cover that protects it from dust and scratches.
Chapter 1 Selecting a Language You can display menus and screen messages in different languages. The Language screen is automatically displayed the first time you turn on the camera. If this is the first time the camera has been turned on, go to step 4. To change the language after that: 1 In Capture or Review mode, press the Menu button. 2 Highlight Setup , then press the OK button. 3 Highlight Language , then press the OK button. 4 Press to highlight a language, then press the OK button.
Chapter 1 Setting the Clock The Date & Time screen appears the first time you turn on the camera or if the battery is removed for an extended time. If this is the first time the camera has been turned on, go to step 4. To set the date and time after that: 1 In Capture or Review mode, press the Menu OK button. 2 Highlight Setup Menu , then press the OK button. 3 Highlight Date & Time , then press the OK button. The date format is YYYY/MM/DD in a 24hour format. 4 Press to move through the fields.
Chapter 1 Checking Camera Status To check the current camera settings push the down arrow in Capture mode or the flash button any time: or Camera Status Icons Date stamp Close up Self Timer 072 Internal Card Capture Review Share Best Better Good Pictures remaining Storage location Camera mode (icons not displayed in Liveview) Flash mode (page 16) Low Battery Exhausted battery (blinking)* Quality Digital Zoom Battery Status If no battery icon appears on the LCD, the battery is fully charged.
Chapter 1 Inserting an MMC/SD Card Optional MMC/SD cards provide removable, reusable storage for pictures. CAUTION: The card can only be inserted one way; forcing it may damage the camera or card. Do not insert or remove a card when the green ready light is blinking; it may damage your pictures, card, or camera. 1 2 3 4 Notched corner Turn off the camera. Open the card door. Orient the card as shown. Push the card into the slot to seat the connector. (To remove the card, push it in, then release it.
Chapter 1 Choosing Internal Memory or MMC/SD Card The camera offers two options for storing pictures: Internal Memory—store up to 23 pictures (at Best quality) in the 16 MB internal memory. MMC/SD Card—store as many pictures as you like, storage capacity depends on the size of the card. See page 81 for storage capacities. Purchase KODAK Multimedia Cards at your Kodak retail dealer or on our Web site at http://www.kodak.com/go/ cx4210accessories.
Chapter 1 Camera Modes The camera has four modes: Capture, Review, Share, and Setup. You can always tell which mode the camera is in: Capture Review Share Setup Capture —the LCD is blank, no image is displayed. If you press the down arrow, the status bar and mode icon are displayed. See Chapter 2, Taking Pictures—Capture Mode. But remember, you can press the Shutter button and take a picture anytime, no matter what mode the camera is in! Review —the mode icon is displayed on the LCD.
2 Taking Pictures—Capture Mode Take a Picture Anytime The camera is in Capture mode when you turn it on. Press the Shutter button to take a picture. But remember, you can press the Shutter button and take a picture anytime, no matter what mode the camera is in! Taking a Picture Before you take a picture, make sure your picture storage location is set the way you want it (see page 10). Viewfinder Shutter 1 Use the Viewfinder to frame your subject. (Or press the OK button to turn on Liveview.
Chapter 2 Liveview—Using the LCD to Frame Your Subject When you turn on Liveview, the LCD displays a live image of what the lens sees. Look at the LCD to frame your picture. 1 Make sure the camera is in Capture mode ( on the LCD). Press the OK button to turn on Liveview. Frame your picture in the LCD. OK Take the picture. To turn off Liveview, press the OK button. NOTE: Liveview quickly depletes battery power; use it sparingly. To conserve battery power, Liveview automatically turns off after one minute.
Chapter 2 Quickview—Reviewing the Picture Just Taken After you take a picture, the LCD displays a Quickview of that picture for 5 seconds. While the picture is displayed, you can: Delete m Review It. If you take no action, the picture is saved. m Delete it. Press the Delete button while the picture and are displayed. NOTE: To save battery power, you can turn off the Quickview feature. See page 39.
Chapter 2 Using the Flash Use the flash when you take pictures outdoors in heavy shadows, at night, or indoors. Flash is effective at the distances of 1.6 to 7.9 feet (0.5 to 2.4 m). Press the button repeatedly to scroll through the flash options. The flash icon displayed on the LCD is the active option. Current camera status icons are also displayed (see page 8). The LCD screen turns off after 3 seconds. Auto Flash—flash fires when the lighting conditions require it.
Chapter 2 Using Digital Zoom Use Digital Zoom to zoom in two times closer to your subject. The lens does not move during Digital Zoom. IMPORTANT: You may notice a decrease in printed image quality when using Digital Zoom. 1 Press the OK button to turn on Liveview. 2 Press to activate the Digital Zoom. The LCD displays the zoomed image and the Digital Zoom icon . 3 Use the LCD to frame your subject, then take the picture.
Chapter 2 Taking Close-up Pictures The Close-up setting helps you gain sharpness and detail at close range. The Close-Up focus distance is 7.9 to 11.8 in. (200 to 300 mm). To turn on Close-up: 1 Make sure the camera is in Capture mode. 2 Locate the Close Up control on the side of the camera, , then move the switch to the On position. The Close-up icon appears in the status bar and the LCD automatically enters Liveview. 3 Use the LCD to frame your subject and take the picture as usual.
Chapter 2 Changing Picture-Taking Options Use the Capture menus to change picture-taking options. If you are in Review, Share, or Setup modes you must return to Capture mode before you can access the Capture menus. To Return to Capture From Another Mode To return to Capture from: m Any mode, press the Shutter button to take a picture and revert to Capture. m Review mode, press the Review button. m Share mode, press the Share button. m Setup mode, press the Menu button.
Chapter 2 Putting Yourself in the Picture The Self Timer creates a 10-second delay between the time you press the Shutter button and the time the picture is taken. 1 In Capture mode, press the Menu button. 2 Highlight Self Timer , then press the OK button. 3 Highlight On, then press the OK button. 4 Press the Menu button to turn off the menu screen. Press Shutter Self Timer light 5 Place the camera on a flat surface or use a tripod. 6 Press the Shutter button.
Chapter 2 Setting Exposure Compensation Use Exposure Compensation to control how much light is allowed into the camera. The exposure range is +2 to -2 in 1/2-step increments. NOTE: This setting is ideal for controlling pictures in which the light source is behind the subject (backlit), or for correcting pictures that are too light or too dark. 1 In Capture mode, press the Menu button. 2 Highlight Exposure Compensation , then press the OK button. 3 Press to select the Exposure Compensation setting.
Chapter 2 Setting Picture Quality Use the Quality setting to select a picture resolution: 1 In Capture mode, press the Menu button. 2 Highlight Quality , then press the OK button. The active Quality setting appears in the top left corner. 3 Highlight an option: FPO Best —(2 MP) for printing up to 8 x 10 in. (20.3 x 25.4 cm); produces highest picture resolution, more detail, and largest file sizes. appears in the status bar. Better —(1 MP) for printing up to 5 x 7 in. (12.7 x 17.
Chapter 2 Placing the Date on Pictures Use Date Stamp to imprint the date on your pictures. 1 Make sure the camera clock is set to the correct date (page 7). 2 In Capture mode, press the Menu button. 3 Highlight Date Stamp , then press the OK button. 4 Highlight an option: Off YYYY MM DD MM DD YY DD MM YYYY 5 Press the OK button. 6 Press the Menu button to turn off the menu. The current date is printed in the bottom right corner of new pictures. This setting remains until you change it.
Chapter 2 Turning Off the Orientation Sensor If you turn the camera when you take a picture (for example, to take a lengthwise or portrait picture), the Orientation Sensor repositions the picture so it is displayed correct side up during Quickview, Review, picture transfer, multi-up, and in video-out display. The Orientation Sensor is turned on as the factory default. You can turn it off so that pictures are displayed in the same orientation as they are taken.
3 Reviewing Pictures—Review Mode Use Review mode to view and work with the pictures that are stored in internal memory or on a card. But remember, you can press the Shutter button and take a picture anytime, no matter what mode the camera is in! NOTE: Reviewing pictures on the LCD quickly depletes battery power. An optional AC adapter is available (see page 84). To Enter Review Mode 1 Press the Review button. Review button The last picture you took or reviewed is displayed.
Chapter 3 To Access the Review Menus Use the Review menus to work with the pictures that are stored in internal memory or on a card. 1 Press the Review button. 2 Press the Menu button. 3 Press the Menu button to turn off the menus.
Chapter 3 Viewing Single Pictures 1 Press the Review button. Review The camera displays the last picture that was taken or reviewed. 2 Press to scroll backward or forward through the pictures. Viewing Multiple Pictures 1 Press the Review button. 2 Press . Nine pictures (thumbnails) are displayed at once. Review 3 Press 4 Press to display the previous or next row of thumbnails. to scroll through the thumbnails one at a time. The selected picture is highlighted in yellow.
Chapter 3 Deleting Pictures Delete OK Review 1 Press the Review button. 2 Select a picture in single view or highlight a picture in multiple view, then press the Delete button. 3 Highlight an option, then press the OK button: PICTURE—deletes the displayed picture. EXIT—exits the Delete screen. ALL—deletes all pictures from your current storage location. NOTE: Protected pictures cannot be deleted; remove protection before deleting (page 28).
Chapter 3 Running a Slide Show Use the Slide Show to display your pictures on the LCD in the order in which you took them. To run a slide show on a television or other external device, see page 30. Starting the Slide Show 1 Press the Review button, then press the Menu button. 2 Highlight Slide Show , then press the OK button. 3 Highlight Begin Show, then press the OK button. The pictures are each displayed once in the order in which you took them. Then the camera returns to the Menu screen.
Chapter 3 Turning On Loop When you turn on Loop, the slide show is continuously repeated. 1 On the Slide Show menu, press to scroll down to Loop; highlight Loop, then press the OK button. 2 Highlight On, then press the OK button. When you start a slide show, it repeats continuously until you cancel it by pressing the OK button or until battery power is exhausted. The Loop setting remains until you change it.
Chapter 3 Copying Pictures You can copy pictures from a card to internal memory, or from internal memory to a card. Before you copy make sure that: m A card is inserted in the camera. m The camera’s picture storage location is set to the location from which you are copying. See Choosing Internal Memory or MMC/SD Card, page 10. Copy pictures: 1 Press the Review button, then press the Menu button. 2 Highlight Copy , then press the OK button.
Chapter 3 Magnifying Pictures 1 Press the Review button, then press the OK button. The picture is displayed at 2X magnification. The Magnify icon and the magnification value are displayed on the screen. 2 Press the OK button again to display the picture at 4X magnification. 3 Press to view different parts of the picture. 4 Press the OK button again to redisplay the picture at the original size.
4 Tagging Pictures—Share Mode Press the Share button to tag your pictures as Favorites and for automatic printing and emailing. But remember, you can press the Shutter button and take a picture anytime, no matter what mode the camera is in!. NOTE: MACINTOSH OS 8.6/9.x do not support the Share button functions. OS X is recommended for full functionality.
Chapter 4 Tagging Pictures for Printing Share 1 Locate a picture, then press the Share button. 2 Highlight Print and press the OK button. 3 Press to select the number of copies (0-99). Zero removes the tag for that picture. The Print icon appears with the picture. The default quantity is one. To change the default, see page 38. 4 To tag all pictures on the card or in internal memory, highlight Print All, press the OK button, then indicate the number of copies as described above.
Chapter 4 Tagging Pictures for Emailing First, use KODAK EASYSHARE Software to create an email address book on your computer, then copy up to 32 email addresses to the camera’s internal memory. See the KODAK EASYSHARE Software Help for details. Share 1 Locate a picture, then press the Share button. 2 Highlight Email , then press the OK button. 3 Press to highlight an email address, then press the OK button. To send the picture to more than one person, repeat step 3 for each address.
Chapter 4 Tagging Pictures as Favorites Share 1 Locate a picture, then press the Share button. 2 Highlight Favorite , then press the OK button. The Favorite icon appears with the picture. 3 To remove the tag, press the OK button again. 4 Press the Share button to return to Capture mode. Using Favorites on Your Computer See the KODAK EASYSHARE Software Help for details on retrieving and organizing Favorites on your computer.
5 Customizing Camera Settings—Setup Mode Use Setup mode to customize your camera settings. You can access Setup mode two ways: in the Capture menu screen and the Review menu screen. In Capture mode In Review mode To Access Setup Mode/Menus 1 In Capture or Review mode, press the Menu button. 2 Highlight Setup and press the OK button. 3 Press the Menu button to turn off the Setup menu and return to Capture or Review mode.
Chapter 5 Returning to the Previous Menu The Return feature lets you return to the menu screen from which you entered the Setup menu. m In the Setup menu, highlight Return , then press the OK button. You are returned to the menu screen from which you entered Setup: Capture or Review. Changing the Print Quantity Default The Default Print Quantity setting determines the value that is displayed on the Share Print screen (see page 34). The default value is one.
Chapter 5 Turning Off Quickview After you take a picture, Quickview displays it on the LCD for 5 seconds (see page 15). The default setting is on. To save battery power, turn off Quickview: 1 In Capture or Review mode, press the Menu button. 2 Highlight Setup , then press the OK button. 3 Highlight Quickview , then press the OK button. 4 Highlight Off, then press the OK button. 5 Press the Menu button to turn off the menu. The picture is not automatically displayed on the LCD after you take it.
Chapter 5 Setting Video Out The Video Out feature lets you match the camera’s video signal to the standard for your location. Video Out must be set correctly to run a slide show on an external device (see page 30). 1 In Capture or Review mode, press the Menu button. 2 Highlight Setup , then press the OK button. 3 Highlight Video Out , then press the OK button. 4 Highlight an option: NTSC—used in the United States and Japan and most countries outside of Europe. PAL—used in European countries.
Chapter 5 Formatting Memory or MMC/SD Card CAUTION: Formatting deletes everything in memory or on the card, even protected pictures and the internal email address book. Removing a card during formatting may damage the card. 1 In Capture or Review mode, press the Menu button. 2 Highlight Setup , then press the OK button. 3 Highlight Format , then press the OK button. 4 Highlight an option: MEMORY CARD—deletes everything on the card, even protected pictures, and reformats the card for use in the camera.
Chapter 5 Viewing Camera Information The About feature displays information that is helpful if you need to call for service on your camera. 1 In Capture or Review mode, press the Menu button. 2 Highlight Setup , then press the OK button. 3 Highlight About , then press the OK button. The camera information is view-only. 4 Press the Menu button to turn off the menu.
6 Installing the Software System Requirements WINDOWS System Requirements m Personal computer for WINDOWS 98, 98SE, ME*, 2000*, or XP m 233 MHz processor or greater m 64 MB of available RAM (128 MB for WINDOWS XP) m 200 MB of available hard disk space m CD-ROM drive m Available USB port m Color monitor with a minimum resolution of 800 x 600 pixels; High Color (16-bit) or True Color (24-bit) recommended m Internet access for online printing and emailing * For WINDOWS ME and 2000 you must have Administrat
Chapter 6 MACINTOSH OS 8.6/9.x System Requirements m PowerPC-based MACINTOSH computer m MACINTOSH OS 8.6/9.x m 64 MB of available RAM m 200 MB of available hard disk space m CD-ROM drive m Built-in USB port m Color monitor with a minimum resolution of 800 x 600 pixels; thousands or millions of colors recommended m Internet access for online printing and emailing NOTE: OS 8.6/9.x do not support the Share button functions. OS X is recommended for full functionality.
Chapter 6 Install the Software For information on the software applications included on the KODAK EASYSHARE Software CD, see the Quick Start Guide or KODAK EASYSHARE Software Help. CAUTION: Do not install the KODAK EASYSHARE Software with the camera or Camera Dock connected to the computer. It may cause the software to load incorrectly. If you have already connected, disconnect the camera or Camera Dock before you proceed. 1 Before you begin, close all software applications that are open on your computer.
Chapter 6 4 Follow the on-screen instructions to install the software. If prompted, restart the computer when the installation is complete. m Select Typical to automatically install the needed applications on WINDOWS-based computers. Select Custom to choose the applications to install. m Select Easy to automatically install the needed applications on MACINTOSH computers running OS 8.6/9.x. m Follow the on-screen instructions to install the software on MACINTOSH computers running OS X.
7 Connecting to the Computer Important—Before You Connect Install the software from the KODAK EASYSHARE Software CD BEFORE you connect the camera or Camera Dock to the computer. Connecting to the Computer You can transfer your pictures from the camera to the computer using either the camera alone or the optional KODAK EASYSHARE Camera Dock or Camera Dock II. See page 51 for connecting with a Camera Dock. Connecting With the USB Cable 1 Turn off the camera.
Chapter 7 Transferring Pictures to Your Computer For details on transferring pictures, see the Quick Start Guide or the KODAK EASYSHARE Software Help. Printing Pictures from Your Computer For details on printing pictures from your computer, and ordering prints online, see the Quick Start Guide or the KODAK EASYSHARE Software Help. Printing from an MMC/SD Card m Automatically print tagged pictures when you insert your card into a printer with an MMC/SD slot. See your printer user guide for details.
8 Using the KODAK EASYSHARE Camera Dock II The KODAK EASYSHARE Camera Dock II (Camera Dock) makes it easy to transfer your pictures to the computer. The Camera Dock is also a rapid battery charger for the included KODAK EASYSHARE Ni-MH Rechargeable Battery Pack, and supplies power to the camera. To keep the Battery Pack charged and the camera always ready to take pictures, store your camera in the Camera Dock.
Chapter 8 Installing the Camera Insert KODAK EASYSHARE digital cameras are packaged with a custom camera insert, which is used to perfectly fit the camera to the Camera Dock. 1 Place the front tabs on the custom insert into the slots in the Camera Dock cavity. 2 Fit the insert down into the cavity and snap the insert into place. If You Do Not Have the Custom Insert If you do not have the custom insert that was included with your camera, use the universal insert that is included with the Camera Dock II.
Chapter 8 Connecting the Camera Dock After the KODAK EASYSHARE Software is loaded (see page 45), connect the Camera Dock to your computer and to an external power source. You will need: m the USB cable included with your camera m the AC adapter, 7-Volt included with the Camera Dock IMPORTANT: Make sure your camera is NOT in the Camera Dock when you are connecting to power and the computer. 1 Plug the labeled ( ) end of the USB cable into the labeled USB port on your computer.
Chapter 8 Installing the Battery Pack in the Camera 1 Open the battery door on the bottom of the camera. 2 Install the Battery Pack as illustrated. CAUTION: The Battery Pack can only be inserted into the camera in the orientation shown. If the Battery Pack does not easily install, reposition it and try again. DO NOT FORCE IT. Doing so can damage your camera. 3 Close the battery door. IMPORTANT: The Battery Pack is not charged when you receive it. See page 54 for charging instructions.
Chapter 8 Docking the Camera When you are ready to transfer your pictures from the camera to the computer, or charge the Battery Pack, place the camera in the Camera Dock. 1 Turn off the camera. 2 On the camera bottom, slide the connector cover open. Connector cover 3 Place the camera in the Camera Dock and push down to seat the connectors. The Power/Transfer light glows green when the camera is properly seated.
Chapter 8 Charging the Battery Pack The Battery Pack is not charged when you receive it. 1 Turn off the camera. 2 Make sure the Battery Pack is installed in the camera (see page 52). 3 Place the camera in the Camera Dock (see page 53). m Charging begins immediately. m The three green charging lights monitor the charging status: Charging Lights on Dock II battery low battery partially charged battery fully charged m Full charging takes about 2.5 hours.
Chapter 8 Transferring Pictures To transfer pictures from your camera to your computer: 1 Place the camera in the Camera Connect Power/Transfer light blinks Dock. The camera can be on or off. 2 Push the Connect button. The Power/Transfer light blinks green while the pictures are transferring. 3 For details on transferring, organizing, printing, emailing, and editing your pictures, see the Quick Start Guide or the KODAK EASYSHARE Software Help.
Chapter 8 Earlier Camera Dock Model If you have the KODAK EASYSHARE Camera Dock, not the Camera Dock II, the functionality is exactly the same as described in this chapter. The only difference is that the earlier Camera Dock has one indicator light. Indicator light status: Steady green—camera is properly seated in the Camera Dock. Blinking green— pictures are transferring. Steady red—Battery Pack is charging. Blinking red—error condition.
9 Troubleshooting This chapter contains help for your KODAK EASYSHARE CX4210 Digital Camera or Camera Dock II. Additional technical information is available in the ReadMe file located on the KODAK EASYSHARE Software CD. For updates to Troubleshooting information, visit our Web site at http://www.kodak.com/go/cx4210support. Troubleshooting—Camera Camera Problems Camera Problem Camera does not turn on. Cause Battery is not properly installed. Battery is not charged.
Chapter 9 Camera Problem Camera does not turn off. Cause Solution Alkaline batteries were DO NOT USE ALKALINE installed in the camera. BATTERIES. Turn off the power switch, remove the alkaline batteries, and replace with an approved battery type (page 83). If the power switch is on when you replace the batteries, the camera may not turn back on. In that case, turn the power switch off, then on. Shutter button does Camera is not turned on. Turn on the camera not work. (page 5).
Chapter 9 Camera Problem Cause Part of the picture Something was blocking is missing. the lens when the picture was taken. Your eye or the picture was not centered correctly in the viewfinder. In Review mode, The camera may not be you do not see a accessing the correct picture on the LCD storage location. or do not see the picture you expected. In Review mode, The pictures were taken pictures are with a different camera displayed as black or were generated with screens. other software. Picture is too dark.
Chapter 9 Camera Problem Camera freezes up when a card is inserted or removed. Cause Camera detects an error when the card was inserted or removed. Picture is too light. The flash is not needed. The subject was too close when the flash was used. Lighting condition is too bright. Stored pictures are The card was removed damaged. when the ready light was blinking. Pictures remaining Picture does not take up number does not sufficient space to decrease after decrease the picture taking a picture.
Chapter 9 Camera Problem Cause Picture is not clear. The lens is dirty. Subject too close when taking picture. Solution Clean the lens (page 80). Move so there is at least 1.6 ft (0.5 m) between the camera and the subject; or turn on Close-up (page 18). Camera may be in Close- Turn off Close-up (page 18). up (page 18) and the subject is too far away for proper focus. Subject or the camera Hold the camera steady moved while the picture while taking the picture. was taken.
Chapter 9 Camera/Computer Communications Camera Communications Problem Cause The computer There is a problem with cannot the configuration of the communicate with USB port on your the camera. computer. Solution See the following file on the KODAK EASYSHARE Software CD: USB.html Or, go to: www.kodak.com/ go/camerasupport Camera power is off. Turn on the camera (page 5). Battery is not charged. Replace or recharge the batteries (page 4, page 54).
Chapter 9 Camera Communications Problem Cause Solution Cannot transfer Software is not installed m Disconnect USB cable, or pictures to on computer. Camera Dock, from computer. The Add computer. New Hardware m Install KODAK Wizard cannot EASYSHARE Software locate drivers. (page 45). Cannot transfer Software is not fully or m Disconnect USB cable, or pictures to correctly installed on Camera Dock, from computer. computer. computer.
Chapter 9 MMC/SD Cards MMC/SD Card Problem The camera does not recognize your MMC/SD card. Solution Purchase a certified MMC/SD card (page 9). Reformat the card (page 41). Caution: Formatting erases all pictures from the card. No card is inserted in Insert a card into the card slot, camera or card is not then push to seat the connector fully inserted. (page 9). Camera freezes up Camera detects an Turn the camera off, then back when a card is error when the card on. inserted or removed.
Chapter 9 Camera LCD Messages LCD Messages Message No images to display Cause There are no pictures in the current storage location. Memory card requires The card is corrupted formatting or formatted for Memory card cannot another digital camera. be read (Please format memory card or insert another memory card) Internal memory The camera internal requires formatting memory is corrupted.
Chapter 9 LCD Messages Message Memory card is protected (Reset switch on memory card) Card is locked Cause Solution Switch on card is in Reset the switch as shown write-protect position. on LCD. The card in the camera To take a picture, insert a is write-protected. new card or change storage location to internal memory (page 10). Date/Time entry screen This is the first time you Reset the clock (page 7).
Chapter 9 LCD Messages Message Cause Internal Memory is full There is no more space in the camera’s internal memory. Solution Delete pictures from the internal memory (page 28) or change storage location to Auto and insert card (page 10). Unrecognized File The camera cannot Transfer the unreadable Format read the picture format. picture to the computer (page 48), or delete the picture (page 28).
Chapter 9 Camera Ready Light Status Ready light Camera Ready Light Light Status Ready light does not turn on and the camera does not work. Ready light glows steady green. Cause Camera is not turned on. Batteries are exhausted. Power switch was on when batteries were reloaded. Camera is on; ready to take a picture. Ready light blinks red. Batteries are low or exhausted. 68 Solution Turn on the camera (page 5). Replace or recharge the batteries (page 4, page 54). Turn camera off, then back on.
Chapter 9 Camera Ready Light Light Status Cause Ready light glows Camera’s internal steady red. memory or card is full. Ready light blinks green. Ready light blinks orange. Solution Transfer pictures to your computer (page 48), delete pictures from the camera (page 28), switch storage locations (page 10), or insert a card with available memory. Camera processing Wait. Resume picture taking memory is full. when the light turns green. Your card is readChange your storage location only.
Chapter 9 Troubleshooting—Camera Dock II Camera Dock II Problems Camera Dock Problem Pictures are not transferred to the computer 70 Cause AC adapter or USB cable is not securely connected. Software is not installed. There are too many applications running on your computer. Camera was removed from the Camera Dock during picture transfer. Connect button was not pressed. Solution Check the connections (page 51). Install the software (page 45). Close all software applications and try again.
Chapter 9 Camera Dock II Light Status Battery charging lights Power/Transfer light Camera Dock Power/Transfer Light Light Status Cause Light glows steady Camera is properly seated in green the Camera Dock. Light blinks green Pictures are being transferred to the computer. Light is off Camera is not properly seated in Camera Dock. Camera Dock Charging Lights Light Status Cause Charging has not No lights started. Comment The camera and Camera Dock are operating normally.
Chapter 9 Camera Dock Charging Lights Light Status Cause Battery is low. One green light Battery is partially charged. Two green lights Three green lights Comment The camera and Camera Dock are operating normally. Battery is fully charged. Camera Dock Error Light Light Status Cause Battery Pack is installed incorrectly. One blinking red light The Battery Pack or connector pins are damaged. The camera and Battery Pack have been exposed to very high or low temperatures.
10 Getting Help Helpful Web Links http://www.kodak.com/go/pcbasics For help navigating through a WINDOWS-based computer and working with digital pictures. http://www.kodak.com/go/cx4210support For help with your KODAK EASYSHARE CX4210 Digital Camera http://www.kodak.com/go/cx4210downloads To download the latest camera software and firmware http://www.kodak.com/go/onetouch To optimize your printer for prints with truer, vibrant colors http://www.kodak.
Chapter 10 Help in this User Guide See Chapter 9, Troubleshooting, for help with problems you may have with your camera, camera/computer connections, Camera Dock, or MMC/SD cards. Software Help For help with the software included on the KODAK EASYSHARE Software CD, see the Quick Start Guide or the KODAK EASYSHARE Software Help. Telephone Customer Support If you have questions concerning the operation of the software or camera, you may speak directly to a customer support representative.
Chapter 10 Telephone Numbers Australia Austria/Osterreich Belgium/Belgique Brazil Canada China Denmark/Danmark Ireland/Eire Finland/Suomi France Germany/Deutschland Greece Hong Kong India Italy/Italia Japan Korea Netherlands/Nederland New Zealand Norway/Norge Philippines Portugal Singapore 1800 147 701 0179 567 357 02 713 14 45 0800 15 0000 1 800 465 6325 800 820 6027 3 848 71 30 01 407 3054 0800 1 17056 01 55 1740 77 069 5007 0035 00800 441 25605 800 901 514 91 22 617 5823 02 696 33452 81 3 5644 5500 079
Chapter 10 Spain/España Sweden/Sverige Switzerland/Schweiz/Suisse Taiwan Thailand UK United States Outside the United States International Toll Line International Toll Fax Number 91 749 76 53 08 587 704 21 01 838 53 51 0080 861 008 001 800 631 0017 0870 243 0270 1 800 235 6325 585 726 7260 +44 131 458 6714 +44 131 458 6962 These telephone numbers change occasionally; for the most up-to-date listings, visit: http://www.kodak.com/US/en/digital/contacts/ DAIInternationalContacts.shtml.
11 Appendix This appendix serves as a resource for technical information about your KODAK EASYSHARE CX4210 Digital Camera, KODAK EASYSHARE Camera Dock II, MMC/SD cards, batteries, and available accessories. Camera Specifications Specifications—KODAK EASYSHARE CX4210 Digital Camera Pixel Resolution Best - 2.0 MP 1632 x 1232, 1/5 JPEG compressed (by Quality Better - 1.0 MP 1184 x 888, 1/5 JPEG compressed setting) Good - 0.
Chapter 11 Specifications—KODAK EASYSHARE CX4210 Digital Camera Power Batteries 2 Lithium, AA 2 KODAK AA Digital Camera Batteries KODAK CRV3 Lithium Battery 2 Ni-MH, AA rechargeable Alkaline batteries not recommended KODAK EASYSHARE Ni-MH Rechargeable Battery Pack, Camera Dock Battery Pack, recharge in Camera Dock only only. Dock provides power to the camera. 3V, DC power in AC adapter not included Lens Type Optical quality glass Maximum f/4.
Chapter 11 Original Factory Settings—Camera Feature Date/Time Date Stamp Exposure Compensation Flash Image Storage Liveview Orientation Sensor Print Quantity Quality Quickview Self Timer Slide Show Interval Video Out Factory Setting 2001/1/1; 12:00 Off 0 Auto Auto Off On 1 Best - 2.0 MP (highest resolution) On Off 5 seconds NTSC Upgrading Your Software and Firmware Take advantage of the latest enhancements to your Kodak software and camera firmware.
Chapter 11 Tips, Safety, Maintenance m Always follow basic safety precautions. Refer to the “Important Safety Instructions” booklet packed with your camera. m Do not allow any chemicals, such as suntan lotion, to come into contact with the painted surface of the camera. m If the camera has been subjected to inclement weather or you suspect water has gotten inside the camera, turn off the camera and remove the battery and card.
Chapter 11 Picture Storage Capacities Picture file sizes can vary. You may be able to store more or fewer pictures. Purchase cards on our Web site at http://www.kodak.com/go/ cx4210accessories.
Chapter 11 Card File Naming Conventions m Pictures are named DCP_nnnn.JPG, and are numbered in the order in which they are taken. The first picture is named DCP_0001.JPG; the highest number allowed is DCP_9999.JPG. m When a card contains a picture named DCP_9999.JPG in the \DCIM\100K4210 folder, subsequent pictures appear in a new folder (\DCIM\101K4210), beginning with picture DCP_0001.JPG.
Chapter 11 Using Your Batteries m Replacement Types—your camera can use the following battery types: – 2, 1.5 volt AA lithium batteries – 1, KODAK CRV3 Lithium Battery * – 1, KODAK EASYSHARE Ni-MH Rechargeable Battery Pack, rechargeable in the KODAK EASYSHARE Camera Docks * – 2, 1.2 volt AA Nickel Metal Hydride (Ni-MH) batteries, rechargeable * – 2, KODAK Digital Camera Batteries* * Purchase these batteries on our Web site at http://www.kodak.com/go/ cx4210accessories.
Chapter 11 Battery-Saving Features The LCD or camera turn off when the camera has been inactive.
Chapter 11 Camera Dock II Specifications Specifications—KODAK EASYSHARE Camera Dock II Communication with USB Cable included with KODAK computer EASYSHARE Cameras Dimensions Width/Depth/ 5.9 in. /4.1 in. /1.4 in. Height (without insert) (150 mm/104 mm/35 mm) Weight 5.5 oz (156 g) Indicator lights Power/ Indicates operating/transferring Transfer pictures Charging, 3 Indicate charging and error conditions lights Input voltage 7 ±0.
Chapter 11 Regulatory Information FCC Compliance and Advisory This device complies with Part 15 of the FCC Rules. Operation is subject to the following two conditions: 1) this device may not cause harmful interference, and 2) this device must accept any interference received, including interference that may cause undesired operation. This equipment has been tested and found to comply with the limits for a Class B digital device, pursuant to Part 15 of the FCC Rules.
Chapter 11 Canadian DOC Statement DOC Class B Compliance—This Class B digital apparatus complies with Canadian ICES-003. Observation des normes-Class B—Cet appareil numérique de la classe B est conforme à la norme NMB-003 du Canada. VCCI Class B ITE English translation: This is a Class B product based on the standard of the Voluntary Control Council for Interference from Information Technology Equipment (VCCI).
Index A about camera information, 42 picture information, 32 AC adapter, optional, 84 accessories, buying, 73 adjusting exposure, 21 picture quality, 22 resolution, 22 alkaline batteries, 4 arrow button, 5 auto flash, 16 power-off, 84 storage location, 10 B backlit scenes, 21 batteries alkaline, 4 charging Battery Pack, 54 extending battery life, 83 loading Battery Pack, 52 loading CRV3, 4 power level icon, 25 replacement types, 83 tips, 83 with Camera Dock, 49 button delete, 15, 28 five-way/zoom, 5 flash,
Index power connection, 51 specifications, 85 transferring pictures, 55 USB connection, 51 using, 49 Canadian compliance, 87 capture mode accessing menus, 19 overview, 11 returning from other modes, 19 taking pictures, 13 card, memory, 9, 10, 81, 82 caring for your camera, 80 changing storage location, 10 charging Battery Pack, 54 charging lights, Camera Dock II, 54, 71 cleaning camera, lens, 80 clock, setting, 7 close-up scenes, 18 communication problems, 62 compensation, exposure, 21 computer connecting c
Index by formatting, 41 during quickview, 15 last picture, 15 pictures, 28 protected pictures, 28 digital pictures, using, 48 digital zoom, 17 display problems, 59 displaying pictures, 25, 29 distance, close-up, 18 dock insert custom, 3 universal, 50 Dock, Camera.
Index I icons camera status, 8 capture menus, 19 picture information, 25 review menus, 26 setup menus, 37 share menus, 33 image storage menu, 10 information about camera, 42 about pictures, 32 product support, 73 insert, for Camera Dock custom, 50 universal, 49, 50 installing Battery Pack, 52 CRV3 battery, 4 insert, Camera Dock, 50 KODAK Digital Camera batteries, 4 MMC/SD card, 9 software, 45 internal memory change storage location, 10 format, 41 internet, helpful web links, 73 92 K KODAK Digital Camera Ba
Index Camera Dock, 56 Camera Dock II, 54, 71–72 ready, camera, 68 self-timer, camera, iii, 20 links, world wide web, 73 liveview turning on, 39 using LCD as viewfinder, 14 loading Battery Pack, 52 CRV3 battery, 4 insert, Camera Dock, 50 MMC/SD card, 9 software, 45 loop, slide show, 30 M MACINTOSH installing software on, 45 system requirements, 43, 44 magnify picture, 32 maintenance, camera, 80 memory internal or card, 10 storage location setting, 10 memory card inserting, 9 storage capacities, 81 menu butto
Index thumbnails, 27 multiple pictures, viewing, 27 N NTSC, video out setting, 40 O OK button, 5 on/off switch, iii, 5 orientation sensor, 24 overview camera features, iii–iv camera modes, 11 P package contents Camera Dock, 49 PAL, video out setting, 40 picture location icon, 25 picture number icon, 25 pictures close-ups, 18 copying, 31 date imprint, 23 deleting, 28 downloading, 48, 55 e-mailing, tagged, 35 file naming, 82 information, viewing, 32 94 locating on card, 82 magnifying, 32 printing, 48 printin
Index pictures, 48 tagged pictures, 34 this user guide, 1 protect icon, 25 protecting pictures, 28 Q quality print, digital zoom, 17 settings, 22, 81 quickview deleting pictures, 15 reviewing last picture, 15 turning off, 39 R ReadMe file, 57 ready light status, 68 taking pictures, 13 red-eye, flash, 16 regulatory information, 86, 87 removable memory card, 9 replacement batteries, types, 83 requirements MACINTOSH OS, 43, 44 WINDOWS-based OS, 43 resolution, setting, 22 return to previous menu, 38 review mod
Index resolution, 22 self-timer, 20 video out, 40 setup mode getting there, 37 overview, 11 returning to previous, 38 using, 37 share button, 34, 35, 36 share mode email tagging, 35 getting there, 33 overview, 11 print tagging, 34 tagging favorites, 36 shutoff, auto, 84 shutter button problems, 58 self-timer delay, 20 taking pictures, 13 sleep mode, 84 slide show continuous loop, 30 problems, 61 running, 29 software help, 48, 74 installing, 45 upgrading, 73, 79 96 specifications camera, 77 Camera Dock II,
Index close-up, 18 menus, 19 quality settings, 22 using LCD as viewfinder, 14 telephone support, 74 television, viewing pictures, 30 thumbnails, viewing on lcd, 27 time, setting, 7 timer, shutter delay, 20 tips battery guidelines, 83 maintenance, 80 ReadMe file, 57 safety, 80 transfer light, Camera Dock, 71 transferring pictures to computer, 48, 55 trash can, deleting pictures, 15, 28 tripod, connecting, iii, 55 troubleshooting problems camera, 57 Camera Dock, 70 camera ready light, 68 communications, 62 er
Index Z zoom button, 5 digital, 17 98